VSzA techblog

DEF CON 20 CTF grab bag 300 writeup

2012-06-04

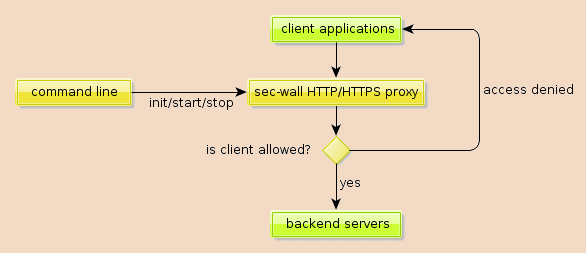
As a proud member of the Hungarian team called “senkihaziak”, I managed to solve the following challenge for 300 points in the grab bag category on the 20th DEF CON Capture The Flag contest. The description consisted of an IP address, a port number, a password, and a hint.

Description of the challenge

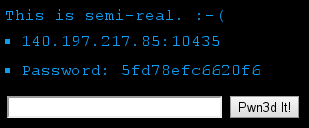
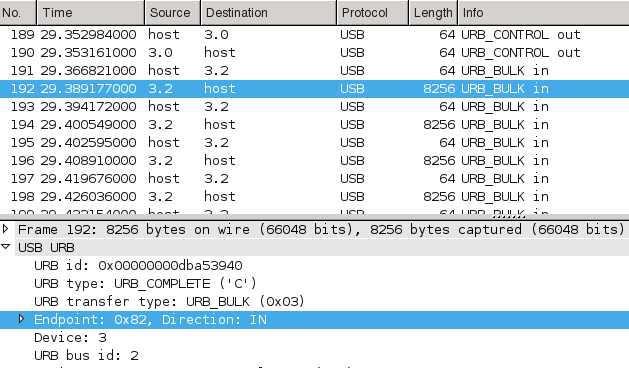
Connecting with netcat to the specified IP address and port using TCP and sending the password followed by a newline triggered the server to send back the actual challenge, utilizing ANSI escape sequences for colors.

Output of netcat after connecting and sending the password

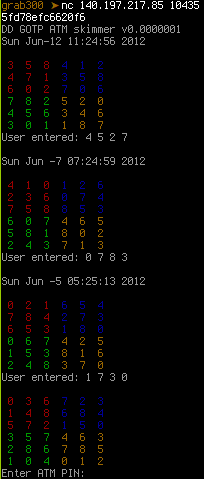
As Buherátor pointed it out, the matrices are parts of a scheme designed to hide PIN codes in random matrices in which only the cardholder knows which digits are part of the PIN code. The service sent three matrices for which the PIN code was known and the challenge was to find the PIN code for the fourth one. As we hoped, the position of the digits within the matrices were the same for all four, so all we needed to do was to find a set of valid positions for each matrix, and apply their intersection to the fourth. I chose Python for the task, and began with connecting to the service.

PW = '5fd78efc6620f6\n'
TARGET = ('140.197.217.85', 10435)
PROMPT = 'Enter ATM PIN:'

def main():
  with closing(socket.socket()) as s:
    s.connect(TARGET)
    s.send(PW)
    buf = ''
    while PROMPT not in buf:
      buf += s.recv(4096)
    pin = buffer2pin(buf)
    s.send(pin + '\n')

The buffer2pin function parses the response of the service and returns the digits of the PIN code, separated with spaces. First, the ANSI escape sequences are stripped from the input buffer. Then, the remaining contents are split into an array of lines (buf.split('\n')), trailing and leading whitespaces get stripped (imap(str.strip, ...)), and finally, lines that doesn't contain a single digit surrounded with spaces get filtered out.

ESCAPE_RE = re.compile('\x1b\\[0;[0-9]+;[0-9]+m')
INTERESTING_RE = re.compile(' [0-9] ')

def buffer2pin(buf):
  buf = ESCAPE_RE.sub('', buf)
  buf = filter(INTERESTING_RE.search, imap(str.strip, buf.split('\n')))
  ...

By now, buf contains strings like '3 5 8 4 1 2' and 'User entered: 4 5 2 7', so it's time to build the sets of valid positions. The initial sets contain all valid numbers, and later, these sets get updated with an intersection operation. For each example (a matrix with a valid PIN code) the script joins the six lines of the matrix and removes all spaces. This results in base holding 36 digits as a string. Finally, the innen for loop iterates over the four digits in the last line of the current example (User entered: 4 5 2 7) and finds all occurences in the matrix. The resulting list of positions is intersected with the set of valid positions for the current digit (sets[n]). I know that using regular expressions for this purpose is a little bit of an overkill, but it's the least evil of the available solutions.

EXAMPLES = 3
DIGITS = 4
INIT_RANGE = range(36)

def buffer2pin(buf):
  ...
  sets = [set(INIT_RANGE) for _ in xrange(DIGITS)]
  for i in xrange(EXAMPLES):
    base = ''.join(buf[i * 7:i * 7 + 6]).replace(' ', '')
    for n, i in enumerate(ifilter(str.isdigit, buf[i * 7 + 6])):
      sets[n].intersection_update(m.start() for m in re.finditer(i, base))
  ...

The only thing that remains is to transform the fourth matrix into a 36 chars long string like the other three, and pick the digits of the resulting PIN code using the sets, which – hopefully – only contain one element each by now.

def buffer2pin(buf):
  ...
  quest = ''.join(buf[3 * 7:3 * 7 + 6]).replace(' ', '')
  return ' '.join(quest[digit.pop()] for digit in sets)

The resulting script worked almost perfectly, but after the first run, we found out that after sending a correct PIN code, several more challenges were sent, so the whole logic had to be put in an outer loop. The final script can be found on Gist, and it produced the following output, resulting in 300 points.

Result of a successful run, displaying the key


Extracting DB schema migration from Redmine

2012-04-21

Although I consider keeping SQL schema versioned a good habit, and several great solutions exist that automatize the task of creating migration scripts to transform the schema of the database from version A to B, for most of my projects, I find it sufficient to record a hand-crafted piece of SQL in the project/issue log. For latter, I mostly use Redmine, which offers a nice REST-style API for the issue tracker. Since it returns XML, I chose XSL to do the necessary transformations to extract the SQL statements stored in the issue logs.

For purposes of configuration, I chose something already in the system: Git, my choice of SCM solution. One can store hierarchical key-value pairs in a systemwide, user- or repository-specific way, all transparently accessible through a simple command line interface. For purposes of bridging the gap between Git and the XML/XSL, I chose shell scripting and xsltproc since producing a working prototype is only a matter of minutes.

The end product is a shell script that extracts the Git-style history expression from command line and passes it directly to the git logcommand, which in turn parses it just like the user would assume. The output is formatted in a way that the only output is the first lines of commit messages in the specified range of commits. If the commancd fails, the original message is shown, so the script doesn't need to know anything about git commit range parsing or other internals.

GL=$(git log --pretty=format:"%s" --abbrev-commit )

if [ $? -ne 0 ]; then
  echo "Git error occured: $GL" 1>&2
  exit 1
fi

Since the HTML-formatted issue log messages are double-encoded in the API XML output, two round of XSL transformation needs to be done. The first round extracts log entries probably containing SQL fragments and with the output method set to text, it decodes HTML entities embedded into XML.

<?xml version="1.0" encoding="utf-8"?>
<xsl:stylesheet version="1.0"
  xmlns:xsl="http://www.w3.org/1999/XSL/Transform">
 <xsl:output method="text"/>
 <xsl:template match="/">
  <xsl:for-each
    select="issue/journals/journal/notes[contains(text(), 'sql')]">
   <xsl:value-of select="text()"/>
  </xsl:for-each>
 </xsl:template>
</xsl:stylesheet>

The above XSL takes the output of the XML REST API and produces XHTML fragments for every issue log entry. The following part of the shell script extracts the issue numbers from the commit messages (egrep and sed), calls the issue API (curl) with each ID exactly once (sort -u), passes the output through the first XSL and concatenate these along with an artifical/fake XML root in order to produce well-formed XML, ready for the second pass.

echo '<?xml version="1.0" encoding="utf-8"?><fakeroot>'
echo "$GL" | egrep -o '#[0-9]+' | sort -u | sed 's/#//' \
  | while read ISSUE; do
    curl --silent "$BASE/issues/$ISSUE.xml?key=$KEY&include=journals" \
      | xsltproc "$DIR/notes.xsl" -
  done
echo '</fakeroot>'

The second pass extracts code tags with language set as sql, and the method is again set to text, causing a second expansion of HTML entities. The output of this final XSL transformation is a concatenation of SQL statements required to transform the database schema to be in sync with the commit range specified.

<?xml version="1.0" encoding="utf-8"?>
<xsl:stylesheet version="1.0"
  xmlns:xsl="http://www.w3.org/1999/XSL/Transform">
 <xsl:output method="text"/>
 <xsl:template match="/">
  <xsl:for-each select="fakeroot/pre/code[@class = 'sql']">
   <xsl:value-of select="normalize-space(text())"/>
   <xsl:text>&#10;</xsl:text>
  </xsl:for-each>
 </xsl:template>
</xsl:stylesheet>

While this stylesheet follows almost the same logic as the first one, it's worth noting the usage of normalize-space() and a literal newline, which formats the output in a nice way – SQL fragments are separated from each other by a single newline, no matter if there's any trailing or leading whitespace present in the code. The code is available under MIT license on GitHub.


Unofficial Android app for alldatasheet.com

2012-04-17

In February 2012, I read the Hack a Day article about ElectroDroid, and the following remark triggered challenge accepted in my mind.

A ‘killer app’ for electronic reference tools would be a front end for
alldatasheet.com that includes the ability to search, save, and display
the datasheet for any imaginable component.

First, I checked whether any applications like that exists on the smartphone application markets. I found several applications of high quality but tied to certain chip vendors, such as Digi-Key and NXP. There's also one that implies to be an alldatasheet.com application, it even calls itself Datasheet (Alldatasheet.com), but as one commenter writes

All this app does is open a web browser to their website.
Nothing more. A bookmark can suffice.

I looked around the alldatasheet.com website and found the search to be rather easy. Although there's no API available, the HTML output can be easily parsed with the MIT-licensed jsoup library. First I tried to build a separate Java API for the site, and a separate Android UI, with former having no dependencies on the Android library. The API can be found in the hu.vsza.adsapi package, and as of version 1.0, it offers two classes. The Search class has a method called searchByParName which can be used to use the functionality of the left form on the website. Here's an example:

List<Part> parts = Search.searchByPartName("ATMEGA168", Search.Mode.MATCH);

for (Part part : part) {
    doSomethingWithPart(part);
}

The Part class has one useful method called getPdfConnection, which returns an URLConnection instance that can be used to read the PDF datasheet about the electronics part described by the object. It spoofs the User-Agent HTTP header and sends the appropriate Referer values wherever it's necessary to go throught the process of downloading the PDF. This can be used like this:

URLConnection pdfConn = selectedPart.getPdfConnection();
pdfConn.connect();
InputStream input = new BufferedInputStream(pdfConn.getInputStream());
OutputStream output = new FileOutputStream(fileName);

byte data[] = new byte[1024];
long total = 0;
while ((count = input.read(data)) != -1) output.write(data, 0, count);

output.flush();
output.close();
input.close();

The Android application built around this API displays a so-called Spinner (similar to combo lists on PCs) to select search mode and a text input to enter the part name, and a button to initiate search. Results are displayed in a list view displaying the name and the description of each part. Touching a part downloads the PDF to the SD card and opens it with the default PDF reader (or prompts for selection if more than one are installed).

ADSdroid version 1.0 screenshots

You can download version 1.0 by clicking on the version number link or using the QR code below. It only does one thing (search by part name), and even that functionality is experimental, so I'm glad if anyone tries it and in case of problems, contacts me in e-mail. The source code is available on GitHub, licensed under MIT.

ADSdroid version 1.0 QR code


Mounting Sympa shared directories with FUSE

2012-03-29

The database laboratory course at the Budapest University of Technology and Economics which I collaborate with as a lecturer uses Sympa for mailing lists and file sharing. Latter is not one of the most used features of this software, and the web interface feels sluggish, not to mention the lots of leftover files in my Downloads directory for each attempt to view one page of a certain file. I understood that using the same software for these two tasks made managing user accounts easier, so I tried to come up with a solution that makes it easier to handle these files with the existing setup.

First, I searched whether an API for Sympa exists and I found that while they created the Sympa SOAP server, it only handles common use-cases related to mailing lists management, so it can be considered a dead end. This meant that my solution had to use the web interface, so I selected an old and a new tool for the task: LXML for parsing, since I already knew of its power, and requests for handling HTTP, because of its fame. These two tools made it possible to create half of the solution first, resulting in a Sympa API that can be used independently of the file system bridge.

Two things I found particularly great about requests were that its handling of sessions was superior than any APIs I've ever seen, and that it was possible to retrieve the results in multiple formats (raw socket, bytes, Unicode text). Since I only had one Sympa installation to test with, I only hacked the code so far to make it work, so for example, I had to use regular expressions to strip the XML and HTML encoding information, since both stated us-ascii while the output was in ISO-8859-2, correctly stated in the HTTP Content-type header.

In the second half of the time, I had to create a bridge between the file system and the API I created, and FUSE was my natural choice. Choosing the Python binding was not so easy, as a Debian user, the python-fuse package seemed like a logical choice, but as Matt Joiner wrote in his answer on a related Stack Overflow question, fusepy was a better choice. Using one of the examples, I managed to build an experimental version of SympaFS with naive caching and session management, but it works!

$ mkdir /tmp/sympa
$ python sympafs.py https://foo.tld/lists foo@bar.tld adatlabor /tmp/sympa
Password:
$ mount | fgrep sympa
SympaFS on /tmp/sympa type fuse (rw,nosuid,nodev,relatime,user_id=1000,
group_id=1000)
$ ls -l /tmp/sympa/2012
összesen 0
-r-xr-xr-x 1 root root  11776 febr   9 00:00 CensoredFile1.doc
-r-xr-xr-x 1 root root 161792 febr  22 00:00 CensoredFile2.xls
-r-xr-xr-x 1 root root  39424 febr   9 00:00 CensoredFile3.doc
dr-xr-xr-x 2 root root      0 febr  14 00:00 CensoredDir1
dr-xr-xr-x 2 root root      0 ápr    4  2011 CensoredDir2
$ file /tmp/sympa/2012/CensoredFile1.doc
Composite Document File V2 Document, Little Endian, Os: Windows, Version
5.1, Code page: 1252, Author: Censored, Last Saved By: User, Name of
Creating Application: Microsoft Excel, Last Printed: Tue Feb 14 15:00:39
2012, Create Time/Date: Wed Feb  8 21:51:10 2012, Last Saved Time/Date:
Wed Feb 22 08:10:20 2012, Security: 0
$ fusermount -u /tmp/sympa

Tracking history of docx files with Git

2012-03-27

Just as with PHP, OOXML, and specifically, docx is not my favorite format, but when I use it, I prefer tracking the history using my preferred SCM of choice, Git. What makes it perfect to track documents is not only the fact that setting up a repository takes one command and a few miliseconds, but its ability to use an external program to transform artifacts (files) to text before displaying differences, which results in meaningful diffs.

The process of setting up an environment like this is described best in Chapter 7.2 of Pro Git. The solution I found best to convert docx files to plain text was docx2txt, especially since it's available as a Debian package in the official repositories, so it takes only an apt-get install docx2txt to have it installed on a Debian/Ubuntu box.

The only problem was that Git executes the text conversion program with the name of the input file given as the first and only argument, and docx2txt (in contrast with catdoc or antiword, which uses the standard output) saves the text content of foo.docx in foo.txt. Because of this, I needed to create a wrapper in the form of the following small shell script.

#!/bin/sh
docx2txt <$1

That being done, the only thing left to do is configuring Git to use this wrapper for docx files by issuing the following commands in the root of the repository.

$ git config diff.docx.textconv /path/to/wrapper.sh
$ echo "*.docx diff=docx" >>.git/info/attributes

End-to-end secure REST service using CakePHP

2012-03-14

While PHP is not my favorite language and platform of choice, I have to admit its ease of deployment, and that's one of the reasons I've used it to build some of my web-related projects, including the REST API and the PNG output of HackSense, and even the homepage of my company. Some of these also used CakePHP, which tries to provide the flexibility and “frameworkyness” of Ruby on Rails while keeping it easy to deploy. It also has the capability of simple and rapid REST API development, which I often prefer to the bloatedness of SOAP.

One of the standardized non-functional services of SOAP is WS-Security, and while it's great for authentication and end-to-end signed messages, its encryption scheme not only has a big overhead, but it had been cracked in 2011, thus cannot be considered secure. That being said, I wanted a solution that can be applied to a REST API, does not waste resources (e.g. spawning OS processes per HTTP call), and uses as many existing code as feasible.

The solution I came up with is a new layout for CakePHP that uses the GnuPG module of PHP, which in turn uses the native GnuPG library. This also means, that the keyring of the user running the web server has to be used. Also, Debian (and thus Ubuntu) doesn't ship this module as a package, so it needs to be compiled, but it's no big deal. Here's what I did:

# apt-get install libgpgme11-dev php5-dev
# wget http://pecl.php.net/get/gnupg-1.3.2.tgz
# tar -xvzf gnupg-1.3.2.tgz
# phpize && ./configure && make && make install
# echo "extension=gnupg.so" >/etc/php5/conf.d/gnupg.ini
# /etc/init.d/apache2 reload

These versions made sense in February 2012, so make sure that libgpgme, PHP and the PHP GnuPG module refers to the latest version available. After the last command has executed successfully, PHP scripts should be able to make use of the GnuPG package. I crafted the following layout in views/layouts/gpg.ctp:

<?php

$gpg = new gnupg();
$gpg->addencryptkey(Configure::read('Gpg.enckey'));
$gpg->addsignkey(Configure::read('Gpg.sigkey'));
$gpg->setarmor(0);
$out = $gpg->encryptsign($content_for_layout);
header('Content-Length: ' . strlen($out));
header('Content-Type: application/octet-stream');
print $out;

?>

By using Configure::read($key), the keys used for making signatures and encryption can be stored away from the code, I put the following two lines in config/core.php:

Configure::write('Gpg.enckey', 'ID of the recipient's public key');
Configure::write('Gpg.sigkey', 'Fingerprint of the signing key');

And at last, actions that require this security layer only need a single line in the controller code (e.g. controllers/foo_controller.php):

$this->layout = 'gpg';

Make sure to set this as close to the beginning of the function as you can to avoid leaking error messages to attackers triggering errors in the code before the layout is set to the secured one.

And that's it, the layout makes sure that all information sent from the view is protected both from interception and modification. During testing, I favored using armored output, I only disabled it after moving it to production, so if it's needed, only two lines need modification: setarmor(0) should be setarmor(1) and the Content-Type should be set to text/plain. Have fun!


Reverse engineering chinese scope with USB

2012-03-04

The members of H.A.C.K. – one of the less wealthy hackerspaces – felt happy at first, when the place could afford to buy a slightly used UNI-T UT2025B digital storage oscilloscope. Besides being useful as a part of the infrastructure, having a USB and an RS-232 port seized our imagination – one of the interesting use-cases is the ability to capture screenshots from the device to illustrate documentation. As I tried interfacing the device, I found that supporting multiple platforms meant Windows XP and 2000 for the developers, which are not very common in the place.

I installed the original software in a virtual machine, and tried the serial port first, but found out, that although most of the functionality worked, taking screenshots is one available only using USB. I connected the scope using USB next, and although the vendor-product tuple was present in the list of USB IDs, so lsusb could identify it, no drivers in the kernel tried to take control of the device. So I started looking for USB sniffing software and found that on Linux, Wireshark is capable of doing just that. I forwarded the USB device into the VM and captured a screenshot transmission for analysis. Wireshark was very handy during analysis as well – just like in case of TCP/IP – so it was easy to spot the multi-kilobyte bulk transfer among tiny 64 byte long control packets.

Wireshark analysis of screenshot transmission via USB

I started looking for simple ways to reproduce the exact same conversation using free software – I've used libusb before while experimenting with V-USB on the Free USB JTAG interface project, but C requires compilation, and adding things like image processing makes the final product harder to use on other computers. For these purposes, I usually choose Python, and as it turned out, the PyUSB library makes it possible to access libusb 0.1, libusb 1.0 and OpenUSB through a single pythonic layer. Using this knowledge, it was pretty straightforward to modify their getting started example and replicate the “PC end” of the conversation. The core of the resulting code is the following.

dev = usb.core.find(idVendor=0x5656, idProduct=0x0832)
if dev is None:
    print >>sys.stderr, 'USB device cannot be found, check connection'
    sys.exit(1)

dev.set_configuration()
dev.ctrl_transfer(ReqType.CTRL_OUT, 177, 0x2C, 0)
dev.ctrl_transfer(ReqType.CTRL_IN, 178, 0, 0, 8)
for i in [0xF0] + [0x2C] * 10 + [0xCC] * 10 + [0xE2]:
    dev.ctrl_transfer(ReqType.CTRL_OUT, 177, i, 0)

try:
    dev.ctrl_transfer(ReqType.CTRL_OUT, 176, 0, 38)
    for bufsize in [8192] * 4 + [6144]:
        buf = dev.read(Endpoint.BULK_IN, bufsize, 0)
        buf.tofile(sys.stdout)
    dev.ctrl_transfer(ReqType.CTRL_OUT, 177, 0xF1, 0)
except usb.core.USBError:
    print >>sys.stderr, 'Image transfer error, try again'
    sys.exit(1)

Using this, I managed to get a binary dump of 38912 bytes, which contained the precious screenshot. From my experience with the original software, I already knew that the resolution is 320 by 240 pixels – which meant that 4 bits made up each pixel. Using this information, I started generating bitmaps from the binary dump in the hope of identifying some patterns visually as I already knew what was on the screen. The first results were the result of converting each 4-bit value to a pixel coloured on a linear scale from 0 = black to 15 = white, and looked like the following.

Early version of a converted screenshot

Most of the elements looked like they're in the right spot, and both horizontal and vertical lines seemed intact, apart from the corners. Also, the linear mapping resulted in an overly bright image, and as it seemed, the firmware was transmitting 4-bit (16 color) images, even though the device only had a monochrome LCD – and the Windows software downgraded the quality before displaying it on the PC on purpose. After some fiddling, I figured out that the pixels were transmitted in 16-bit words, and the order of the pixels inside these were 3, 4, 1, 2 (“mixed endian”). After I added code to compensate for this and created a more readable color mapping I finally had a script that could produce colorful PNGs out of the BLOBs, see below for an example.

Final version of a converted screenshot

In the end, my solution is not only free as in both senses and runs on more platforms, but can capture 8 times more colors than the original one. All code is published under MIT license, and further contributions are welcome both on the GitHub repository and the H.A.C.K. wiki page. I also gave a talk about the project in Hungarian, the video recording and the slides can be found on the bottom of the wiki page.


Accented characters in hyperref PDF fields

2012-01-18

I've always found hyperref one of the best features of LaTeX, and although it supported Unicode, certain accented characters (in my case, ő and ű) were treated abnormally in case of PDF metadata fields, such as author and title. I mostly ignored the issue and reworded the contents, until I met a situation, where changing the data was not an option. To illustrate the issue, the following example was saved as wrong.tex and got compiled with the pdflatex wrong.tex command.

\documentclass{report}

\usepackage[utf8]{inputenc}
\usepackage[T1]{fontenc}
\usepackage[unicode, pdftitle={Árvíztűrő tükörfúrógép}]{hyperref}

\begin{document}
foobar
\end{document}

The result could be checked with pdfinfo and was far from what I expected.

$ pdfinfo wrong.pdf | grep Title
Title:          Árvízt¶r® tükörfúrógép

I searched the web, and was disappointed at first, having found unsolved forum threads, such as one written by also a Hungarian. Finally, I opened up the TeX section of the Stack Exchange network, and started typing a title for my question. Based on this, the forum offered a number of probably related posts, and I browsed through them out of curiosity. As it turned out, the solution lied within a post about Polish characters in pdftitle, and in retrospect, it seems obvious – like any other great idea. As Schweinebacke writes, “The optional argument of \usepackage is read by the LaTeX kernel, so hyperref cannot change scanning of the argument”. The problem can be eliminated simply by moving the title setup into a separate \hypersetup command – and behold, the pilcrow and the registered sign is gone, as seen in the following example.

$ diff wrong.tex right.tex
5c5,6
< \usepackage[unicode, pdftitle={Árvíztűrő tükörfúrógép}]{hyperref}
---
> \usepackage[unicode]{hyperref}
> \hypersetup{pdftitle={Árvíztűrő tükörfúrógép}}
$ pdfinfo right.pdf | grep Title
Title:          Árvíztűrő tükörfúrógép

Proxmark3 vs. udev

2012-01-06

In the summer, I successfully made my Proxmark3 work by working around every symptom of bit rot that made it impossible to run in a recent environment. One bit that survived the aforementioned effect was the single udev entry that solved the controversy of the principle of least privilege and the need of raw USB access. As the official HOWTO mentioned, putting the following line into the udev configuration (/etc/udev/rules.d/026-proxmark.rules on Debian) ensured that the Proxmark3 USB device node will be accessible by any user in the dnet group.

SYSFS{idVendor}=="9ac4", SYSFS{idProduct}=="4b8f", MODE="0660", GROUP="dnet"

However, the SYSFS{} notation became obsolete in newer udev releases, and at first, I followed the instincts of a real programmer by disregarding a mere warning. But with a recent udev upgrade, complete removal of support for the obsolete notation came, so I had to face messages like the following on every boot.

unknown key 'SYSFS{idVendor}' in /etc/udev/rules.d/026-proxmark.rules:1
invalid rule '/etc/udev/rules.d/026-proxmark.rules:1'

The solution is detailed on many websites, including the blogpost of jpichon, who also met the issue in a Debian vs. custom hardware situation. The line in the udev configuration has to be changed to something like the following.

SUBSYSTEM=="usb", ATTR{idVendor}=="9ac4", ATTR{idProduct}=="4b8f", MODE="0660", GROUP="dnet"

Mangling RSS feeds with Python

2011-10-28

There are blogs on the web, that are written/configured in a way, that the RSS or Atom feed contains only a teaser (or no content at all), and one must open a link to get the real content – and thus load all the crap on the page, something RSS feeds were designed to avoid. Dittygirl has added one of those sites in her feed reader, and told me that it takes lots of resources on her netbook to load the whole page – not to mention the discomfort of leaving the feed reader.

I accepted the challenge, and decided to write a Python RSS gateway in less than 30 minutes. I chose plain WSGI, something I wanted to play with, and this project was a perfect match for its simplicity and lightweightness. Plain WSGI applications are Python modules with a callable named application, which the webserver will call every time, an HTTP request is made. The callable gets two parameters,

  • a dictionary of environment values (including the Path of the query, IP address of the browser, etc.), and
  • a callable, which can be used to signal the web server about the progress.

In this case, the script ignores the path, so only the second parameter is used.

def application(environ, start_response):
  rss = getfeed()
  response_headers = [('Content-Type', 'text/xml; charset=UTF-8'),
                      ('Content-Length', str(len(rss)))]
  start_response('200 OK', response_headers)
  return [rss]

Simple enough, the function emits a successful HTTP status, the necessary headers, and returns the content. The list (array) format is needed because a WSGI application can be a generator too (using a yield statement), which can be handy when rendering larger content, so the server expects an iterable result.

The real “business logic” is in the getfeed function, which first tries to load a cache, to avoid abusing the resources of the target server. I chose JSON as it's included in the standard Python libraries, and easy to debug.

try:
  with open(CACHE, 'rb') as f:
    cached = json.load(f)
  etag = cached['etag']
except:
  etag = ''

Next, I load the original feed, using the cached ETag value to encourage conditional HTTP GET. The urllib2.urlopen function can operate on a Request object, which takes a third parameter, that can be used to add HTTP headers. If the server responds with a HTTP 304 Not Modified, urlopen raises an HTTPError, and the script knows that the cache can be used.

try:
  feedfp = urlopen(Request('http://HOSTNAME/feed/',
      None, {'If-None-Match': etag}))
except HTTPError as e:
  if e.code != 304:
    raise
  return cached['content'].encode('utf-8')

I used lxml to handle the contents, as it's a really convenient and fast library for XML/HTML parsing and manipulation. I compiled the XPath queries used for every item in the head of the module for performance reasons.

GUID = etree.XPath('guid/text()')
IFRAME = etree.XPath('iframe')
DESC = etree.XPath('description')

To avoid unnecessary copying, lxml's etree can parse the object returned by urlopen directly, and returns an object, which behaves like a DOM on steroids. The GUID XPath extracts the URL of the current feed item, and the HTML parser of lxml takes care of it. The actual contents of the post is helpfully put in a div with the class post-content, so I took advantage of lxml's HTML helper functions to get the div I needed.

While I was there, I also removed the first iframe from the post, which contains the Facebook tracker bug Like button. Finally, I cleared the class attribute of the div element, and serialized its contents to HTML to replace the useless description of the feed item.

feed = etree.parse(feedfp)
for entry in feed.xpath('/rss/channel/item'):
  ehtml = html.parse(GUID(entry)[0]).getroot()
  div = ehtml.find_class('post-content')[0]
  div.remove(IFRAME(div)[0])
  div.set('class', '')
  DESC(entry)[0].text = etree.CDATA(etree.tostring(div, method="html"))

There are two things left. First, the URL that points to the feed itself needs to be modified to produce a valid feed, and the result needs to be serialized into a string.

link = feed.xpath('/rss/channel/a:link',
  namespaces={'a': 'http://www.w3.org/2005/Atom'})[0]
link.set('href', 'http://URL_OF_FEED_GATEWAY/')
retval = etree.tostring(feed)

The second and final step is to save the ETag we got from the HTTP response and the transformed content to the cache in order to minimize the amount of resources (ab)used.

with open(CACHE, 'wb') as f:
  json.dump(dict(etag=feedfp.info()['ETag'], content=retval), f)
return retval

You might say, that it's not fully optimized, the design is monolithic, and so on – but it was done in less than 30 minutes, and it's been working perfectly ever since. It's a typical quick-and-dirty hack, and although it contains no technical breakthrough, I learned a few things, and I hope someone else might also do by reading it. Happy hacking!


Erlang HTTPd directory traversal

2011-10-21

During a security-focused week in August, I had the perfect environment to take a look at the security of the libraries bundled with one of my favorite languages, Erlang. The language itself follows a functional paradigm, so the connection with the outside world is made possible with so-called port drivers implemented in C. Suprisingly, very little code is written that way, and even that codebase is elegant, and seemed secure.

So I started poking at the libraries implemented in pure Erlang, priorizing network-facing modules, which are mostly concentrated in the inets OTP application. Latter contains clients and servers for some of the most used internet protocols, such as FTP, TFTP and HTTP. As they are written in pure Erlang, traditional binary vulnerabilities (such as buffer overflows) are almost impossible to find, so I tried looking for logical errors, using my previous experience with such services.

After some time, I started poking the HTTP server called inets:httpd. One of the most common vulnerabilities with HTTP daemons serving static content is the ability to access files outside the so-called document root, which is called directory traversal. It's called that way, because most of the time, these issues are exploited using repeated ../ or ..\ to move higher and higher in the directory tree of the file system, slowly traversing out of the “sandbox” called document root.

I started following the flow of control in the code, and found an elegant way of handling these issues, and at first sight, everything seemed OK with it. In the November 2010 version of lib/inets/src/http_server/httpd_request.erl the following check is made at line 316 (I whitespace-formatted the code a little bit for the sake of readability).

Path2 = [X || X <- string:tokens(Path, "/"), X =/= "."], %% OTP-5938
validate_path(Path2, 0, RequestURI)

The first line uses a construct called list comprehension, which is syntactic sugar for generating and filtering a list, thus avoiding boilerplate code to create a new list, some kind of loop, and a bunch of if statements. The string:tokens splits the requested path at slashes, =/= expresses nonequivalence, so Path2 contains a list (array) of strings that represent the parts of the URL except the ones that contain a single dot ("."). For example, a request for /foo/bar/./qux results in Path2 being a list with three strings in it: ["foo", "bar", "qux"].

The second line passes this list, a zero, and the requested URI to a function called validate_path, which can be found next to it at line 320.

validate_path([], _, _) ->
    ok;
validate_path([".." | _], 0, RequestURI) ->
    {error, {bad_request, {forbidden, RequestURI}}};
validate_path([".." | Rest], N, RequestURI) ->
    validate_path(Rest, N - 1, RequestURI);
validate_path([_ | Rest], N, RequestURI) ->
    validate_path(Rest, N + 1, RequestURI).

In Erlang, a function can be declared as many times as needed, and the runtime tries to match the arguments in order of declaration. Being a functional language, Erlang contains no such thing as a loop, but solves most of those problems with recursion. The first two declarations are the two possible exits of the function.

  • If there are no (more) items in the list, the request is OK.
  • If the second argument is zero, and the first item of the list is "..", the request is denied with an HTTP 403 Forbidden message.

The last two declarations are the ones processing the items, one by one.

  • If the item is "..", the second argument is decremented.
  • In any other case, the second argument is incremented.

As you can see, it accepts URLs that contain ".." parts, as long as they don't lead outside the document root, by simply counting how deep the path goes inside the document root. The first line has a comment, referring to a ticket number (or similar), and by doing a little web search, I found the Erlang OTP R10B release 10 README from 2006, which implies, that this code was designed with directory traversal attacks in mind.

There's only one problem with this solution, and it's called Windows. Erlang runs on a number of platforms, and Windows is one of them – with the exception that it uses backslash to separate paths (although most APIs accept slashes too), which leads to the following ugly result.

Erlang HTTPd started in OTP R14B3 on Windows

$ curl -silent -D - 'http://192.168.56.3:8080/../boot.ini' | head -n 1
HTTP/1.1 403 Forbidden

$ curl -D - 'http://192.168.56.3:8080/..\boot.ini'
HTTP/1.1 200 OK
Server: inets/5.6
Date: Fri, 21 Oct 2011 17:11:45 GMT
Content-Type: text/plain
Etag: dDGWXY211
Content-Length: 211
Last-Modified: Thu, 06 Mar 2008 21:23:24 GMT

[boot loader]
timeout=30
default=multi(0)disk(0)rdisk(0)partition(1)\WINDOWS
[operating systems]
multi(0)disk(0)rdisk(0)partition(1)\WINDOWS="Microsoft Windows XP Professional" /noexecute=optin /fastdetect

Erlang/OTP R14B04 has been released on October 5, 2011, and it contains the simple fix I wrote that closes the vulnerability. I'd like to thank everyone at hekkcamp 2011 for their help, especially Buherátor who helped me with testing.


Secure web services with Python part 1 - UserNameToken

2011-10-20

In 2004 OASIS created WS-Security, which describes several techniques for securing web services. The simplest is UsernameToken (PDF warning), which can be thought of as the equivalent of HTTP authentication in the SOAP world – the client supplies a username and a password, and latter can be transmitted either in cleartext or in a digested form.

The digest algorithm is quite simple (Base64(SHA-1(nonce + created + password))) and by using a nonce, this protocol can prevent replay attacks, while a timestamp can reduce the memory requirements since nonces can expire after a specified amount of time. A sample envelope can be seen below, I removed the longish URLs for the sake of readability, these can be found in the PDF linked in the previous paragraph. If you're into security, you can try to guess the password based on the username, and then try to verify the digest based on that. ;)

<soap:Envelope xmlns:soap="http://schemas.xmlsoap.org/soap/envelope/">
 <soap:Header>
  <wsse:Security xmlns:wsse="..." xmlns:wsu="..." soap:mustUnderstand="1">
   <wsse:UsernameToken wsu:Id="UsernameToken-3">
    <wsse:Username>admin</wsse:Username>
    <wsse:Password Type="...#PasswordDigest">fTI7fNcwD69Z3dOT1bYfvSbQPb8=</wsse:Password>
    <wsse:Nonce EncodingType="...#Base64Binary">1DLfpq3fLJ5O8Dlrnr4blQ==</wsse:Nonce>
    <wsu:Created>2011-05-05T17:20:22.319Z</wsu:Created>
   </wsse:UsernameToken>
  </wsse:Security>
 </soap:Header>
 <soap:Body>
  ...
 </soap:Body>
</soap:Envelope>

Python had little support for UsernameToken, SUDS, the preferred web service client mentioned cleartext support in their documentation, so I set up a simple service using Apache CXF and tried to access it. As it turned out, the implementation violated the OASIS standard by not specifying the Type attribute of the Password element, which would've indicated whether the password were transmitted in cleartext or in a digested form.

It was a trivial fix, and while I was there, I also added a standards-compliant digest support, and tested it with Apache CXF. I sent a patch to the SUDS mailing list in May 2011, but got no response ever since, so I have no information if/when this improvement will get into mainline SUDS.

On the server side, things got trickier. The preferred Python web service implementation is soaplib/rpclib, and I did some research, whether it's possible to implement UsernameToken support in it. It turned out, that there's a project called sec-wall which takes this to a whole new level by creating a (reverse) proxy, and this way, security can be detached from the service to another layer, which also satisfies the UNIX part of my mind.

Overview of sec-wall

I started hacking on sec-wall, first with some code cleanup, then I managed to fix up the codebase so that all test passed on Python 2.7, too. After getting myself familiar with the project, I created an environment with Soaplib as a server, sec-wall as the proxy, SUDS as a client, and tried both UsernameToken configurations. It worked pretty well, with minor glitches, such as sec-wall expecting a nonce and creation time even when cleartext password was used. I helped the developer, Dariusz Suchojad fixing the problem, so in the end, I could create a pure Python solution utilizing UsernameToken to secure webservices.

That previous sentence could be a great one to end this post with, so this paragraph is kind of an extra for those who kept on reading. The current WSSE implementation in sec-wall “lets all nonces in”, so I created a class that overrode this implementation using memcached. There are two Python clients for it, so I developed and tested both. Below is the code for python-memcached, which is pure Python, whereas pylibmc uses native code, but mimics the interface of former, so only the second line needs to be changed to switch between the implementations.

from secwall.wsse import WSSE
from memcache import Client

class WSSEmc(WSSE):
  keyfmt = 'WSSEmc_nonce_{0}'

  def __init__(self):
    self.mc = Client(['127.0.0.1:11211'], debug=0)

  def check_nonce(self, wsse_nonce, now, nonce_freshness_time):
    if not nonce_freshness_time:
      return False
    key = self.keyfmt.wsse_nonce
    if self.mc.get(key):
      return True
    self.mc.set(key, '1', time=nonce_freshness_time)
    return False

I hope to publish at least a second part in this subject, focusing on digital signatures in the next two months (it's part of my Masters thesis, which is due December 9, 2011).


Optimizing Django ORM in f33dme

2011-10-19

As I was hacking around with django-oursql vs f33dme, I started sniffing the network traffic between the Python process and the MySQL server to follow up on a bug in oursql. I found that the following queries (yes, plural!) ran every time a feed item was marked as read.

SELECT `f33dme_item`.`id`, `f33dme_item`.`title`, `f33dme_item`.`content`,
  `f33dme_item`.`url`, `f33dme_item`.`date`, `f33dme_item`.`added`,
  `f33dme_item`.`feed_id`, `f33dme_item`.`score`, `f33dme_item`.`archived`
FROM `f33dme_item` WHERE `f33dme_item`.`id` = ?

SELECT (1) AS `a` FROM `f33dme_item` WHERE `f33dme_item`.`id` = ?  LIMIT 1

UPDATE `f33dme_item` SET `title` = ?, `content` = ?, `url` = ?, `date` = ?,
  `added` = ?, `feed_id` = ?, `score` = ?, `archived` = ?
WHERE `f33dme_item`.`id` = ?

The above queries not only multiply the round-trip overhead by three, but the first and the last ones generate quite a bit of a traffic, by sending the content of all the fields (including the content which might contain a full-blown blog post like this) to and from the ORM, respectively. The innocent-looking lines of code that generated them were the following ones.

item = Item.objects.get(id=item_id)
if not item:
  return HttpResponse('No item found')
item.archived = True
item.save()

By looking at the queries above first, it's pretty clear, that the get method needs to query all the columns, since later code might access any of the fields. The same can be said about the update, which knows nothing about the contents of the database – it even has to check if a row with the ID specified exists to figure out whether to use an INSERT or and UPDATE DML query.

Of course, the developers of the Django ORM met this situation as well, and even documented it along with nice examples in the QuerySet API reference. All I needed was to adapt the code a little bit, and as the documentation states, the update method even “returns the number of affected rows”, so the check for the existence of the item can be preserved. The improved code is the following.

if Item.objects.filter(id=item_id).update(archived=True) != 1:
  return HttpResponse('No item found')

The first line is a bit longish (although still 62 characters only), but replaced four lines of the original code. When read carefully, one might even find it readable, and it produces the following SQL queries in the background.

UPDATE `f33dme_item` SET `archived` = ? WHERE `f33dme_item`.`id` = ?

How I made Proxmark3 work

2011-08-27

Due to the widespread usage of RFID technology, we decided to buy a Proxmark3 with all the extension (except for the case of course, who needs that anyway). After going through the bureucracy of the customs office, I could finally start working on the technology issues of the gadget.

First of all, the FPGA and the MCU in the unit comes preprogrammed, and a ZIP file is available from the official website with a Linux client. The first problem was the client, which was provided in a binary form, and required old versions of several libraries. After creating a few symlinks, it ran, but crashed during antenna tuning with a SIGFPE (I didn't even know such signal existed till now).

Next step was to download and compile the latest code from the Google Code project site following the Compiling page on their wiki. The instructions are clear and mostly correct, the first problem comes with the dependencies that the tools/install-gnuarm4.sh script is trying to find on wrong URLs, and since the script doesn't check the return values of the wget calls, 404s cause weird errors as the script keeps running even if download fails.

As of 27 August 2011, the following URLs needed to be changed:

The last obstacle was a problem (apparently) specific to the Hungarian locale (hu_HU.UTF8) used by me, as reported by the Arch Linux guys (and as far as my Google searches found, noone else). Because of this, sed crashed during cross build environment buildup, and for now, the only fix is setting the LANG environment variable to something else (like "C").

This way, the ARM crossbuild environment can be built and make can be started. In order to build the firmware, the common/Makefile.common file also needs to be changed according to the following diff. With this last change done, I managed to build the firmware and the client successfully.

--- common/Makefile.common      (revision 486)
+++ common/Makefile.common      (working copy)
@@ -20,7 +20,7 @@

 all:

-CROSS  ?= arm-eabi-
+CROSS  ?= arm-elf-
 CC     = $(CROSS)gcc
 AS     = $(CROSS)as
 LD     = $(CROSS)ld

CCCamp 2011 video selection

2011-08-27

The Chaos Communication Camp was really great this year, and for those who were unable to attend (or just enjoyed the fresh air and presence of fellow hackers instead of sitting in the lecture room), the angels recorded and made all the talks available on the camp2011 page of CCC-TV.

I compiled two lists, the first one consists of talks I attended and recommend for viewing in no particular order.

  • Jayson E. Street gave a talk titled Steal Everything, Kill Everyone, Cause Total Financial Ruin! Or: How I walked in and misbehaved, and presented how he had entered various facilities with minimal effort and expertise, just by exploiting human stupidity, recklessness and incompetence. It's not really technical, and fun to watch, stuffed with photographical evidence and motivation slides.
  • While many hackers penetrate at high-level interfaces, Dan Kaminsky did it low level with his Black Ops of TCP/IP 2011 talk. Without sploilers, I can only mention some keywords: BitCoin anonimity and abuse, IP TTLs, net neutrality preservation, and the security of TCP sequence numbers. The combination of the technical content and his way of presenting it makes it worth watching.
  • Three talented hackers from the Metalab radio crew (Metafunk), Andreas Schreiner, Clemens Hopfer, and Patrick Strasser talked about Moonbounce Radio Communication, an experiment they did at the campsite with much success. Bouncing signals off the moon, which is ten times farther than communication satellites requires quite a bit of technical preparation, especially without expensive equipments.

The second list consists of talks I didn't attend but am planning to watch now the camp is over.

I'll expand the lists as the angels upload more videos to the CCC-TV site.


next posts >
< prev posts

CC BY-SA RSS Export
Proudly powered by Utterson