VSzA techblog

CCCamp 2015 video selection

2015-08-24

(note: any similarity between this post and the one I made four years ago is not a coincidence)

The Chaos Communication Camp was even better than four years ago, and for those who were unable to attend (or just enjoyed the fresh air and presence of fellow hackers instead of sitting in the lecture room), the angels recorded and made all the talks available on the camp2015 page of CCC-TV.

I compiled two lists, the first one consists of talks I attended and recommend for viewing in no particular order.

  • Two members of CCC Munich – a hackerspace H.A.C.K. has a really good relationship with – presented Iridium Hacking, which showed that they continued the journey they published last December at the Congress. It's really interesting to see what SDRs make possible for hackers, especially knowing that the crew of MuCCC was the one that created rad1o, the HackRF-based badge they gave to every attendee.
  • Speaking of the rad1o, the talk detailing that awesome piece of hardware was also inspiring and included a surprise appearance of Michael Ossmann, creator of HackRF.
  • I only watched the opening and closing ceremonies from recording, but it was worth it. If you know the feeling of a hacker camp, it has some nice gems (especially the closing one), if you don't, it's a good introduction.
  • Mitch Altman's talk titled Hackerspace Design Patterns 2.0 also appeals to two distinct audiences; if you already run a hackerspace, it distills some of the experience he gathered while running Noisebridge, if you don't, it encourages to start or join one. It was followed by a pretty good workshop too, but I haven't seen any recording of that yet.
  • Like many others, my IT background covers way more than my hardware DIY skills, so Lieven's practical prototyping primer gave me 50 really handy tips so that I can avoid some of the mistakes he made over the last 10 years.
  • Last but not least, now that analog TV stations are being turned off in many countries, Elektra's talk titled Freifunk in TV-Whitespace shows not only solutions for transverting Wi-Fi signals into the 70 cm band, but also many advantages to motivate hackers doing so.

The second list consists of talks I didn't attend but am planning to watch now the camp is over.


Video manipulation using stdio and FFmpeg

2015-05-11

Since my FFmpeg recipes post I've been using FFmpeg to process videos recorded at H.A.C.K. talks and workshops, and I needed an easy way to inject my own code into the pixel pipeline. For such tasks, I prefer stdio since there are APIs in every sane programming language, and the OS solves all the problems regarding the producer–consumer problem including parallelization and buffer management out of the box, while making it simple to tap into streams and/or replace them with files for debug purposes.

As it turned out, FFmpeg can be used both as a decoder and encoder in this regard. In case of former, the input is a video file (in my case, raw DV) and FFmpeg outputs raw RGB triplets, from left to right, then from top to bottom, advancing from frame to frame. The relevant command line switches are the following.

  • -pix_fmt rgb24 sets the pixel format to 24-bit (3 × 8 bit) RGB
  • -vcodec rawvideo sets the video codec to raw, resulting in raw pixels
  • -f rawvideo sets the container format to raw, e.g. no wrapping
  • - (a single dash) as the last parameter sends output to stdout

A simple example with 2 frames of 2x2 pixels:

Frame 1Frame 2Raw output (hex dump)
ff 00 00  ff ff 00   00 ff 00  00 00 ff
00 00 00 55 55 55 aa aa aa ff ff ff

The simplest way to test is redirecting the output of a video with solid colors to hd as it can be seen below (input.mkv is the input file).

$ ffmpeg -i input.mkv -vcodec rawvideo -pix_fmt rgb24 \
    -f rawvideo - | hd | head

Such raw image data can be imported in GIMP by selecting Raw image data in the Select File Type list in the Open dialog; since no metadata is supplied, every consumer must know at least the width and pixel format of the image. While GIMP is great for debugging such data, imaging libraries can also easily read such data, for example PIL offers the Image.frombytes method that takes the pixel format and the size as a tuple via parameters.

For example Image.frombytes('RGB', (320, 240), binary_data) returns an Image object if binary_data contains the necessary 320 × 240 × 3 bytes produced by FFmpeg in rgb24 mode. If you only need grayscale, 'RGB' can be replaced with 'L' and rgb24 with gray, like we did in our editor.

FFmpeg can also be used as an encoder; in this scenario, the input consists of raw RGB triplets in the same order as described above, and the output is a video-only file. The relevant command line switches are the following.

  • -r 25 defines the number of frames per second (should match the original)
  • -s 320x240 defines the size of a frame
  • -f rawvideo -pix_fmt rgb24 are the same as above
  • -i - sets stdin as input

The simplest way to test is redirecting /dev/urandom which results in white noise as it can be seen below (4 seconds in the example).

$ dd if=/dev/urandom bs=$((320 * 240 * 3)) count=100 | ffmpeg -r 25 \
    -s 320x240 -f rawvideo -pix_fmt rgb24 -i - output.mkv

Below is an example of a result played in Mplayer.

4 seconds of RGB white noise in Mplayer

Having a working encoder and decoder pipeline makes it possible not only to generate arbitrary output (that's how we generated our intro) but also to merge slides with the video recording of the talk. In that case, pixels can be “forwarded” without modification from the output of the decoder to the input of the encoder by reading stdin to and writing stdout from the same buffer, thus creating rectangular shapes of video doesn't even require image libraries.


MWR BSides Challenge 2013 writeup

2013-04-27

On 11th March 2013, MWR Labs announced a challenge that involved an Android application called Evil Planner. I got the news on 12th March around 17:00 and by 20:30 I found two vulnerabilities in the application and had a working malware that could extract the data protected by the app. The app I created as a proof-of-concept is available in its GitHub repository, and below are the steps I've taken to assess the security of the application.

The application itself was quite simple, and seemed secure at first sight. It required the user to use a PIN code to protect information entered. Unlike many application it even used this PIN code to encrypt the database, so even if the device was stolen, the user shouldn't have worried about it.

After downloading the APK, I unzipped it and converted the classes.dex file containing the Dalvik bytecode to a JAR file using dex2jar. I opened the resulting JAR with JD-GUI and saw that no obfuscation took place, so all class, method and member names were available. For example, the Login class contained the following line, revealing where the PIN code was stored:

private final String PIN_FILE = "/creds.txt";

Further static code analysis revealed that the PIN code was stored in the file using a simple method of encoding (I wouldn't dare calling it encryption).

public static String encryptPIN(String paramString,
    TelephonyManager paramTelephonyManager)
{
    String str1 = paramTelephonyManager.getDeviceId();
    String str2 = paramString.substring(0, 4);
    byte[] arrayOfByte1 = str1.getBytes();
    byte[] arrayOfByte2 = str2.getBytes();
    return Base64.encodeToString(xor(arrayOfByte1, arrayOfByte2), 2);
}

Although variable names are not available to JD-GUI, it's still easy to see what happens: the getDeviceId method returns the IMEI of the device, and this gets XOR'd with the PIN string. The result can have weird characters, so it's Base64 encoded before being written to creds.txt.

As you can see, this method of encoding is easily reversible, but I wouldn't even need to go that far, since there's a decryptPIN method as well that performs the reverse of the code above. Thus acquiring the PIN code protecting the application is only a matter of accessing the creds.txt, which has its permissions set correctly, so it's only accessible to the Evil Planner.

However, using apktool to get readable XMLs from the binary ones used in APK files revealed that the application exposes two content providers whose security implications I already mentioned with regard to Seesmic.

<provider android:name=".content.LogFileContentProvider" 
    android:authorities="com.mwri.fileEncryptor.localfile" />
<provider android:name="com.example.bsidechallenge.content.DBContentProvider"
    android:authorities="com.example.bsideschallenge.evilPlannerdb" />

Latter is more like the one used by Seesmic and would've provided some limited access to the database, so I turned my attention to the other. Former is more interesting since it implements the openFile method in a way that it just opens a file received in a parameter without any checks, as it can be seen in the decompiled fragment below. (I removed some unrelated lines regarding logging to make it easier to read, but didn't change it in any other way.)

public ParcelFileDescriptor openFile(Uri paramUri, String paramString)
    throws FileNotFoundException
{
    // removed logging from here
    String str5 = paramUri.getPath();
    return ParcelFileDescriptor.open(new File(str5), 268435456);
}

Since the content provider is not protected in any way, this makes it possible to access any file with the privileges of the Evil Planner. In the proof-of-concept code, I used the following function to wrap its functionality into a simple method that gets a path as a parameter, and returns an InputStream that can be used to access the contents of that file.

protected InputStream openFile(String path) throws Exception {
    return getContentResolver().openInputStream(Uri.parse(
                "content://com.mwri.fileEncryptor.localfile" + path));
}

Having this, reading the contents of creds.txt only took a few lines (and even most of those just had to do with the crappy IO handling of Java).

InputStream istr = openFile(
            "/data/data/com.example.bsidechallenge/files/creds.txt");
InputStreamReader isr = new InputStreamReader(istr);
BufferedReader br = new BufferedReader(isr);
String creds = br.readLine();

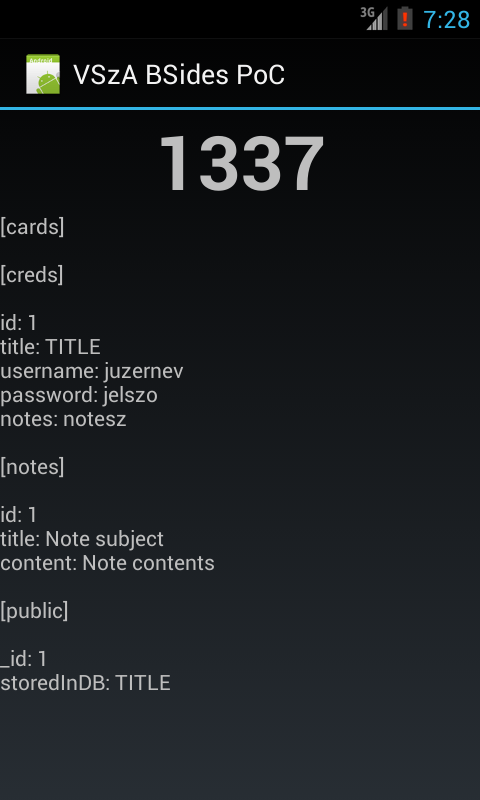
Since I had access to every file that Evil Planner had, the rest was just copy-pasting code from JD-GUI to decrypt the PIN, get the database file in the same way, decrypt that using the PIN, and dump it on the screen. All of the logic can be found in Main.java, and the result looks like the following screenshot.

Working proof-of-concept displaying sensitive information

I'd like to thank the guys at MWR for creating this challenge, I don't remember any smartphone app security competitions before. Although I felt that the communication was far from being perfect (it's not a great feeling having the solution ready, but having no address to send it to), it was fun, and they even told me they'll send a T-shirt for taking part in the game. Congratulation to the winners, and let's hope this wasn't the last challenge of its kind!


FFmpeg recipes for workshop videos

2013-01-23

In November 2012, I started doing Arduino workshops in H.A.C.K. and after I announced it on some local channels, some people asked if it could be recorded and published. At first, it seemed that recording video would require the least effort to publish what we've done, and while I though otherwise after the first one, now we have a collection of simple and robust tools and snippets that glue them together that can be reused for all future workshops.

The recording part was simple, I won't write about it outside this paragraph, but although the following thoughts might seem trivial, important things cannot be repeated enough times. Although the built-in microphones are great for lots of purposes, unless you're sitting in a silent room (no noise from machines nor people) or you already use a microphone with an amplifier, a microphone closer to the speaker should be used. We already got a cheap lavalier microphone with a preamplifier and 5 meters of cable, so we used that. It also helps if the camera operator has a headphone, so the volume level can be checked, and you won't freak out after importing the video to the PC that either the level is so low that it has lots of noise or it's so high that it becomes distorted.

I used a DV camera, so running dvgrab resulted in dvgrab-*.dv files. Although the automatic splitting is sometimes desireable (not just because of crippled file systems, but it makes it possible to transfer each file after it's closed, lowering the amount of drive space needed), if not, it can be disabled by setting the split size to zero using -size 0. It's also handy to enable automatic splitting upon new recordings with -autosplit. Finally, -timestamp gives meaningful names to the files by using the metadata recorded on the tape, including the exact date and time.

The camera I used had a stereo microphone and a matching stereo connector, but the microphone was mono, with a connector that shorted the right channel and the ground of the input jack, the audio track had a left channel carrying the sound, and a right one with total silence. My problem was that most software handled channel reduction by calculating an average, so the amplitude of the resulting mono track was half of the original. Fortunately, I found that ffmpeg is capable of powerful audio panning, so the following parameter takes a stereo audio track, discards the right channel, and uses the left audio channel as a mono output.

-filter_complex "pan=1:c0=c0"

I also wanted to have a little watermark in the corner to inform viewers about the web page of our hackerspace, so I created an image with matching resolution in GIMP, wrote the domain name in the corner, and made it semi-transparent. I used this method with Mencoder too, but FFmpeg can handle PNGs with 8-bit alpha channels out-of-the-box. The following, combined command line adds the watermark, fixes the audio track, and encodes the output using H.264 into an MKV container.

$ ffmpeg -i input.dv -i watermark.png -filter_complex "pan=1:c0=c0" \
    -filter_complex 'overlay' -vcodec libx264 output.mkv

A cropped sample frame of the output can be seen below, with the zoomed watermark opened in GIMP in the corner.
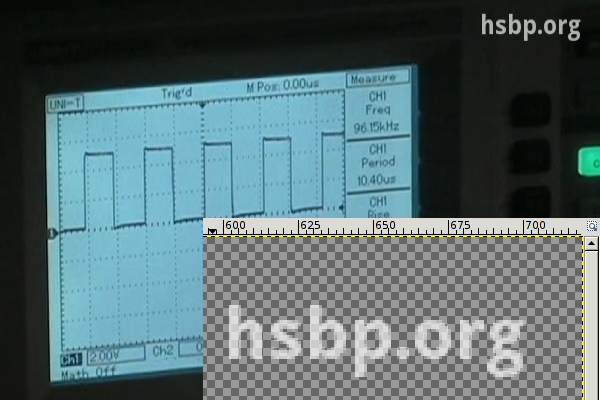
hsbp.org watermark

I chose MKV (Matroska) because of the great tools provided by MKVToolNix (packaged under the same name in lowercase for Debian and Ubuntu) that make it possible to merge files later in a safe way. Merging was needed in my case for two reasons.

  • If I had to work with split .dv files, I converted them to .mkv files one by one, and merged them in the end.
  • I wanted to add a title to the beginning, which also required a merge with the recorded material.

I tried putting the title screen together from scratch, but I found it much easier to take the first 8 seconds of an already done MKV using mkvmerge, then placed a fully opaque title image of matching size using the overlay I wrote about above, and finally replace the sound with silence. In terms of shell commands, it's like the following.

ffmpeg -i input.mkv -i title.png -filter_complex 'overlay' -an \
    -vcodec libx264 title-img.mkv
mkvmerge -o title-img-8s.mkv --split timecodes:00:00:08 title-img.mkv
rm -f title-img-8s-002.mkv
ffmpeg -i title-img-8s-001.mkv -f lavfi -i "aevalsrc=0::s=48000" \
    -shortest -c:v copy title.mkv
rm -f title-img-8s-001.mkv

The first FFmpeg invocation disables audio using the -an switch, and produces title-img.mkv that contains our PNG image in the video track, and has no audio. Then mkvmerge splits it into two files, an 8 seconds long title-img-8s-001.mkv, and the rest as title-img-8s-002.mkv. Latter gets discarded right away, and a second FFmpeg invocation adds an audio track containing nothing but silence with a frequency (48 kHz) matching that of the recording. The -c:v copy parameter ensures that no video recompression is done, and -shortest discourages FFmpeg from trying to read as long as at least one input has data, since aevalsrc would generate silence forever.

Finally, the title(s) and recording(s) can be joined together by using mkvmerge for the purpose its name suggest at last. If you're lucky, the command line is as simple as the following:

$ mkvmerge -o workshop.mkv title.mkv + rec1.mkv + rec2.mkv

If you produced your input files using the methods described above, if it displays an error message, it's almost certainly the following (since all resolution/codec/etc. parameters should match, right?).

No append mapping was given for the file no. 1 ('rec1.mkv'). A default
mapping of 1:0:0:0,1:1:0:1 will be used instead. Please keep that in mind
if mkvmerge aborts with an error message regarding invalid '--append-to'
options.
Error: The track number 0 from the file 'dvgrab-001.mkv' cannot be
appended to the track number 0 from the file 'title.mkv'. The formats do
not match.

As the error message suggests, the order of the tracks can differ between MKV files, so an explicit mapping must be provided to mkvmerge for matching the tracks befor concatenation. The mapping for the most common case (a single audio and a single video track) is the following.

$ mkvmerge -o workshop.mkv t.mkv --append-to '1:0:0:1,1:1:0:0' + r1.mkv

I've had a pretty good experience with H.264-encoded MKV files, the size stayed reasonable, and most players had no problem with it. It also supports subtitles, and since YouTube and other video sharing sites accept it as well, with these tips, I hope it gets used more in recording and publishing workshops.

DEF CON 20 CTF urandom 300 writeup

2012-06-04

As a proud member of the Hungarian team called “senkihaziak”, I managed to solve the following challenge for 300 points in the /urandom category on the 20th DEF CON Capture The Flag contest. The description consisted of an IP address, a port number, a password, and a hint.

Description of the challenge

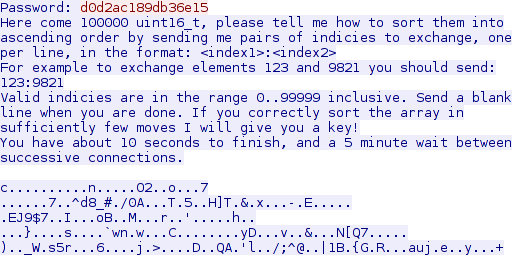
Connecting with netcat to the specified IP address and port using TCP resulted in a password prompt being printed. After sending the password followed by a newline triggered the server to send back what seemed to be an awful lot of garbage, screwing up the terminal settings. A closer inspection using Wireshark revealed the actual challenge.

Network traffic after connecting and sending the password

Brief analysis of the network traffic dump confirmed that after about 500 bytes of text, exactly 200000 bytes of binary data was sent by the service, which equals to 100000 unsigned 16-bit numbers (uint16_t). As the text said, both the time and the number of moves to sort the array in-place was limited, and while I knew that quicksort is unbeatable in the former (it took 35 ms to sort the list on my 2.30GHz Core i3), I knew little to nothing about which algorithms support in-place sorting, and of those, which one requires the least number of exchanges.

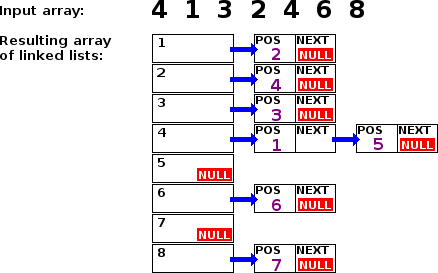
KT came up with the idea of building a 64k long array to store the number of occurences of each index, filling it during reading, and iterating over it to achieve the sorted array. While this was a working concept in itself, it didn't give me what the challenge wanted – pairs of indices to exchange in order to reach the sorted state. To overcome this, I improved his idea by storing the position(s) on which the index occurs in a linked list insted of just the number of occurences. For easier understanding, here's an example of what this array of linked lists would look like on an array of 7 numbers.

Example of an array of linked lists

Since performance mattered, I chose C and began with establishing the TCP connection and handling the login.

#define PW "d0d2ac189db36e15\n"
#define BUFLEN 4096
#define PWPROMPTLEN 10

int main() {
  int i, sockfd;
  struct sockaddr_in serv_addr;
  char buf[BUFLEN];

  sockfd = socket(AF_INET, SOCK_STREAM, 0);
  memset(&serv_addr, '0', sizeof(serv_addr));

  serv_addr.sin_family = AF_INET;
  serv_addr.sin_port = htons(5601);
  inet_pton(AF_INET, "140.197.217.155", &serv_addr.sin_addr);

  connect(sockfd, (struct sockaddr *)&serv_addr, sizeof(serv_addr));
  for (i = 0; i < PWPROMPTLEN; i += read(sockfd, buf, BUFLEN));
  write(sockfd, PW, strlen(PW));
  ...
}

After login, there was 504 bytes of text to ignore, and then the numbers were read into an array.

#define MSGLEN 504
#define NUMBERS 100000

uint16_t nums[NUMBERS];

for (i = 0; i < MSGLEN; i += read(sockfd, buf, MSGLEN - i));
for (i = 0; i < NUMBERS * sizeof(uint16_t);
  i += read(sockfd, ((char*)nums) + i, NUMBERS * sizeof(uint16_t) - i));

After the numbers were available in a local array, the array of linked lists was built. The end of a linked list was marked with a NULL pointer, so the array was initialized with 0 bytes;

typedef struct numpos {
  int pos;
  struct numpos *next;
} numpos_t;

numpos_t *positions[MAXNUM];

memset(positions, 0, MAXNUM * sizeof(void*));
for (i = 0; i < NUMBERS; i++) {
  numpos_t *newpos = malloc(sizeof(numpos_t));
  newpos->next = positions[nums[i]];
  newpos->pos = i;
  positions[nums[i]] = newpos;
}

The heart of the program is the iteration over this array of lists. The outer loop goes over each number in ascending order, while the inner loop iterates over the linked lists. An auxiliary counter named j tracks the current index on the output array. Inside the loops the current number is exchanged with the one at the current index in the original array, and the positions array of linked lists is also changed to reflect the layout of the output array.

int n, j = 0;
numpos_t *cur, *cur2;

for (n = 0; n < MAXNUM; n++) {
  for (cur = positions[n]; cur != NULL; cur = cur->next) {
    if (cur->pos != j) {
      sprintf(buf, "%d:%d\n", cur->pos, j);
      write(sockfd, buf, strlen(buf));
      tmp = nums[j];
      nums[j] = n;
      for (cur2 = positions[tmp]; cur2 != NULL; cur2 = cur2->next) {
        if (cur2->pos == j) {
          cur2->pos = cur->pos;
          break;
        }
      }
      nums[cur->pos] = tmp;
    }
    j++;
  }
}

Finally, there's only one thing left to do: send an empty line and wait for the key to arrive.

write(sockfd, "\n", 1);
while (1) {
  if ((i = read(sockfd, buf, BUFLEN))) {
    buf[i] = '\0';
    printf("Got %d bytes of response: %s\n", i, buf);
  }
}

After an awful lot of local testing, the final version of the program worked perfectly for the first time it was ran on the actual server, and printed the following precious key.

Result of the successful run, displaying the key


DEF CON 20 CTF grab bag 300 writeup

2012-06-04

As a proud member of the Hungarian team called “senkihaziak”, I managed to solve the following challenge for 300 points in the grab bag category on the 20th DEF CON Capture The Flag contest. The description consisted of an IP address, a port number, a password, and a hint.

Description of the challenge

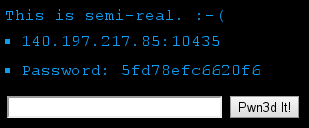
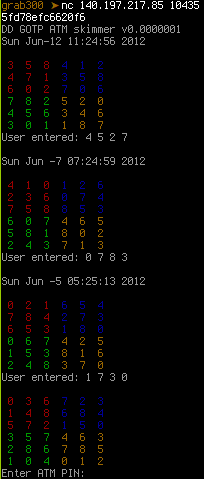
Connecting with netcat to the specified IP address and port using TCP and sending the password followed by a newline triggered the server to send back the actual challenge, utilizing ANSI escape sequences for colors.

Output of netcat after connecting and sending the password

As Buherátor pointed it out, the matrices are parts of a scheme designed to hide PIN codes in random matrices in which only the cardholder knows which digits are part of the PIN code. The service sent three matrices for which the PIN code was known and the challenge was to find the PIN code for the fourth one. As we hoped, the position of the digits within the matrices were the same for all four, so all we needed to do was to find a set of valid positions for each matrix, and apply their intersection to the fourth. I chose Python for the task, and began with connecting to the service.

PW = '5fd78efc6620f6\n'
TARGET = ('140.197.217.85', 10435)
PROMPT = 'Enter ATM PIN:'

def main():
  with closing(socket.socket()) as s:
    s.connect(TARGET)
    s.send(PW)
    buf = ''
    while PROMPT not in buf:
      buf += s.recv(4096)
    pin = buffer2pin(buf)
    s.send(pin + '\n')

The buffer2pin function parses the response of the service and returns the digits of the PIN code, separated with spaces. First, the ANSI escape sequences are stripped from the input buffer. Then, the remaining contents are split into an array of lines (buf.split('\n')), trailing and leading whitespaces get stripped (imap(str.strip, ...)), and finally, lines that doesn't contain a single digit surrounded with spaces get filtered out.

ESCAPE_RE = re.compile('\x1b\\[0;[0-9]+;[0-9]+m')
INTERESTING_RE = re.compile(' [0-9] ')

def buffer2pin(buf):
  buf = ESCAPE_RE.sub('', buf)
  buf = filter(INTERESTING_RE.search, imap(str.strip, buf.split('\n')))
  ...

By now, buf contains strings like '3 5 8 4 1 2' and 'User entered: 4 5 2 7', so it's time to build the sets of valid positions. The initial sets contain all valid numbers, and later, these sets get updated with an intersection operation. For each example (a matrix with a valid PIN code) the script joins the six lines of the matrix and removes all spaces. This results in base holding 36 digits as a string. Finally, the innen for loop iterates over the four digits in the last line of the current example (User entered: 4 5 2 7) and finds all occurences in the matrix. The resulting list of positions is intersected with the set of valid positions for the current digit (sets[n]). I know that using regular expressions for this purpose is a little bit of an overkill, but it's the least evil of the available solutions.

EXAMPLES = 3
DIGITS = 4
INIT_RANGE = range(36)

def buffer2pin(buf):
  ...
  sets = [set(INIT_RANGE) for _ in xrange(DIGITS)]
  for i in xrange(EXAMPLES):
    base = ''.join(buf[i * 7:i * 7 + 6]).replace(' ', '')
    for n, i in enumerate(ifilter(str.isdigit, buf[i * 7 + 6])):
      sets[n].intersection_update(m.start() for m in re.finditer(i, base))
  ...

The only thing that remains is to transform the fourth matrix into a 36 chars long string like the other three, and pick the digits of the resulting PIN code using the sets, which – hopefully – only contain one element each by now.

def buffer2pin(buf):
  ...
  quest = ''.join(buf[3 * 7:3 * 7 + 6]).replace(' ', '')
  return ' '.join(quest[digit.pop()] for digit in sets)

The resulting script worked almost perfectly, but after the first run, we found out that after sending a correct PIN code, several more challenges were sent, so the whole logic had to be put in an outer loop. The final script can be found on Gist, and it produced the following output, resulting in 300 points.

Result of a successful run, displaying the key


CCCamp 2011 video selection

2011-08-27

The Chaos Communication Camp was really great this year, and for those who were unable to attend (or just enjoyed the fresh air and presence of fellow hackers instead of sitting in the lecture room), the angels recorded and made all the talks available on the camp2011 page of CCC-TV.

I compiled two lists, the first one consists of talks I attended and recommend for viewing in no particular order.

  • Jayson E. Street gave a talk titled Steal Everything, Kill Everyone, Cause Total Financial Ruin! Or: How I walked in and misbehaved, and presented how he had entered various facilities with minimal effort and expertise, just by exploiting human stupidity, recklessness and incompetence. It's not really technical, and fun to watch, stuffed with photographical evidence and motivation slides.
  • While many hackers penetrate at high-level interfaces, Dan Kaminsky did it low level with his Black Ops of TCP/IP 2011 talk. Without sploilers, I can only mention some keywords: BitCoin anonimity and abuse, IP TTLs, net neutrality preservation, and the security of TCP sequence numbers. The combination of the technical content and his way of presenting it makes it worth watching.
  • Three talented hackers from the Metalab radio crew (Metafunk), Andreas Schreiner, Clemens Hopfer, and Patrick Strasser talked about Moonbounce Radio Communication, an experiment they did at the campsite with much success. Bouncing signals off the moon, which is ten times farther than communication satellites requires quite a bit of technical preparation, especially without expensive equipments.

The second list consists of talks I didn't attend but am planning to watch now the camp is over.

I'll expand the lists as the angels upload more videos to the CCC-TV site.


CC BY-SA RSS Export
Proudly powered by Utterson