VSzA techblog

My ACME wildcard certificate stack

2018-05-01

I was pretty excited when Let's Encrypt began their public beta on December 3, 2015. I spent some time looking for the best client and finally got my first certificate issued on January 11, 2016 using acme-nosudo, also known as letsencrypt-nosudo back then. It was a nice solution as the source was short and sweet, and it didn't require access to the certificate private key and even the account private key was only touched by human-readable OpenSSL command line invocations.

As soon as Let's Encrypt became popular, people started demanding wildcard certificates, and as it turned out, this marked the next milestone in my ACME client stack. On March 13, 2018, wildcard support went live, and I started doing my research again to find the perfect stack.

Although ACME (and thus Let's Encrypt) support many different methods of validation, wildcard certificates could only be validated using dns-02. This involves the ACME API giving the user a challenge, which must be later returned in the TXT record of _acme-challenge.domain.tld thus requires frequent access to DNS records. Most solutions solve the problem by invoking APIs to the biggest DNS provider, however, I don't use any of those and have no plan on doing so.

Fortunately, one day I bumped into acme-dns, which had an elegant solution to this problem. Just like http-01 and http-02 validators follow HTTP redirects, dns-01 and dns-02 behave in a similar way regarding CNAME records. By running a tiny specialized DNS server with a simple API, and pointing a CNAME record to a name that belongs to it, I could have my cake and eat it too. I only had to create the CNAME record once per domain and that's it.

The next step was finding a suitable ACME client with support for dns-02 and wildcard certificates. While there are lots of ACMEv1 clients, adoption of ACMEv2 is a bit slow, which limited my options. Also, since a whole new DNS API had to be supported, I preferred to find a project in a programming language I was comfortable contributing in.

This led me to sewer, written in Python, with full support for dns-02 and wildcard certificates, and infrastructure for DNS providers plugins. Thus writing the code was pretty painless, and I submitted a pull request on March 20, 2018. Since requests was already a dependency of the project, invoking the acme-dns HTTP API was painless, and implementing the interface was pretty straightforward. The main problem was finding the acme-dns subdomain since that's required by the HTTP API, while there's no functionality in the Python standard library to query a TXT record. I solved that using dnspython, however, that involved adding a new dependency to the project just for this small task.

I tested the result in the staging environment, which is something I'd recommend for anyone playing with Let's Encrypt to avoid running into request quotas. Interestingly, both the staging and production Let's Encrypt endpoints failed for the first attempt but worked for subsequent requests (even lots of them), so I haven't debugged this part so far. I got my first certificate issued on April 28, 2018 using this new stack, and used the following script:

from sys import argv
import sewer

dns_class = sewer.AcmeDnsDns(
        ACME_DNS_API_USER='xxxxxxxx-xxxx-xxxx-xxxx-xxxxxxxxxxxx',
        ACME_DNS_API_KEY='yyyyyyyyyyyyyyyyyyyyyyyyyyyyyyyyyyyyyyyy',
        ACME_DNS_API_BASE_URL='http://127.0.0.1:zzzz',
        )

with open('/path/to/account.key', 'r') as f:
    account_key = f.read()

with open('/path/to/certificate.key', 'r') as f:
    certificate_key = f.read()

client = sewer.Client(domain_name='*.'+argv[1],
                      domain_alt_names=[argv[1]],
                      dns_class=dns_class,
                      account_key=account_key,
                      certificate_key=certificate_key,
#                     ACME_DIRECTORY_URL='https://acme-staging-v02...',
                      LOG_LEVEL='DEBUG',
                      )

certificate = client.cert()
with open(argv[1] + '.crt', 'w') as certificate_file:
    certificate_file.write(certificate)

By pointing all the CNAME records to the same acme-dns subdomain, I could hardcode that, and even though there's an API key, I also set acme-dns to listen on localhost only to limit exposure. By specifying the ACME_DIRECTORY_URL optional argument in the sewer.Client constructor, the script can easily be used on the staging Let's Encrypt infrastructure instead of the production one. Also, at the time of this writing, certificate_key is not yet in mainline sewer, so if you'd like to try it before it's merged, take a look at my pull request regarding this.

SSTV encoding in Python for fun and profit

2013-11-03

I had been attending the HAM course for a month when I saw SSTV for the first time, and I really liked the idea of transmitting images over low bandwidth channels. I tried several solutions including QSSTV for desktop and DroidSSTV for mobile usage, but found slowrx to be the best of all, but it was receive-only. I even contributed a patch to make it usable on machines with more than one sound card (think HDMI), and started thinking about developing a transmit-only counterpart.

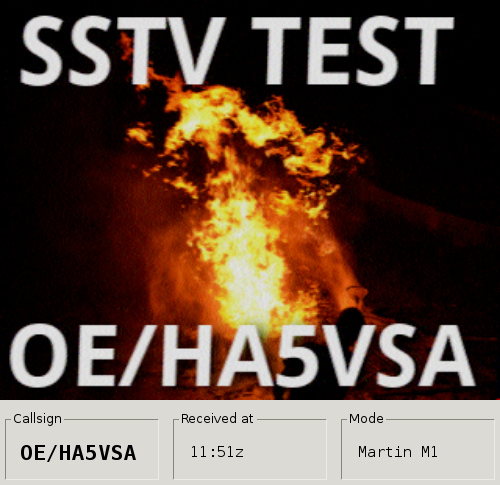
Back in the university days, vmiklos gave me the idea of implementing non-trivial tasks in Python (such as solving Sudoku puzzles in Erlang and Prolog), so I started PySSTV on a day I had time and limited network connectivity. I relied heavily on the great SSTV book and testing with slowrx. For the purposes of latter, I used the ALSA loopback device that made it possible to interconnect an application playing sound with another that records it. Below is the result of such a test with event my call sign sent in FSK being recognized at the bottom. (I used the OE prefix since it was Stadtflucht6 – thankfully, I could use the MetaFunk antenna to test the rig, although as it turned out, Austrians don't use that much SSTV as no-one replied.)

PySSTV test with slowrx in Austria

My idea was to create a simple (preferably pure Python) implementation that helped me understand how SSTV works. Although later I performed optimizations, the basic design remained the same, as outlined below. The implementation relies heavily on Python generators so if you're not familiar with things like the yield statement, I advise you to read into it first.

Phase 1 of 3: encoding images as an input to the FM modulator

As SSTV images are effectively modulated using FM, the first or innermost phase reads the input image and produces input to the FM modulator in the form of frequency-duration pairs. As the standard references milliseconds, duration is an float in ms, and since SSTV operates on voice frequencies, frequency is also an float in Hz. As Python provides powerful immutable tuples, I used them to tie these values together. The gen_freq_bits method of the SSTV class implements this and generates such tuples when called.

SSTV is a generic class located in the sstv module, and provides a frame for common functionality, such as emitting any headers and trailers. It calls methods (gen_image_tuples) and reads attributes (VIS_CODE) that can be overridden / set by descendant classes such as Robot8BW or MartinM1. Images are read using PIL objects, so the image can be loaded using simple PIL methods and/or generated/modified using Python code.

Phase 2 of 3: FM modulation and sampling

The gen_values method of the SSTV class iterates over the values returned by gen_freq_bits and implements a simple FM modulator that generates a fixed sine wave of fixed amplitude. It's also a generator that yields float values between -1 and +1, the number of those samples per seconds is determined by the samples_per_sec attribute, usually set upon initialization.

Phase 3 of 3: quantization

Although later I found that floats can also be used in WAVE (.wav) files, I wasn't aware of it earlier, so I implemented a method called gen_samples that performs quantization by iterating over the output of gen_values, yielding int values this time. I used quantization noise using additive noise, which introduced a little bit of randomness by the output, which was compensated in the test suite by using assertAlmostEqual with a delta value of 1.

Optimization and examples

Although it was meant to be a proof of concept, it turned out to be quite usable on its own. So I started profiling it, and managed to make it run so fast that now most of the time is taken by the overhead of the generators; it turns out that every yield means the cost of a function call. For example, I realized that generating a random value per sample is slow, and the quality of the output remains the same if I generate 1024 random values and use itertools.cycle to repeat them as long as there's input data.

In the end, performance was quite good on my desktop, but resulted in long runs on Raspberry Pi (more about that later). So I created two simple tools that made the output of the first two phases above accessible on the standard output. As I mentioned above, every yield was expensive at this stage of optimization, and phase 2 and 3 used the largest amount of it (one per pixel vs. one per sample). On the other hand, these two phases were the simplest ones, so I reimplemented them using C in UNIXSSTV, so gen_freq_bits.py can be used to get the best of both worlds.

I also created two examples to show the power of extensibility Python provides in such few lines of code. The examples module/directory contains scripts for

  • playing audio directly using PyAudio,
  • laying a text over the image using PIL calls, and
  • using inotify with the pyinotify bindings to implement a simple repeater.

Reception, contribution and real-world usage

After having a working version, I sent e-mails to some mailing lists and got quite a few replies. First, some people measured that it took only 240 lines to implement a few modes, and I was surprised by this. HA5CBM told me about his idea of putting a small computer and camera into a CCTV case, attaching it to an UHF radio, transmitting live imagery on a regular basis. I liked the idea and bought a Raspberry Pi, which can generate a Martin M2 modulated WAVE file using UNIXSSTV in 30 seconds. Documentation and photos can be found on the H.A.C.K. project page, source code is available in a GitHub repo.

Contribution came from another direction, Joël Franusic submitted a pull request called Minor updates which improved some things in the code and raised my motivation. In the end, he created a dial-a-cat service and posted a great write-up on the Twilio blog.

If you do something like this, I'd be glad to hear about it, the source code is available under MIT license in my GitHub repository and on PyPI.


F33dme vs. Django 1.4 HOWTO

2013-05-31

Although asciimoo unofficially abandoned it for potion, I've been using f33dme with slight modifications as a feed reader since May 2011. On 4th May 2013, Debian released Wheezy, so when I upgraded the server I ran my f33dme instance on, I got Django 1.4 along with it. As with major upgrades, nothing worked after the upgrade, so I had to tweak the code to make it work with the new release of the framework.

First of all, the database configuration in settings.py were just simple key-value pairs like DATABASE_ENGINE = 'sqlite3', these had to be replaced with a more structured block like the one below.

DATABASES = {
    'default': {
        'ENGINE': 'sqlite3',
        ...
    }
}

Then starting the service using manage.py displayed the following error message.

Error: One or more models did not validate:
admin.logentry: 'user' has a relation with model
    <class 'django.contrib.auth.models.User'>, which
    has either not been installed or is abstract.

Abdul Rafi wrote on Stack Overflow that such issues could be solved by adding django.contrib.auth to INSTALLED_APPS, and in case of f33dme, it was already there, I just had to uncomment it. After this modification, manage.py started without problems, but rendering the page resulted in the error message below.

ImproperlyConfigured: Error importing template source loader
    django.template.loaders.filesystem.load_template_source: "'module'
    object has no attribute 'load_template_source'"

Searching the web for the text above led me to another Stack Overflow question, and correcting the template loaders section in settings.py solved the issue. Although it's not a strictly Django-related problem, but another component called feedparser also got upgraded and started returning such values that resulted in TypeError exceptions, so the handler in fetch.py also had to be extended to deal with such cases.

With the modifications described above, f33dme now works like a charm, although deprecation warnings still get written to the logs both from Django and feedparser, but these can be dealt with till the next Debian upgrade, and until then, I have a working feed reader.


Bootstrapping MySQL for testing

2013-05-06

When I created registr, I wanted a way to test it on the same RDBMS as the one I use for Redmine, MySQL. For the purposes of testing, I wanted to start a fresh instance of mysqld that could be ran without superuser privileges, without affecting other running MySQL instances, and with minimal resource consumtion.

Although the test suite was developed in Python, the idea can be used with any language that makes it possible to create temporary directories in a manner that avoids race conditions and spawn processes. The code can be found in the TestRedmineMySQL class, and it follows the steps described below.

  • Create a temporary directory (path)
  • Create a directory inside path (datadir)
  • Generate two filenames inside path (socket and pidfile)
  • Spawn the mysqld_safe binary with the following parameters.
    • --socket= and the value of socket makes MySQL accept connections throught that file
    • --datadir= and the value of datadir makes MySQL store all databases in that directory
    • --skip-networking disables the TCP listener, thus minimizes interference with other instances
    • --skip_grant_tables disables access control, since we don't need that for testing
    • --pid-file= and the value of pidfile makes MySQL store the process ID in that file
  • Do what you want with the database
  • Open the file named pidfile and read an integer from the only row
  • Send a SIGTERM to the PID
  • Wait for the process to finish.

The above way worked fine for me, didn't leave any garbage on the system, and ran as fast as an Oracle product could do. :)


Single mbox outbox vs. multiple IMAP accounts

2013-04-01

As I've mentioned in February 2013, I started using mutt in December 2012 and as a transitional state, I've been using my three IMAP accounts in on-line mode, like I did with KMail. All outgoing mail got recorded in an mbox file called ~/Mail/Sent for all three accounts, which was not intentional, but a configuration glitch at first. But now I realized that it has two positive side effects when I'm using cellular Internet connection. Since this way, the MUA doesn't upload the message using IMAP to the Sent folder, resulting in 50% less data sent, which makes sending mail faster and saves precious megabytes in my mobile data plan.

However, I still prefer having my sent mail present in the Sent folder of my IMAP accounts, so I needed a solution to transfer the contents of an mbox file to IMAP folders based on the From field. I preferred Python for the task as the standard library had support for both IMAP and mbox out of the box, and I've already had good experience with the former. Many solutions I found used Python as well, but none of them had support for multiple IMAP accounts and many used deprecated classes, or treated the process as a one-shot operation, while I planned to use this to upload my mbox regularly to IMAP.

So I decided to write a simple script, which I completed in about an hour or two that did exactly what I need, and still had no dependencies to anything that's not part of the standard library. The script has support for invocation from other modules and the command line as well, core functionality was implemented in the process_mbox method of the OutboxSyncer class. The method gets the Mailbox object and a reference for a database as parameters, latter is used to ensure that all messages are uploaded exactly once, even in case of exceptions or parallel invocations.

for key, msg in mbox.iteritems():
    account, date_time = msg.get_from().split(' ', 1)
    contents = mbox.get_string(key)
    msg_hash = HASH_ALGO(contents).hexdigest()
    params = (msg_hash, account)

The built-in iterator of the mailbox is used to iterate through messages in a memory-efficient way. Both key and msg are needed as former is needed to obtain the raw message as a byte string (contents), while latter makes parsed data, such as the sender (account) and the timestamp (date_time) accessible. The contents of the message is hashed (currently using SHA-256) to get a unique identifier for database storage. In the last line, params is instantiated for later usage in parameterized database queries.

with db:
    cur.execute(
        'SELECT COUNT(*) FROM messages WHERE hash = ? AND account = ?',
        params)
    ((count,),) = cur.fetchall()
    if count == 0:
        cur.execute('INSERT INTO messages (hash, account) VALUES (?, ?)',
            params)
    else:
        continue

By using the context manager of the database object, checking whether the message free for processing and locking it is done in a single transaction, resulting in a ROLLBACK in case an exception gets thrown and in a COMMIT otherwise. Assigning the variable count was done this way to assert that the result has a single row with a single column. If the message is locked or has already been uploaded, the mailbox iterator is advanced without further processing using continue.

try:
    acc_cfg = accounts[account]
    imap = self.get_imap_connection(account, acc_cfg)
    response, _ = imap.append(acc_cfg['folder'], r'\Seen',
            parsedate(date_time), contents)
    assert response == 'OK'

After the message is locked for processing, it gets uploaded to the IMAP account into the folder specified in the configuration. The class has a get_imap_connection method that calls the appropriate imaplib constructors and takes care of connection pooling to avoid connection and disconnection for every message processed. The return value of the IMAP server is checked to avoid silent fail.

except:
    with db:
        cur.execute('DELETE FROM messages WHERE hash = ? AND account = ?',
            params)
    raise
else:
    print('Appended', msg_hash, 'to', account)
    with db:
        cur.execute(
            'UPDATE messages SET success = 1 WHERE hash = ? AND account = ?',
            params)

In case of errors, the message lock gets released and the exception is re-raised to stop the process. Otherwise, the success flag is set to 1, and processing continues with the next message. Source code is available in my GitHub repository under MIT license, feel free to fork and send pull requests or comment on the code there.


Two tools to aid protocol reverse engineering

2013-03-14

Lately I analyzed a closed-source proprietary thick client application that rolled its own cryptography, including the one used for the network layer. To aid the protocol analysis, I needed two tools with a shared input. The input was the flow of packets sent and received by the application, which I first tried to extract using the hex output of tshark, but I realized that it displayed data from layers above TCP I didn't need, and on the other hand, it didn't perform TCP reassembly, which I didn't want to do by hand or reinventing the wheel.

So I decided to use the output of the Follow TCP stream function of Wireshark, in hex mode to be precise. It can be saved to a plain text file with a single click, and it just had what I needed: offsets and easily parseable hex data. I've written a simple parser based on regular expressions that could read such file, starting by defining the actual expressions. The first one matches a single line, starting with whitespace in case of packets sent, and nothing if received (group 1). This is followed by a hex offset of the row (group 2), the row data encoded in 1 to 16 hex bytes (group 3), and the ASCII dump of the row data. Latter is padded, so by limiting group 3 to 49 characters, it could be ignored effectively. I used the re.I flag so I didn't have to write a-fA-F everywhere instead of a-f explicitly.

import re

FLOW_ROW_RE = re.compile(r'^(\s*)([0-9a-f]+)\s+([0-9a-f\s]{1,49})', re.I)
NON_HEX_RE = re.compile(r'[^0-9a-f]', re.I)

The Flow class itself is a list of entries, so I made the class inherit from list and added a custom constructor. I also added an inner class called Entry for the entries and two constants to indicate packet directions. I used a namedtuple to provide some formality over using a dict. The constructor expects the name of a file from Wireshark, opens it and populates the list using the parent constructor and a generator function called load_flow.

from collections import namedtuple

class Flow(list):
    Entry = namedtuple('Entry', ['direction', 'data', 'offset'])
    SENT = 'sent'
    RECEIVED = 'received'
    DIRECTIONS = [SENT, RECEIVED]

    def __init__(self, filename):
        with file(filename, 'r') as flow_file:
            list.__init__(self, load_flow(flow_file))

This load_flow got a file object, which it used as an iterator, returning each line of the input file. It got mapped using imap to regular expression match objects, and filtered using ifilter to ignore rows that didn't match. In the body of the loop, all three match groups are parsed, and sanity checks are performed on the offset to make sure to bytes were lost during parsing. For this purpose, a dict is used, initialized to zeros before the loop, and incremented after each row to measure the number of bytes read in both directions.

from binascii import unhexlify
from itertools import imap, ifilter

def load_flow(flow_file):
    offset_cache = {Flow.SENT: 0, Flow.RECEIVED: 0}
    for m in ifilter(None, imap(FLOW_ROW_RE.match, flow_file)):
        direction = Flow.SENT if m.group(1) == '' else Flow.RECEIVED
        offset = int(m.group(2), 16)
        data = unhexlify(NON_HEX_RE.sub('', m.group(3)))
        last_offset = offset_cache[direction]
        assert last_offset == offset
        offset_cache[direction] = last_offset + len(data)

The rest of the function is some code that (as of 14 March 2013) needs some cleaning, and handles yielding Flow.Entry objects properly, squashing entries spanning multiple rows at the same time.

As I mentioned in the beginning, there were two kinds of functionality I needed, both of which use these Flow objects as an input. The first one is a fake client/server that makes it possible to generate network traffic quickly by using previously captured flows, called flowfake. It simply replays flows from a selected viewpoint using plain sockets, either as a client or a server.

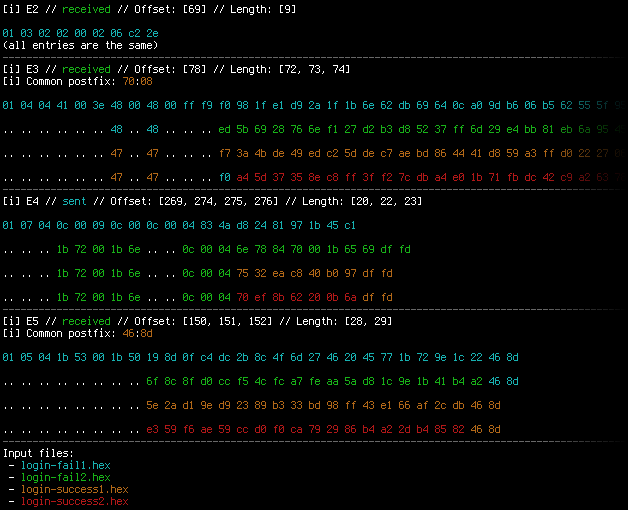
The second one is more interesting and complex (at least for me) as it makes possible to view the differences (or similarities, depending on the use-case) between 2 to 4 flows (latter being an ad-hoc limit based on the colors defined) using simple algorithms and colors to aid visual analysis. For better understanding, see the screenshot below to understand how it works on four flows. The whole project is available under MIT license in a GitHub repo.

Screenshot of flowdiff


Generating XSRF PoC from Burp with Python

2013-02-20

Burp Suite is the tool I'd feel lost without when testing web applications, we even bought the pro version, since it's a great tool with a low price tag. One of its great features is generating proof-of-concept HTML forms for Cross-Site Request Forgery (CSRF or XSRF) testing, and it usually just works out of the box. As it works using HTTP POST data, it has no information about the character-level encoding of the data, so when it comes to applications with accented characters (not a rare thing in Hungary), it just generates garbage, which needs to be fixed manually, but it's not a big problem.

However, today, I met another limitation; when testing an ASP.NET application with quite a big ViewState (the HTTP post request was around 150 KB), Burp outputs only the first 4096 byte or so, and then continues to build the next field, even without closing the <input> tag or its value attribute. (It's also obvious from this that it uses string manipulation to serialize data into HTML, which sounds odd from a security-related software product.)

Since I really needed a working solution, I created a simple Python script to parse the XML export of a HTTP request from Burp and create an HTML page with a form that have values sent in the request preset. I used LXML to both parse the input XML and serialize the HTML output to avoid the pitfalls Burp met, and first, I loaded the Burp XML request file. XPath was used to get the first item (such exports can store more than one), and to extract the method, URL and request information. Using the single-element tuple assignment syntax asserts that the right-hand side of the assignment contains one and only one element, asserting the sanity of the input.

from lxml import etree

root = etree.parse(input_file).getroot()
item = root.xpath("/items/item")[0]
(method,) = item.xpath("method/text()")
if method.lower() != "post":
    raise ValueError("Only POST requests are supported")
(url,) = item.xpath("url/text()")
(request,) = item.xpath("request")

Burp can encode the request body using Base64, so it should be checked for and decoded if necessary. The resulting body contains the HTTP headers and the encoded POST data, separated by an empty line, so splitting it is pretty straightforward. The second parameter of the split method stops after the first split, and naming the first result with an underscore makes it apparent for both humans and machines that we don't care about that piece of data.

from base64 import b64decode

contents = request.text
if request.get("base64"):
    contents = b64decode(contents)
_, body = contents.split("\r\n\r\n", 1)

I wrote a small generator function that yields the names and values of each form field as tuples of Unicode objects. I initially used string manipulation, then discovered that Python had me covered with urlparse.

from urlparse import parse_qsl

def decode_form_urlencoded_values(request_body, encoding):
    for pair in parse_qsl(request_body, keep_blank_values=True):
        yield tuple(i.decode(encoding) for i in pair)

With this done, I just had to build the resulting HTML. I used LXML's E-Factory and Python's argument list unpacking to make it happen in a more or less readable way.

from lxml.html import builder as E
import codecs

output = E.HTML(
    E.HEAD(E.META(**{'http-equiv': 'Content-type',
        'content': 'text/html; charset=' + encoding})),
    E.BODY(
        E.FORM(
            E.INPUT(type="submit"),
            *(E.INPUT(type="hidden", name=name, value=value) for name, value
                in decode_form_urlencoded_values(body, encoding)),
            action=url, method=method
            )
        )
    )
with codecs.open(output_file, 'wb', encoding) as html_output:
    html_output.write(html.tostring(output, encoding=unicode))

The complete and working script can be downloaded from my GitHub repository, and in case you've been wondering if it was worth it; yes, the PoC proved that the target application with the 150 KB ViewState was indeed vulnerable to XSRF.


LibreOffice 4.0 workaround for read-only FS

2013-02-10

LibreOffice 4.0 got released on 7th February, and since it offered improved OOXML interoperability, I immediately downloaded and installed it on my laptop. It worked quite well, but after the next boot, it just flashed the window for a tenth of a second, and displayed the following output on the console.

Fatal Python error: Py_Initialize: Unable to get the locale encoding
Traceback (most recent call last):
  File "<frozen importlib._bootstrap>", line 1558, in _find_and_load
  File "<frozen importlib._bootstrap>", line 1525, in _find_and_load_unlocked
  File "<frozen importlib._bootstrap>", line 586, in _check_name_wrapper
  File "<frozen importlib._bootstrap>", line 1023, in load_module
  File "<frozen importlib._bootstrap>", line 1004, in load_module
  File "<frozen importlib._bootstrap>", line 562, in module_for_loader_wrapper
  File "<frozen importlib._bootstrap>", line 854, in _load_module
  File "<frozen importlib._bootstrap>", line 990, in get_code
  File "<frozen importlib._bootstrap>", line 1051, in _cache_bytecode
  File "<frozen importlib._bootstrap>", line 1065, in set_data
OSError: [Errno 30] Read-only file system: '/usr/local/opt/libreoffice4.0/program/../program/python-core-3.3.0/lib/encodings/__pycache__'

I symlinked /opt to /usr/local/opt, and for many reasons (including faster boot, storing /usr on an SSD) I mount /usr in read-only mode by default, and use the following snippet in /etc/apt/apt.conf.d/12remount to do the magic upon system upgrade and software installs.

DPkg
{
    Pre-Invoke {"mount -o remount,rw /usr && mount -o remount,exec /var && mount -o remount,exec /tmp";};
    Post-Invoke {"mount -o remount,ro /usr ; mount -o remount,noexec /var && mount -o remount,noexec /tmp";};
}

It seems that LibreOffice 4.0 tries to put compiled Python objects into a persistent cache, and since it resides on a read-only filesystem, it cannot even create the __pycache__ directories needed for that. My workaround is the following shell script that needs to be ran just once, and works quite well by letting LibreOffice put its cached pyc files into /tmp.

#!/bin/sh
mount /usr -o rw,remount
find /opt/libreoffice4.0/program/python-core-3.3.0/lib -type d \
    -exec ln -s /tmp {}/__pycache__ \;
mount /usr -o ro,remount

Complementing Python GPGME with M2Crypto

2012-12-31

While the GPGME Python bindings provide interface to most of the functionality provided by GnuPG, so I could generate keys and perform encryption and decryption using them, I found that it wasn't possible to list, which public keys can decrypt a PGP encrypted file. Of course, it's always a possibility to invoke the gpg binary, but I wanted to avoid spawning processes if possible.

As Heikki Toivonen mentioned in a Stack Overflow thread, the M2Crypto library had a PGP module, and based on a demo code, it seemed to be able to parse OpenPGP files into meaningful structures, including pke_packet that contains an attribute called keyid. I installed the module from the Debian package python-m2crypto, tried calling the PGP parser functionality, and found that

  • the keyid attribute is called _keyid now, and
  • after returning the pke_packet instances, it raises an XXXError in case of OpenPGP output generated by GnuPG 1.4.12.

It's also important to note that the M2Crypto keyid is an 8 bytes long raw byte string, while GPGME uses 16 characters long uppercase hex strings for the same purpose. I chose to convert the former to the latter format, resulting in a set of hexadecimal key IDs. Later, I could check, which keys available in the current keyring are able to decrypt the file. The get_acl function thus returns a dict mapping e-mail addresses to a boolean value that indicates the key's ability to decrypt the file specified in the filename parameter.

from M2Crypto import PGP
from contextlib import closing
from binascii import hexlify
import gpgme

def get_acl(filename):
    with file(filename, 'rb') as stream:
        with closing(PGP.packet_stream(stream)) as ps:
            own_pk = set(packet_stream2hexkeys(ps))
    return dict(
            (k.uids[0].email, any(s.keyid in own_pk for s in k.subkeys))
            for k in gpgme.Context().keylist())

def packet_stream2hexkeys(ps):
    try:
        while True:
            pkt = ps.read()
            if pkt is None:
                break
            elif pkt and isinstance(pkt, PGP.pke_packet):
                yield hexlify(pkt._keyid).upper()
    except:
        pass

Connecting Baofeng UV-5R to a Linux box

2012-12-23

Ever since I bought my Baofeng UV-5R handheld VHF/UHF FM transceiver, I wanted to hook it up to my notebook – partly to populate the channel list without fighting the crippled UI, partly out of curiosity. First, I had to build a cable, since I didn't receive one in the package, and it would've cost at least around 20 bucks to get my hands on one – plus the delay involved in postal delivery. In a Yahoo! group, jwheatleyus mentioned the following pinout:

  • 3.5mm Plug Programming Pins
    • Sleeve: Mic – (and PTT) Rx Data
    • Ring: Mic +
    • Tip: +V
  • 2.5mm Plug
    • Sleeve: Speaker – (and PTT) Data GND
    • Ring: Tx Data
    • Tip: Speaker +
  • Connect Sleeve to Sleeve for PTT

I took apart the headset bundled with the gear, and verified this pinout in case of the Mic/Speaker/PTT lines with a multimeter, so I only had to connect these pins to the notebook. Since I already had an FTDI TTL-232R-5V cable lying around for use with my Diavolino (actually, I won both of them on the LoL shield contest at 27C3), I created a breakout board that can be connected to the radio, and had pin headers just in the right order for the FTDI cable and two others for speaker and mic lines. The schematic and the resulting hardware can be seen below.

Baofeng UV-5R breakout board

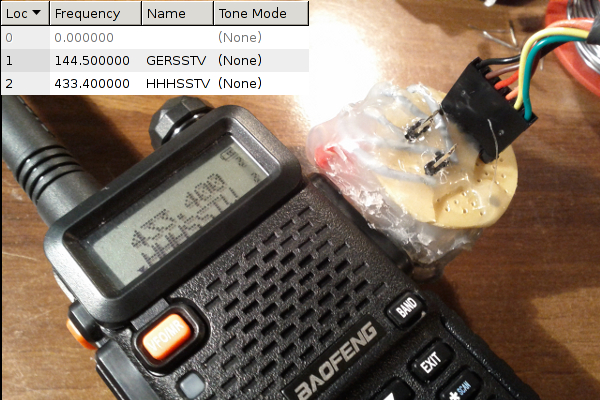
With the physical layer ready, I only had to find some way to manipulate the radio using software running on the notebook. While many software available for this radio is either closed and/or available for Windows only, I found Chirp, a FLOSS solution written in Python (thus available for all sane platforms) which – as of this writing – could access Baofeng UV-5R in the experimental daily builds. Like most Python software, Chirp doesn't require any install procedures either, downloading and extracting the tarball led to a functional and minimalistic GUI. First, I set the second tuner to display the name of the channel, and uploaded a channel list with the Hármashatár-hegy SSTV relay (thus the name HHHSSTV) at position 2, with the following results.

HHHSSTV channel stored on Baofeng UV-5R

I could also access an interesting tab named other settings that made it possible to edit the message displayed upon startup and limit the frequency range in both bands.

Other settings and their effect on Baofeng UV-5R

Although Chirp states that the driver for UV-5R is still experimental, I didn't have any problems with it, and as it's written in Python, its code is readable and extensible, while avoiding cryptic dependencies. It's definitely worth a try, and if lack of PC connectivity without proprietary software was a reason for you to avoid this radio, then I have good news for you.


Leaking data using DIY USB HID device

2012-10-29

Years ago, there was a competition, where contestants had to extract date out of a system that was protected by a state-of-the-art anti-leaking solution. Such challenges are based on the fact that private information should be available for use on a protected computer, but it must stay within the physical boundaries of the system. Obvious methods like networking and removable storage devices are usually covered by these mechanisms, but as with DRM, it's difficult – if not impossible – to think of every possibility. For example, in the aforementioned challenge, some guys used the audio output to get a file off the box – and when I heard about the Little Wire project, I started thinking about a new vector.

The requirements for my solution was to be able to extract data out of a

  • Windows 7 box
  • with no additional software installed
  • logged in as non-administrative account
  • that only allows a display, a keyboard and a mouse to be connected.

My idea was to use a USB HID device, since these can be connected to such system without additional drivers or special privileges. I've already built such a device for interfacing JTAG using an Arduino clone and V-USB, so I could reuse both hardware and experience, but avoid using an external programmer. The V-USB library made it possible for me to create an USB device without buying purpose-built hardware, by bit-banging the USB protocol with the general-purpose input and output pins of an AVR ATmega328 microcontroller. When used correctly, the AVR device shows up as a regular keyboard in the Windows 7 devices dialog.

USBpwn in the Windows 7 devices dialog

Keyboard was a logical choice for data extraction, since it was the only part of the HID specification that has a three bit wide output channel that's controllable without drivers and/or administrative privileges: the NUM, CAPS and SCROLL lock status LEDs. I've crafted a simple protocol that used NUM and CAPS as two data bits and SCROLL as a clock signal. When the SCROLL LED was on, the other two LEDs could be sampled for data. The newline (that could be achieved by “pressing” the Enter/Return key, since we're already “keyboards”) was the acknowledgement signal, making the protocol fully synchronous. For example, the bits 1101 could be sent in the following way:

            __________________________________
   NUM ____/
                               _______________
  CAPS _______________________/
                ______            ______
SCROLL ________/      \__________/      \_____

                  01                11

On the Windows host, an extractor agent was needed, that performed the transfer using the following code snippet:

set_lock(NUM,  (frame & 0x01) == 0x01);
set_lock(CAPS, (frame & 0x02) == 0x02);
set_lock(SCROLL, 1);
getchar();
toggle_key(SCROLL);

Bits were sent from LSB to MSB, n bytes were sent from 0 to n-1, stored at the nth position in the EEPROM. I tried using an SD card to store the data received, but it conflicted with the V-USB library, so I had to use the built-in EEPROM – the MCU I used was the ATmega328, which had 1 kbyte of it, which limited the size of the largest file that could be extracted.

Of course, the aforementoned agent had to be placed on the Windows box before transmitting file contents. The problem was similar to using dumb bindshell shellcodes to upload binary content, and most people solved it by using debug.com. Although it's there on most versions of Windows, it has its limitations: the output file can be 64 kilobytes at maximum, and it requires data to be typed using hexadecimal characters, which requires at least two characters per byte.

In contrast, base64 requires only 4 characters per 3 bytes (33% overhead instead of 100%), and there's a way to do it on recent Windows systems using a good old friend of ours: Visual Basic. I created a simple VBS skeleton that decodes base64 strings and saves the binary output to a file, and another simple Python script that fills the skeleton base64-encoded content, and also compresses it (like JS and CSS minifiers on the web). The output of the minified version is something like the one below.

Dim a,b
Set a=CreateObject("Msxml2.DOMDocument.3.0").CreateElement("base64")
a.dataType="bin.base64"
a.text="TVpQAAIAAAAEAA8A//8AALgAAAAAAAAAQAAaAAAAAAAAAAAAAAAAAA..."
Set b=CreateObject("ADODB.Stream")
b.Type=1
b.Open
b.Write a.nodeTypedValue
b.SaveToFile "foo.exe",2

The result is such a solution that makes it possible to carry a Windows agent (a simple exe program) that can be typed in from the Flash memory of the AVR, which, when executed, can leak any file using the LEDs. I successfully demonstrated these abilities at Hacktivity 2012, my slideshow is available for download on the Silent Signal homepage, videos should be posted soon. The hardware itself can be seen below, the self-made USB interface shield is the same as the one in the V-USB wiki hardware page.

USBpwn hardware

The hardware itself is bulky, and I won't try to make it smaller and faster any time soon, since I've already heard enough people considering it weaponized. Anyway, the proof-of-concept hardware and software solution

  • can type in 13 characters per seconds from the flash memory of the AVR,
  • which results in 10 bytes per seconds (considering base64 encoding),
  • and after deploying the agent, it can read LEDs with 1.24 effective bytes per second.

All the code is available in my GitHub repositories:


DEF CON 20 CTF grab bag 300 writeup

2012-06-04

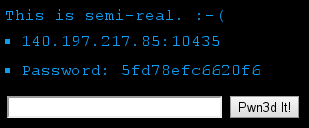
As a proud member of the Hungarian team called “senkihaziak”, I managed to solve the following challenge for 300 points in the grab bag category on the 20th DEF CON Capture The Flag contest. The description consisted of an IP address, a port number, a password, and a hint.

Description of the challenge

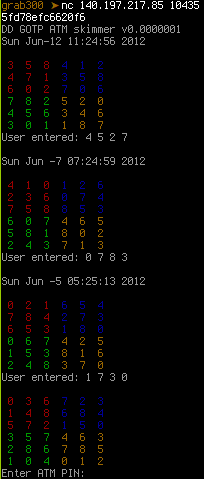
Connecting with netcat to the specified IP address and port using TCP and sending the password followed by a newline triggered the server to send back the actual challenge, utilizing ANSI escape sequences for colors.

Output of netcat after connecting and sending the password

As Buherátor pointed it out, the matrices are parts of a scheme designed to hide PIN codes in random matrices in which only the cardholder knows which digits are part of the PIN code. The service sent three matrices for which the PIN code was known and the challenge was to find the PIN code for the fourth one. As we hoped, the position of the digits within the matrices were the same for all four, so all we needed to do was to find a set of valid positions for each matrix, and apply their intersection to the fourth. I chose Python for the task, and began with connecting to the service.

PW = '5fd78efc6620f6\n'
TARGET = ('140.197.217.85', 10435)
PROMPT = 'Enter ATM PIN:'

def main():
  with closing(socket.socket()) as s:
    s.connect(TARGET)
    s.send(PW)
    buf = ''
    while PROMPT not in buf:
      buf += s.recv(4096)
    pin = buffer2pin(buf)
    s.send(pin + '\n')

The buffer2pin function parses the response of the service and returns the digits of the PIN code, separated with spaces. First, the ANSI escape sequences are stripped from the input buffer. Then, the remaining contents are split into an array of lines (buf.split('\n')), trailing and leading whitespaces get stripped (imap(str.strip, ...)), and finally, lines that doesn't contain a single digit surrounded with spaces get filtered out.

ESCAPE_RE = re.compile('\x1b\\[0;[0-9]+;[0-9]+m')
INTERESTING_RE = re.compile(' [0-9] ')

def buffer2pin(buf):
  buf = ESCAPE_RE.sub('', buf)
  buf = filter(INTERESTING_RE.search, imap(str.strip, buf.split('\n')))
  ...

By now, buf contains strings like '3 5 8 4 1 2' and 'User entered: 4 5 2 7', so it's time to build the sets of valid positions. The initial sets contain all valid numbers, and later, these sets get updated with an intersection operation. For each example (a matrix with a valid PIN code) the script joins the six lines of the matrix and removes all spaces. This results in base holding 36 digits as a string. Finally, the innen for loop iterates over the four digits in the last line of the current example (User entered: 4 5 2 7) and finds all occurences in the matrix. The resulting list of positions is intersected with the set of valid positions for the current digit (sets[n]). I know that using regular expressions for this purpose is a little bit of an overkill, but it's the least evil of the available solutions.

EXAMPLES = 3
DIGITS = 4
INIT_RANGE = range(36)

def buffer2pin(buf):
  ...
  sets = [set(INIT_RANGE) for _ in xrange(DIGITS)]
  for i in xrange(EXAMPLES):
    base = ''.join(buf[i * 7:i * 7 + 6]).replace(' ', '')
    for n, i in enumerate(ifilter(str.isdigit, buf[i * 7 + 6])):
      sets[n].intersection_update(m.start() for m in re.finditer(i, base))
  ...

The only thing that remains is to transform the fourth matrix into a 36 chars long string like the other three, and pick the digits of the resulting PIN code using the sets, which – hopefully – only contain one element each by now.

def buffer2pin(buf):
  ...
  quest = ''.join(buf[3 * 7:3 * 7 + 6]).replace(' ', '')
  return ' '.join(quest[digit.pop()] for digit in sets)

The resulting script worked almost perfectly, but after the first run, we found out that after sending a correct PIN code, several more challenges were sent, so the whole logic had to be put in an outer loop. The final script can be found on Gist, and it produced the following output, resulting in 300 points.

Result of a successful run, displaying the key


Mounting Sympa shared directories with FUSE

2012-03-29

The database laboratory course at the Budapest University of Technology and Economics which I collaborate with as a lecturer uses Sympa for mailing lists and file sharing. Latter is not one of the most used features of this software, and the web interface feels sluggish, not to mention the lots of leftover files in my Downloads directory for each attempt to view one page of a certain file. I understood that using the same software for these two tasks made managing user accounts easier, so I tried to come up with a solution that makes it easier to handle these files with the existing setup.

First, I searched whether an API for Sympa exists and I found that while they created the Sympa SOAP server, it only handles common use-cases related to mailing lists management, so it can be considered a dead end. This meant that my solution had to use the web interface, so I selected an old and a new tool for the task: LXML for parsing, since I already knew of its power, and requests for handling HTTP, because of its fame. These two tools made it possible to create half of the solution first, resulting in a Sympa API that can be used independently of the file system bridge.

Two things I found particularly great about requests were that its handling of sessions was superior than any APIs I've ever seen, and that it was possible to retrieve the results in multiple formats (raw socket, bytes, Unicode text). Since I only had one Sympa installation to test with, I only hacked the code so far to make it work, so for example, I had to use regular expressions to strip the XML and HTML encoding information, since both stated us-ascii while the output was in ISO-8859-2, correctly stated in the HTTP Content-type header.

In the second half of the time, I had to create a bridge between the file system and the API I created, and FUSE was my natural choice. Choosing the Python binding was not so easy, as a Debian user, the python-fuse package seemed like a logical choice, but as Matt Joiner wrote in his answer on a related Stack Overflow question, fusepy was a better choice. Using one of the examples, I managed to build an experimental version of SympaFS with naive caching and session management, but it works!

$ mkdir /tmp/sympa
$ python sympafs.py https://foo.tld/lists foo@bar.tld adatlabor /tmp/sympa
Password:
$ mount | fgrep sympa
SympaFS on /tmp/sympa type fuse (rw,nosuid,nodev,relatime,user_id=1000,
group_id=1000)
$ ls -l /tmp/sympa/2012
összesen 0
-r-xr-xr-x 1 root root  11776 febr   9 00:00 CensoredFile1.doc
-r-xr-xr-x 1 root root 161792 febr  22 00:00 CensoredFile2.xls
-r-xr-xr-x 1 root root  39424 febr   9 00:00 CensoredFile3.doc
dr-xr-xr-x 2 root root      0 febr  14 00:00 CensoredDir1
dr-xr-xr-x 2 root root      0 ápr    4  2011 CensoredDir2
$ file /tmp/sympa/2012/CensoredFile1.doc
Composite Document File V2 Document, Little Endian, Os: Windows, Version
5.1, Code page: 1252, Author: Censored, Last Saved By: User, Name of
Creating Application: Microsoft Excel, Last Printed: Tue Feb 14 15:00:39
2012, Create Time/Date: Wed Feb  8 21:51:10 2012, Last Saved Time/Date:
Wed Feb 22 08:10:20 2012, Security: 0
$ fusermount -u /tmp/sympa

Reverse engineering chinese scope with USB

2012-03-04

The members of H.A.C.K. – one of the less wealthy hackerspaces – felt happy at first, when the place could afford to buy a slightly used UNI-T UT2025B digital storage oscilloscope. Besides being useful as a part of the infrastructure, having a USB and an RS-232 port seized our imagination – one of the interesting use-cases is the ability to capture screenshots from the device to illustrate documentation. As I tried interfacing the device, I found that supporting multiple platforms meant Windows XP and 2000 for the developers, which are not very common in the place.

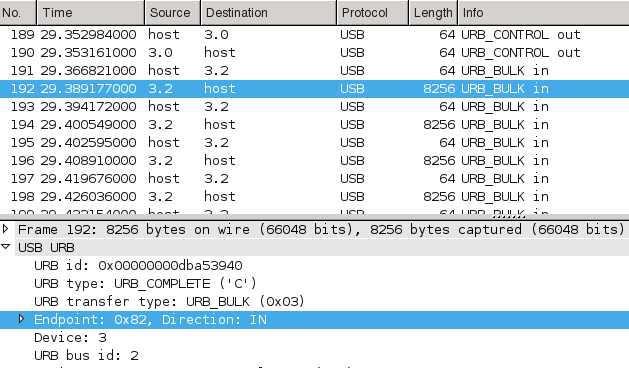
I installed the original software in a virtual machine, and tried the serial port first, but found out, that although most of the functionality worked, taking screenshots is one available only using USB. I connected the scope using USB next, and although the vendor-product tuple was present in the list of USB IDs, so lsusb could identify it, no drivers in the kernel tried to take control of the device. So I started looking for USB sniffing software and found that on Linux, Wireshark is capable of doing just that. I forwarded the USB device into the VM and captured a screenshot transmission for analysis. Wireshark was very handy during analysis as well – just like in case of TCP/IP – so it was easy to spot the multi-kilobyte bulk transfer among tiny 64 byte long control packets.

Wireshark analysis of screenshot transmission via USB

I started looking for simple ways to reproduce the exact same conversation using free software – I've used libusb before while experimenting with V-USB on the Free USB JTAG interface project, but C requires compilation, and adding things like image processing makes the final product harder to use on other computers. For these purposes, I usually choose Python, and as it turned out, the PyUSB library makes it possible to access libusb 0.1, libusb 1.0 and OpenUSB through a single pythonic layer. Using this knowledge, it was pretty straightforward to modify their getting started example and replicate the “PC end” of the conversation. The core of the resulting code is the following.

dev = usb.core.find(idVendor=0x5656, idProduct=0x0832)
if dev is None:
    print >>sys.stderr, 'USB device cannot be found, check connection'
    sys.exit(1)

dev.set_configuration()
dev.ctrl_transfer(ReqType.CTRL_OUT, 177, 0x2C, 0)
dev.ctrl_transfer(ReqType.CTRL_IN, 178, 0, 0, 8)
for i in [0xF0] + [0x2C] * 10 + [0xCC] * 10 + [0xE2]:
    dev.ctrl_transfer(ReqType.CTRL_OUT, 177, i, 0)

try:
    dev.ctrl_transfer(ReqType.CTRL_OUT, 176, 0, 38)
    for bufsize in [8192] * 4 + [6144]:
        buf = dev.read(Endpoint.BULK_IN, bufsize, 0)
        buf.tofile(sys.stdout)
    dev.ctrl_transfer(ReqType.CTRL_OUT, 177, 0xF1, 0)
except usb.core.USBError:
    print >>sys.stderr, 'Image transfer error, try again'
    sys.exit(1)

Using this, I managed to get a binary dump of 38912 bytes, which contained the precious screenshot. From my experience with the original software, I already knew that the resolution is 320 by 240 pixels – which meant that 4 bits made up each pixel. Using this information, I started generating bitmaps from the binary dump in the hope of identifying some patterns visually as I already knew what was on the screen. The first results were the result of converting each 4-bit value to a pixel coloured on a linear scale from 0 = black to 15 = white, and looked like the following.

Early version of a converted screenshot

Most of the elements looked like they're in the right spot, and both horizontal and vertical lines seemed intact, apart from the corners. Also, the linear mapping resulted in an overly bright image, and as it seemed, the firmware was transmitting 4-bit (16 color) images, even though the device only had a monochrome LCD – and the Windows software downgraded the quality before displaying it on the PC on purpose. After some fiddling, I figured out that the pixels were transmitted in 16-bit words, and the order of the pixels inside these were 3, 4, 1, 2 (“mixed endian”). After I added code to compensate for this and created a more readable color mapping I finally had a script that could produce colorful PNGs out of the BLOBs, see below for an example.

Final version of a converted screenshot

In the end, my solution is not only free as in both senses and runs on more platforms, but can capture 8 times more colors than the original one. All code is published under MIT license, and further contributions are welcome both on the GitHub repository and the H.A.C.K. wiki page. I also gave a talk about the project in Hungarian, the video recording and the slides can be found on the bottom of the wiki page.


Mangling RSS feeds with Python

2011-10-28

There are blogs on the web, that are written/configured in a way, that the RSS or Atom feed contains only a teaser (or no content at all), and one must open a link to get the real content – and thus load all the crap on the page, something RSS feeds were designed to avoid. Dittygirl has added one of those sites in her feed reader, and told me that it takes lots of resources on her netbook to load the whole page – not to mention the discomfort of leaving the feed reader.

I accepted the challenge, and decided to write a Python RSS gateway in less than 30 minutes. I chose plain WSGI, something I wanted to play with, and this project was a perfect match for its simplicity and lightweightness. Plain WSGI applications are Python modules with a callable named application, which the webserver will call every time, an HTTP request is made. The callable gets two parameters,

  • a dictionary of environment values (including the Path of the query, IP address of the browser, etc.), and
  • a callable, which can be used to signal the web server about the progress.

In this case, the script ignores the path, so only the second parameter is used.

def application(environ, start_response):
  rss = getfeed()
  response_headers = [('Content-Type', 'text/xml; charset=UTF-8'),
                      ('Content-Length', str(len(rss)))]
  start_response('200 OK', response_headers)
  return [rss]

Simple enough, the function emits a successful HTTP status, the necessary headers, and returns the content. The list (array) format is needed because a WSGI application can be a generator too (using a yield statement), which can be handy when rendering larger content, so the server expects an iterable result.

The real “business logic” is in the getfeed function, which first tries to load a cache, to avoid abusing the resources of the target server. I chose JSON as it's included in the standard Python libraries, and easy to debug.

try:
  with open(CACHE, 'rb') as f:
    cached = json.load(f)
  etag = cached['etag']
except:
  etag = ''

Next, I load the original feed, using the cached ETag value to encourage conditional HTTP GET. The urllib2.urlopen function can operate on a Request object, which takes a third parameter, that can be used to add HTTP headers. If the server responds with a HTTP 304 Not Modified, urlopen raises an HTTPError, and the script knows that the cache can be used.

try:
  feedfp = urlopen(Request('http://HOSTNAME/feed/',
      None, {'If-None-Match': etag}))
except HTTPError as e:
  if e.code != 304:
    raise
  return cached['content'].encode('utf-8')

I used lxml to handle the contents, as it's a really convenient and fast library for XML/HTML parsing and manipulation. I compiled the XPath queries used for every item in the head of the module for performance reasons.

GUID = etree.XPath('guid/text()')
IFRAME = etree.XPath('iframe')
DESC = etree.XPath('description')

To avoid unnecessary copying, lxml's etree can parse the object returned by urlopen directly, and returns an object, which behaves like a DOM on steroids. The GUID XPath extracts the URL of the current feed item, and the HTML parser of lxml takes care of it. The actual contents of the post is helpfully put in a div with the class post-content, so I took advantage of lxml's HTML helper functions to get the div I needed.

While I was there, I also removed the first iframe from the post, which contains the Facebook tracker bug Like button. Finally, I cleared the class attribute of the div element, and serialized its contents to HTML to replace the useless description of the feed item.

feed = etree.parse(feedfp)
for entry in feed.xpath('/rss/channel/item'):
  ehtml = html.parse(GUID(entry)[0]).getroot()
  div = ehtml.find_class('post-content')[0]
  div.remove(IFRAME(div)[0])
  div.set('class', '')
  DESC(entry)[0].text = etree.CDATA(etree.tostring(div, method="html"))

There are two things left. First, the URL that points to the feed itself needs to be modified to produce a valid feed, and the result needs to be serialized into a string.

link = feed.xpath('/rss/channel/a:link',
  namespaces={'a': 'http://www.w3.org/2005/Atom'})[0]
link.set('href', 'http://URL_OF_FEED_GATEWAY/')
retval = etree.tostring(feed)

The second and final step is to save the ETag we got from the HTTP response and the transformed content to the cache in order to minimize the amount of resources (ab)used.

with open(CACHE, 'wb') as f:
  json.dump(dict(etag=feedfp.info()['ETag'], content=retval), f)
return retval

You might say, that it's not fully optimized, the design is monolithic, and so on – but it was done in less than 30 minutes, and it's been working perfectly ever since. It's a typical quick-and-dirty hack, and although it contains no technical breakthrough, I learned a few things, and I hope someone else might also do by reading it. Happy hacking!


< prev posts

CC BY-SA RSS Export
Proudly powered by Utterson