VSzA techblog

Secure web services with Python part 1 - UserNameToken

2011-10-20

In 2004 OASIS created WS-Security, which describes several techniques for securing web services. The simplest is UsernameToken (PDF warning), which can be thought of as the equivalent of HTTP authentication in the SOAP world – the client supplies a username and a password, and latter can be transmitted either in cleartext or in a digested form.

The digest algorithm is quite simple (Base64(SHA-1(nonce + created + password))) and by using a nonce, this protocol can prevent replay attacks, while a timestamp can reduce the memory requirements since nonces can expire after a specified amount of time. A sample envelope can be seen below, I removed the longish URLs for the sake of readability, these can be found in the PDF linked in the previous paragraph. If you're into security, you can try to guess the password based on the username, and then try to verify the digest based on that. ;)

<soap:Envelope xmlns:soap="http://schemas.xmlsoap.org/soap/envelope/">
 <soap:Header>
  <wsse:Security xmlns:wsse="..." xmlns:wsu="..." soap:mustUnderstand="1">
   <wsse:UsernameToken wsu:Id="UsernameToken-3">
    <wsse:Username>admin</wsse:Username>
    <wsse:Password Type="...#PasswordDigest">fTI7fNcwD69Z3dOT1bYfvSbQPb8=</wsse:Password>
    <wsse:Nonce EncodingType="...#Base64Binary">1DLfpq3fLJ5O8Dlrnr4blQ==</wsse:Nonce>
    <wsu:Created>2011-05-05T17:20:22.319Z</wsu:Created>
   </wsse:UsernameToken>
  </wsse:Security>
 </soap:Header>
 <soap:Body>
  ...
 </soap:Body>
</soap:Envelope>

Python had little support for UsernameToken, SUDS, the preferred web service client mentioned cleartext support in their documentation, so I set up a simple service using Apache CXF and tried to access it. As it turned out, the implementation violated the OASIS standard by not specifying the Type attribute of the Password element, which would've indicated whether the password were transmitted in cleartext or in a digested form.

It was a trivial fix, and while I was there, I also added a standards-compliant digest support, and tested it with Apache CXF. I sent a patch to the SUDS mailing list in May 2011, but got no response ever since, so I have no information if/when this improvement will get into mainline SUDS.

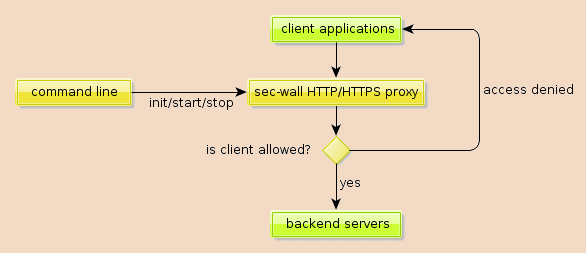
On the server side, things got trickier. The preferred Python web service implementation is soaplib/rpclib, and I did some research, whether it's possible to implement UsernameToken support in it. It turned out, that there's a project called sec-wall which takes this to a whole new level by creating a (reverse) proxy, and this way, security can be detached from the service to another layer, which also satisfies the UNIX part of my mind.

Overview of sec-wall

I started hacking on sec-wall, first with some code cleanup, then I managed to fix up the codebase so that all test passed on Python 2.7, too. After getting myself familiar with the project, I created an environment with Soaplib as a server, sec-wall as the proxy, SUDS as a client, and tried both UsernameToken configurations. It worked pretty well, with minor glitches, such as sec-wall expecting a nonce and creation time even when cleartext password was used. I helped the developer, Dariusz Suchojad fixing the problem, so in the end, I could create a pure Python solution utilizing UsernameToken to secure webservices.

That previous sentence could be a great one to end this post with, so this paragraph is kind of an extra for those who kept on reading. The current WSSE implementation in sec-wall “lets all nonces in”, so I created a class that overrode this implementation using memcached. There are two Python clients for it, so I developed and tested both. Below is the code for python-memcached, which is pure Python, whereas pylibmc uses native code, but mimics the interface of former, so only the second line needs to be changed to switch between the implementations.

from secwall.wsse import WSSE
from memcache import Client

class WSSEmc(WSSE):
  keyfmt = 'WSSEmc_nonce_{0}'

  def __init__(self):
    self.mc = Client(['127.0.0.1:11211'], debug=0)

  def check_nonce(self, wsse_nonce, now, nonce_freshness_time):
    if not nonce_freshness_time:
      return False
    key = self.keyfmt.wsse_nonce
    if self.mc.get(key):
      return True
    self.mc.set(key, '1', time=nonce_freshness_time)
    return False

I hope to publish at least a second part in this subject, focusing on digital signatures in the next two months (it's part of my Masters thesis, which is due December 9, 2011).


Optimizing Django ORM in f33dme

2011-10-19

As I was hacking around with django-oursql vs f33dme, I started sniffing the network traffic between the Python process and the MySQL server to follow up on a bug in oursql. I found that the following queries (yes, plural!) ran every time a feed item was marked as read.

SELECT `f33dme_item`.`id`, `f33dme_item`.`title`, `f33dme_item`.`content`,
  `f33dme_item`.`url`, `f33dme_item`.`date`, `f33dme_item`.`added`,
  `f33dme_item`.`feed_id`, `f33dme_item`.`score`, `f33dme_item`.`archived`
FROM `f33dme_item` WHERE `f33dme_item`.`id` = ?

SELECT (1) AS `a` FROM `f33dme_item` WHERE `f33dme_item`.`id` = ?  LIMIT 1

UPDATE `f33dme_item` SET `title` = ?, `content` = ?, `url` = ?, `date` = ?,
  `added` = ?, `feed_id` = ?, `score` = ?, `archived` = ?
WHERE `f33dme_item`.`id` = ?

The above queries not only multiply the round-trip overhead by three, but the first and the last ones generate quite a bit of a traffic, by sending the content of all the fields (including the content which might contain a full-blown blog post like this) to and from the ORM, respectively. The innocent-looking lines of code that generated them were the following ones.

item = Item.objects.get(id=item_id)
if not item:
  return HttpResponse('No item found')
item.archived = True
item.save()

By looking at the queries above first, it's pretty clear, that the get method needs to query all the columns, since later code might access any of the fields. The same can be said about the update, which knows nothing about the contents of the database – it even has to check if a row with the ID specified exists to figure out whether to use an INSERT or and UPDATE DML query.

Of course, the developers of the Django ORM met this situation as well, and even documented it along with nice examples in the QuerySet API reference. All I needed was to adapt the code a little bit, and as the documentation states, the update method even “returns the number of affected rows”, so the check for the existence of the item can be preserved. The improved code is the following.

if Item.objects.filter(id=item_id).update(archived=True) != 1:
  return HttpResponse('No item found')

The first line is a bit longish (although still 62 characters only), but replaced four lines of the original code. When read carefully, one might even find it readable, and it produces the following SQL queries in the background.

UPDATE `f33dme_item` SET `archived` = ? WHERE `f33dme_item`.`id` = ?

How I made Proxmark3 work

2011-08-27

Due to the widespread usage of RFID technology, we decided to buy a Proxmark3 with all the extension (except for the case of course, who needs that anyway). After going through the bureucracy of the customs office, I could finally start working on the technology issues of the gadget.

First of all, the FPGA and the MCU in the unit comes preprogrammed, and a ZIP file is available from the official website with a Linux client. The first problem was the client, which was provided in a binary form, and required old versions of several libraries. After creating a few symlinks, it ran, but crashed during antenna tuning with a SIGFPE (I didn't even know such signal existed till now).

Next step was to download and compile the latest code from the Google Code project site following the Compiling page on their wiki. The instructions are clear and mostly correct, the first problem comes with the dependencies that the tools/install-gnuarm4.sh script is trying to find on wrong URLs, and since the script doesn't check the return values of the wget calls, 404s cause weird errors as the script keeps running even if download fails.

As of 27 August 2011, the following URLs needed to be changed:

The last obstacle was a problem (apparently) specific to the Hungarian locale (hu_HU.UTF8) used by me, as reported by the Arch Linux guys (and as far as my Google searches found, noone else). Because of this, sed crashed during cross build environment buildup, and for now, the only fix is setting the LANG environment variable to something else (like "C").

This way, the ARM crossbuild environment can be built and make can be started. In order to build the firmware, the common/Makefile.common file also needs to be changed according to the following diff. With this last change done, I managed to build the firmware and the client successfully.

--- common/Makefile.common      (revision 486)
+++ common/Makefile.common      (working copy)
@@ -20,7 +20,7 @@

 all:

-CROSS  ?= arm-eabi-
+CROSS  ?= arm-elf-
 CC     = $(CROSS)gcc
 AS     = $(CROSS)as
 LD     = $(CROSS)ld

CCCamp 2011 video selection

2011-08-27

The Chaos Communication Camp was really great this year, and for those who were unable to attend (or just enjoyed the fresh air and presence of fellow hackers instead of sitting in the lecture room), the angels recorded and made all the talks available on the camp2011 page of CCC-TV.

I compiled two lists, the first one consists of talks I attended and recommend for viewing in no particular order.

  • Jayson E. Street gave a talk titled Steal Everything, Kill Everyone, Cause Total Financial Ruin! Or: How I walked in and misbehaved, and presented how he had entered various facilities with minimal effort and expertise, just by exploiting human stupidity, recklessness and incompetence. It's not really technical, and fun to watch, stuffed with photographical evidence and motivation slides.
  • While many hackers penetrate at high-level interfaces, Dan Kaminsky did it low level with his Black Ops of TCP/IP 2011 talk. Without sploilers, I can only mention some keywords: BitCoin anonimity and abuse, IP TTLs, net neutrality preservation, and the security of TCP sequence numbers. The combination of the technical content and his way of presenting it makes it worth watching.
  • Three talented hackers from the Metalab radio crew (Metafunk), Andreas Schreiner, Clemens Hopfer, and Patrick Strasser talked about Moonbounce Radio Communication, an experiment they did at the campsite with much success. Bouncing signals off the moon, which is ten times farther than communication satellites requires quite a bit of technical preparation, especially without expensive equipments.

The second list consists of talks I didn't attend but am planning to watch now the camp is over.

I'll expand the lists as the angels upload more videos to the CCC-TV site.


Adding certificate checksum to K-9 Mail

2011-07-16

When I got my Android phone, I tried to make it work with my e-mail server which supports TLS and SSL using a CAcert certificate. CAcert is not yet present in the Android list of root certificates, and an FAQ entry of the official CAcert site along with two Android issues (6207 and 11231) state, that since this list is writeable to root only, it requires rooting of the phone, which I've considered an overkill. I also found that the stock Mail application had only two options for TLS or SSL security: either accept all certificates, thus creating a false sense of security, or accept certificates only from the read-only list.

SSL/TLS options of the stock Android Mail application

I tried an alternative mail client called K-9 mail, which had more options available, as it allowed the user to examine the certificate, and accept it to be used in future communications. I configured the mailbox, and got a nice dialog box asking me to confirm the details of the certificate.

SSL/TLS certificate dialog in K-9 Mail

Unfortunately, the only problem with this dialog box was making the whole feature useless: it didn't contain the checksum (also known as fingerprint) of the certificate, which is the only value not spoofable by a man in the middle (MITM) attacker. There are point-and-click tools available on the web that can create a rogue certificate matching the original one in every detail, and the only difference is the public key, which affects the checksum. I developed a patch to fix this problem, which was accepted after a short discussion, and later made its way into the Android Market.

First, I found, that the checksum algorithm is SHA-1 most of the time, since MD5 is considered broken for this purpose. To calculate the SHA-1 hashes of the certificates in the chain, I imported the necessary classes and instantiated the SHA-1 MessageDigest class.

import java.security.NoSuchAlgorithmException;
import java.security.MessageDigest;

...

MessageDigest sha1 = null;
try {
    sha1 = MessageDigest.getInstance("SHA-1");
} catch (NoSuchAlgorithmException e) {
    Log.e(K9.LOG_TAG, "Error while initializing MessageDigest", e);
}

I spent most of the time figuring out how to extract the content of the certificate that needs to be hashed. As Roman D figured out in a post on Stack Overflow, “the hash is calculated over the DER-encoded (again, not the PEM string) TBS part only, including its ASN.1 header (the ID 0x30 == ASN1_SEQUENCE | ASN1_CONSTRUCTED and the length field)”.

Knowing this, I just needed to extract this information form the instances of the X509Certificate interface. I tried the getTBSCertificate method with no luck, but later found that there's a method inherited from Certificate called getEncoded, which does just what I needed. There was only one task to do: since the MessageDigest object returns the digest in raw bytes, I needed to convert them to hex digits in order to display it in the dialog box. It turned out, that the project already had a class for that, so I could avoid reinventing the wheel.

import com.fsck.k9.mail.filter.Hex;
import java.security.cert.CertificateEncodingException;

...

if (sha1 != null) {
  sha1.reset();
  try {
    char[] sha1sum = Hex.encodeHex(sha1.digest(chain[i].getEncoded()));
    chainInfo.append("Fingerprint (SHA-1): " + new String(sha1sum) + "\n");
  } catch (CertificateEncodingException e) {
    Log.e(K9.LOG_TAG, "Error while encoding certificate", e);
  }
}

After development and building, there was only one task: testing. I installed the modified version into an emulator and tried to configure an account on my mail server. It worked, and as you can see on the screenshot below, the checksum matches the one you can CAcert fingerprint page.

Patched version displaying CAcert certificate


Arduino vs. CGA part 1 - flag PoC

2011-07-02

During garbage collection in my room, I found a Mitsubishi CGA display manufactured in 1986. I tested it with the 286 PC it came with and it turned out to be in working condition. CGA has many properties that make it perfect for experimentation with microcontrollers:

  • displays are dirt cheap (if not free) and rarely used for their original purposes
  • the connector is DB-9 thus cheap and easy to solder
  • all signals are TTL (0-5V digital)
  • clocks are in the range of cheap microcontrollers: HSYNC is 15,75 kHz, VSYNC is 60 Hz
  • despite the above, 640 by 200 pixels can be drawn in 16 colors

Of course, life is never perfect, so there's one catch: it's not that well documented, there are not as many forum or blog posts and tutorials about CGA as with VGA or composite video. The pinout and the frequencies can be found on almost every ontopic web search result for the right keywords, the Wikipedia page has a pretty decent summary including colors, but most of the article deals with the PC-side hardware (video card), not the display nor the connection between them.

One of the most helpful document I found was a comment posted on a NES development forum, which revealed two important pieces of information: the pixel clock frequency (4 x NTSC (14.318 MHz) or 2 x NTSC) and the full timing table. I was not sure whether 14.318 MHz referred to NTSC or 4 x NTSC so I checked another helpful Wikipedia page and found that the NTSC M color subcarrier frequency is 3.579545 MHz, and multiplying it by four gives the 4 x NTSC frequency, also noted in the table. The full timing table is the following (in case the original post becomes unavailable):

0 visible-period A right-overscan B right-blanking C sync D left-blanking E left-overscan F 
Horizontal: 
A = 80 (640)   B = 89 (712)   C = 94 (752) 
D = 102 (816)   E = 109 (872)   F = 114 (912) 
Vertical: 
A = 200   B = 223   C = 225 
D = 228   E = 239   F = 261

Multiplying the numbers in parentheses gives the exact length of each period, which makes it possible to write a simple sketch for an Arduino to display something simple. I chose to test with three horizontal displaying the flag of Hungary using a 66 row high light red (12), a 68 row high white (15) and a 66 row high light green (10) stripe. For the sake of simplicity, I connected the high intensity pin (6) to constant 5 volts, so the Arduino had 5 wires connected to it using the following scheme.

  • pin 1 and 2 (ground) were connected to the Arduino ground
  • pin 3 (red) was connected to Arduino digital pin 10 (bit 2 of PORT B)
  • pin 4 (green) was connected to Arduino digital pin 11 (bit 3 of PORT B)
  • pin 5 (blue) was connected to Arduino digital pin 12 (bit 4 of PORT B)
  • pin 6 (intensity) was connected to Arduino power pin 5V
  • pin 7 (reserved) was left floating
  • pin 8 (horizontal sync) was connected to Arduino digital pin 8 (bit 0 of PORT B)
  • pin 9 (vertical sync) was connected to Arduino digital pin 9 (bit 1 of PORT B)

Those who used Arduino digitalWrite exclusively, might not know what PORT B is – if you're not one of them, you can skip this paragraph. The AVR microcontroller used in the Arduino has its I/O pins grouped into 8-bit registers that are mapped into the memory, thus accessible via certain variables, for example assigning an 8-bit value to PORTA writes the bits given to digital pins 0 to 7 in one quick step. In most cases, there's no need to get into this, but in timing-critical cases as this, there's significant advantage in accessing the hardware directly – see for yourself in Bill Grundmann's thorough blog post. You can read more about this direct access on the official Arduino page about port registers.

As you can see, I arranged all five pins to be connected to the low five bits of PORT B, which means that I can modify all their values in a single instruction. At the beginning of my sketch, I used #defines to provide constants named in a meaningful way.

#define HSYNC 1
#define VSYNC 2
#define RED 4
#define GREEN 8
#define BLUE 16
#define WHITE (RED | GREEN | BLUE)
#define BLACK 0
#define COLOR WHITE
#define ROWS 261

In the setup function, the sketch initializes the output ports and sets all output pins to low.

void setup() {
    DDRB |= HSYNC | VSYNC | COLOR;
    PORTB &= ~(HSYNC | VSYNC | COLOR);
}

There are also two global variables used to track the color of the current stripe (rgb) and the number of the current row (row).

int row = ROWS;
byte rgb = BLACK;

In the loop function, the sketch draws a single row. It begins with the left blanking and overscan area that takes around 6.7 μs, then sets the R-G-B pins to the color of the current stripe. The width of the visible area is 640 pixels that take approximately 44.69 μs, after that, all R-G-B pins are reset to low.

delayMicroseconds(6);
PORTB |= rgb;
delayMicroseconds(44);
PORTB &= ~COLOR;

The right overscan and blanking take around 7.8 μs, after that, HSYNC needs to be pulled high for approximately 4.47 μs.

delayMicroseconds(8);
PORTB |= HSYNC; // HSYNC HIGH
delayMicroseconds(4);
PORTB &= ~HSYNC; // HSYNC LOW

At the end of the row, the row-level logic increments the row counter and uses a switch statement to handle certain rows specially. The first three cases cover the flag generation: after the 66th row, the color changes to white, at the 134th it does again to green, and at the bottom of the screen, color gets turned off. Between the 225th and the 228th row, VSYNC is set to high, and after the last row, the row counter gets reset to zero.

switch (row++) {
    case 66:
        rgb = WHITE;
        break;
    case 134:
        rgb = GREEN;
        break;
    case 200:
        rgb = BLACK;
        break;
    case 225:
        PORTB |= VSYNC; // VSYNC HIGH
        break;
    case 228:
        PORTB &= ~VSYNC; // VSYNC LOW
        break;
    case ROWS:
        rgb = RED;
        row = 0;
        break;
}

The actual delay values seen in the snippets above are the results of rounding and testing as the Arduino libraries hook certain interrupts making it difficult to predict the actual execution time of the code. Because of this, I measured the horizontal sync frequency with my multimeter and adjusted the values so that the HSYNC frequency is around 15.65 kHz (instead of 15.75 kHz). It almost worked for the first time – I forgot to put #define WHITE into parentheses causing the negate operator (~) to behave in an unexpected way. After fixing that, it worked perfectly for a proof of concept, as it can be seen on the photo below.

Arduino driving a CGA display to display the Hungarian flag

The weird edges are caused by the improper timing, so the next step will be to use plain AVR C/C++ code to avoid Arduino overhead allowing finer control over the timing. As the RAM of the Atmega168 is far too small for a framebuffer, I have plans to create a character map in the Flash (PROGMEM) and create a library that would allow to display any text or simple graphics. I hope you enjoyed this post, hold on till the next part, or better grab a CGA display and start experimenting!


Org-mode to RSS and custom HTML

2011-07-01

Org-mode is one of the many outliner solutions I've seen, and I prefer it because of its slogan "Your Life in Plain Text". It allows me to keep track of my life in form of notes, lists and plans using only a text editor, and as the name suggests, it has its origins in Emacs, and it's possible to export these files to a number of formats. My problem was that I found no easy way to customize the HTML output, and I wanted to create a solution that'd allow me to generate an HTML page and an RSS feed from an .org file of mine.

My first hack was a really rudimentary solution that used ugly regular expressions and sed tied together in a shell script. It had many problems: first of all, it depended heavily on the formatting of the document, even small deviations would've made it fail. Also, it was difficult (e.g. required less-readable constructs) to achieve things that are usually trivial using any XML-friendly environment, for instance closing tags if there are no remaining items, but before closing the whole document.

#!/bin/bash
INFILE="input.org"
OUTFILE="output.html"
rm -f $OUTFILE
cat <<HTML >$OUTFILE
... HTML header ...
HTML
N=1
while read LINE; do
    OUT=$(echo "$LINE" | sed \
        -e 's/^[^*].*$//' \
        -e 's/^\*\ \(.*\)$/<h2>\1<\/h2>/' \
        -e 's/^\*\*\ DONE\ \[\[\([^]]*\)\]\[\([^]]*\)\]\]/<li class="done"><a href="\1">\2<\/a><\/li>/' \
        -e 's/^\*\*\ \[\[\([^]]*\)\]\[\([^]]*\)\]\]/<li><a href="\1">\2<\/a><\/li>/')
    echo "$OUT" | grep -v '/h2' >/dev/null 2>&1 || [ $N -eq 1 ] || echo "</ul>" >>$OUTFILE
    N=$[$N + 1]
    echo "$OUT" >>$OUTFILE
    echo "$OUT" | grep -v '/h2' >/dev/null 2>&1 || echo "<ul>" >>$OUTFILE
done <$INFILE
echo "</ul></body></html>" >>$OUTFILE

I thought of playing around with third party org-mode parsers, such as the Python one I used and improved called Orgnode, but that would've been also a compromise between a clean solution that involves to external org parsing and the simple but rude shell script, having few pros, but the cons of both. In the end I took a look on the export options of org-mode and found that it's capable of creating DocBook output. I hadn't used DocBook before, only heard of it from vmiklos, but figured out that it's an XML-based document markup language.

The remaining task is transforming XML to XML, and XSLT is the most powerful tool for it. I created two stylesheets, one for XHTML output and one for RSS, they almost instantly worked and produced the same (or better) output as the shell script. I also found a bug/feature in the DocBook export as it converts URL quoted special characters to their literal equivalents (such as %C3%B6 to ö), which may cause incompatibilities in some browsers and also makes the RSS invalid.

<?xml version="1.0" encoding="utf-8"?>
<xsl:stylesheet version="1.0"
  xmlns:xsl="http://www.w3.org/1999/XSL/Transform"
  xmlns:db="http://docbook.org/ns/docbook"
  xmlns:xlink="http://www.w3.org/1999/xlink">
  <xsl:output method="xml" />
  <xsl:template match="/">
    <rss version="2.0">
      <channel>
        <title>...</title>
        <description>...</description>
        <link>http://...</link>
        <lastBuildDate><xsl:value-of select="$lbd" /></lastBuildDate>
        <xsl:for-each select="db:article/db:section/db:section/db:title">
          <xsl:if test="not(contains(text(), 'DONE'))">
            <item>
              <link><xsl:value-of select="db:link/@xlink:href" /></link>
              <guid><xsl:value-of select="db:link/@xlink:href" /></guid>
              <description><xsl:value-of select="db:link" /></description>
              <title><xsl:value-of select="db:link" /></title>
            </item>
          </xsl:if>
        </xsl:for-each>
      </channel>
    </rss>
  </xsl:template>
</xsl:stylesheet>

RSS needs the build date to be passed in RFC 2822 format, which is much easier to do in shell rather than some weird XSLT way. I used xsltproc which allows parameters to be passed on the command line, and the date command is capable of printing the date just in the right format. This way the RSS can be published using the following command.

$ xsltproc --stringparam lbd "$(date --rfc-2822)" \
    rss.xsl docbook.xml >feed.rss

Grsecurity missing GCC plugin

2011-07-01

The problem:

$ make -j4
scripts/kconfig/conf --silentoldconfig Kconfig
warning: (VIDEO_CX231XX_DVB) selects DVB_MB86A20S which has unmet direct dependencies (MEDIA_SUPPORT && DVB_CAPTURE_DRIVERS && DVB_CORE && I2C)
  HOSTCC  -fPIC tools/gcc/pax_plugin.o
  tools/gcc/pax_plugin.c:19:24: fatal error: gcc-plugin.h: No such file or directory
  compilation terminated.
  make[1]: *** [tools/gcc/pax_plugin.o] Error 1
  make: *** [pax-plugin] Error 2
  make: *** Waiting for unfinished jobs....

The solution:

# apt-get install gcc-4.6-plugin-dev


next posts >

CC BY-SA RSS Export
Proudly powered by Utterson