VSzA techblog

Single mbox outbox vs. multiple IMAP accounts

2013-04-01

As I've mentioned in February 2013, I started using mutt in December 2012 and as a transitional state, I've been using my three IMAP accounts in on-line mode, like I did with KMail. All outgoing mail got recorded in an mbox file called ~/Mail/Sent for all three accounts, which was not intentional, but a configuration glitch at first. But now I realized that it has two positive side effects when I'm using cellular Internet connection. Since this way, the MUA doesn't upload the message using IMAP to the Sent folder, resulting in 50% less data sent, which makes sending mail faster and saves precious megabytes in my mobile data plan.

However, I still prefer having my sent mail present in the Sent folder of my IMAP accounts, so I needed a solution to transfer the contents of an mbox file to IMAP folders based on the From field. I preferred Python for the task as the standard library had support for both IMAP and mbox out of the box, and I've already had good experience with the former. Many solutions I found used Python as well, but none of them had support for multiple IMAP accounts and many used deprecated classes, or treated the process as a one-shot operation, while I planned to use this to upload my mbox regularly to IMAP.

So I decided to write a simple script, which I completed in about an hour or two that did exactly what I need, and still had no dependencies to anything that's not part of the standard library. The script has support for invocation from other modules and the command line as well, core functionality was implemented in the process_mbox method of the OutboxSyncer class. The method gets the Mailbox object and a reference for a database as parameters, latter is used to ensure that all messages are uploaded exactly once, even in case of exceptions or parallel invocations.

for key, msg in mbox.iteritems():
    account, date_time = msg.get_from().split(' ', 1)
    contents = mbox.get_string(key)
    msg_hash = HASH_ALGO(contents).hexdigest()
    params = (msg_hash, account)

The built-in iterator of the mailbox is used to iterate through messages in a memory-efficient way. Both key and msg are needed as former is needed to obtain the raw message as a byte string (contents), while latter makes parsed data, such as the sender (account) and the timestamp (date_time) accessible. The contents of the message is hashed (currently using SHA-256) to get a unique identifier for database storage. In the last line, params is instantiated for later usage in parameterized database queries.

with db:
    cur.execute(
        'SELECT COUNT(*) FROM messages WHERE hash = ? AND account = ?',
        params)
    ((count,),) = cur.fetchall()
    if count == 0:
        cur.execute('INSERT INTO messages (hash, account) VALUES (?, ?)',
            params)
    else:
        continue

By using the context manager of the database object, checking whether the message free for processing and locking it is done in a single transaction, resulting in a ROLLBACK in case an exception gets thrown and in a COMMIT otherwise. Assigning the variable count was done this way to assert that the result has a single row with a single column. If the message is locked or has already been uploaded, the mailbox iterator is advanced without further processing using continue.

try:
    acc_cfg = accounts[account]
    imap = self.get_imap_connection(account, acc_cfg)
    response, _ = imap.append(acc_cfg['folder'], r'\Seen',
            parsedate(date_time), contents)
    assert response == 'OK'

After the message is locked for processing, it gets uploaded to the IMAP account into the folder specified in the configuration. The class has a get_imap_connection method that calls the appropriate imaplib constructors and takes care of connection pooling to avoid connection and disconnection for every message processed. The return value of the IMAP server is checked to avoid silent fail.

except:
    with db:
        cur.execute('DELETE FROM messages WHERE hash = ? AND account = ?',
            params)
    raise
else:
    print('Appended', msg_hash, 'to', account)
    with db:
        cur.execute(
            'UPDATE messages SET success = 1 WHERE hash = ? AND account = ?',
            params)

In case of errors, the message lock gets released and the exception is re-raised to stop the process. Otherwise, the success flag is set to 1, and processing continues with the next message. Source code is available in my GitHub repository under MIT license, feel free to fork and send pull requests or comment on the code there.

Two tools to aid protocol reverse engineering

2013-03-14

Lately I analyzed a closed-source proprietary thick client application that rolled its own cryptography, including the one used for the network layer. To aid the protocol analysis, I needed two tools with a shared input. The input was the flow of packets sent and received by the application, which I first tried to extract using the hex output of tshark, but I realized that it displayed data from layers above TCP I didn't need, and on the other hand, it didn't perform TCP reassembly, which I didn't want to do by hand or reinventing the wheel.

So I decided to use the output of the Follow TCP stream function of Wireshark, in hex mode to be precise. It can be saved to a plain text file with a single click, and it just had what I needed: offsets and easily parseable hex data. I've written a simple parser based on regular expressions that could read such file, starting by defining the actual expressions. The first one matches a single line, starting with whitespace in case of packets sent, and nothing if received (group 1). This is followed by a hex offset of the row (group 2), the row data encoded in 1 to 16 hex bytes (group 3), and the ASCII dump of the row data. Latter is padded, so by limiting group 3 to 49 characters, it could be ignored effectively. I used the re.I flag so I didn't have to write a-fA-F everywhere instead of a-f explicitly.

import re

FLOW_ROW_RE = re.compile(r'^(\s*)([0-9a-f]+)\s+([0-9a-f\s]{1,49})', re.I)
NON_HEX_RE = re.compile(r'[^0-9a-f]', re.I)

The Flow class itself is a list of entries, so I made the class inherit from list and added a custom constructor. I also added an inner class called Entry for the entries and two constants to indicate packet directions. I used a namedtuple to provide some formality over using a dict. The constructor expects the name of a file from Wireshark, opens it and populates the list using the parent constructor and a generator function called load_flow.

from collections import namedtuple

class Flow(list):
    Entry = namedtuple('Entry', ['direction', 'data', 'offset'])
    SENT = 'sent'
    RECEIVED = 'received'
    DIRECTIONS = [SENT, RECEIVED]

    def __init__(self, filename):
        with file(filename, 'r') as flow_file:
            list.__init__(self, load_flow(flow_file))

This load_flow got a file object, which it used as an iterator, returning each line of the input file. It got mapped using imap to regular expression match objects, and filtered using ifilter to ignore rows that didn't match. In the body of the loop, all three match groups are parsed, and sanity checks are performed on the offset to make sure to bytes were lost during parsing. For this purpose, a dict is used, initialized to zeros before the loop, and incremented after each row to measure the number of bytes read in both directions.

from binascii import unhexlify
from itertools import imap, ifilter

def load_flow(flow_file):
    offset_cache = {Flow.SENT: 0, Flow.RECEIVED: 0}
    for m in ifilter(None, imap(FLOW_ROW_RE.match, flow_file)):
        direction = Flow.SENT if m.group(1) == '' else Flow.RECEIVED
        offset = int(m.group(2), 16)
        data = unhexlify(NON_HEX_RE.sub('', m.group(3)))
        last_offset = offset_cache[direction]
        assert last_offset == offset
        offset_cache[direction] = last_offset + len(data)

The rest of the function is some code that (as of 14 March 2013) needs some cleaning, and handles yielding Flow.Entry objects properly, squashing entries spanning multiple rows at the same time.

As I mentioned in the beginning, there were two kinds of functionality I needed, both of which use these Flow objects as an input. The first one is a fake client/server that makes it possible to generate network traffic quickly by using previously captured flows, called flowfake. It simply replays flows from a selected viewpoint using plain sockets, either as a client or a server.

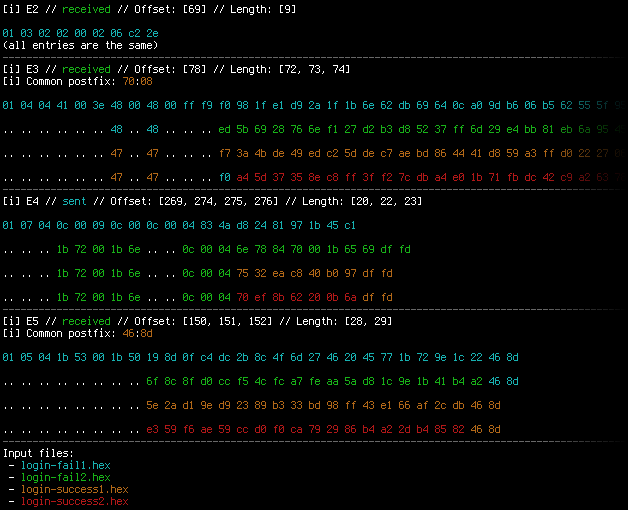
The second one is more interesting and complex (at least for me) as it makes possible to view the differences (or similarities, depending on the use-case) between 2 to 4 flows (latter being an ad-hoc limit based on the colors defined) using simple algorithms and colors to aid visual analysis. For better understanding, see the screenshot below to understand how it works on four flows. The whole project is available under MIT license in a GitHub repo.

Screenshot of flowdiff


Generating XSRF PoC from Burp with Python

2013-02-20

Burp Suite is the tool I'd feel lost without when testing web applications, we even bought the pro version, since it's a great tool with a low price tag. One of its great features is generating proof-of-concept HTML forms for Cross-Site Request Forgery (CSRF or XSRF) testing, and it usually just works out of the box. As it works using HTTP POST data, it has no information about the character-level encoding of the data, so when it comes to applications with accented characters (not a rare thing in Hungary), it just generates garbage, which needs to be fixed manually, but it's not a big problem.

However, today, I met another limitation; when testing an ASP.NET application with quite a big ViewState (the HTTP post request was around 150 KB), Burp outputs only the first 4096 byte or so, and then continues to build the next field, even without closing the <input> tag or its value attribute. (It's also obvious from this that it uses string manipulation to serialize data into HTML, which sounds odd from a security-related software product.)

Since I really needed a working solution, I created a simple Python script to parse the XML export of a HTTP request from Burp and create an HTML page with a form that have values sent in the request preset. I used LXML to both parse the input XML and serialize the HTML output to avoid the pitfalls Burp met, and first, I loaded the Burp XML request file. XPath was used to get the first item (such exports can store more than one), and to extract the method, URL and request information. Using the single-element tuple assignment syntax asserts that the right-hand side of the assignment contains one and only one element, asserting the sanity of the input.

from lxml import etree

root = etree.parse(input_file).getroot()
item = root.xpath("/items/item")[0]
(method,) = item.xpath("method/text()")
if method.lower() != "post":
    raise ValueError("Only POST requests are supported")
(url,) = item.xpath("url/text()")
(request,) = item.xpath("request")

Burp can encode the request body using Base64, so it should be checked for and decoded if necessary. The resulting body contains the HTTP headers and the encoded POST data, separated by an empty line, so splitting it is pretty straightforward. The second parameter of the split method stops after the first split, and naming the first result with an underscore makes it apparent for both humans and machines that we don't care about that piece of data.

from base64 import b64decode

contents = request.text
if request.get("base64"):
    contents = b64decode(contents)
_, body = contents.split("\r\n\r\n", 1)

I wrote a small generator function that yields the names and values of each form field as tuples of Unicode objects. I initially used string manipulation, then discovered that Python had me covered with urlparse.

from urlparse import parse_qsl

def decode_form_urlencoded_values(request_body, encoding):
    for pair in parse_qsl(request_body, keep_blank_values=True):
        yield tuple(i.decode(encoding) for i in pair)

With this done, I just had to build the resulting HTML. I used LXML's E-Factory and Python's argument list unpacking to make it happen in a more or less readable way.

from lxml.html import builder as E
import codecs

output = E.HTML(
    E.HEAD(E.META(**{'http-equiv': 'Content-type',
        'content': 'text/html; charset=' + encoding})),
    E.BODY(
        E.FORM(
            E.INPUT(type="submit"),
            *(E.INPUT(type="hidden", name=name, value=value) for name, value
                in decode_form_urlencoded_values(body, encoding)),
            action=url, method=method
            )
        )
    )
with codecs.open(output_file, 'wb', encoding) as html_output:
    html_output.write(html.tostring(output, encoding=unicode))

The complete and working script can be downloaded from my GitHub repository, and in case you've been wondering if it was worth it; yes, the PoC proved that the target application with the 150 KB ViewState was indeed vulnerable to XSRF.


LibreOffice 4.0 workaround for read-only FS

2013-02-10

LibreOffice 4.0 got released on 7th February, and since it offered improved OOXML interoperability, I immediately downloaded and installed it on my laptop. It worked quite well, but after the next boot, it just flashed the window for a tenth of a second, and displayed the following output on the console.

Fatal Python error: Py_Initialize: Unable to get the locale encoding
Traceback (most recent call last):
  File "<frozen importlib._bootstrap>", line 1558, in _find_and_load
  File "<frozen importlib._bootstrap>", line 1525, in _find_and_load_unlocked
  File "<frozen importlib._bootstrap>", line 586, in _check_name_wrapper
  File "<frozen importlib._bootstrap>", line 1023, in load_module
  File "<frozen importlib._bootstrap>", line 1004, in load_module
  File "<frozen importlib._bootstrap>", line 562, in module_for_loader_wrapper
  File "<frozen importlib._bootstrap>", line 854, in _load_module
  File "<frozen importlib._bootstrap>", line 990, in get_code
  File "<frozen importlib._bootstrap>", line 1051, in _cache_bytecode
  File "<frozen importlib._bootstrap>", line 1065, in set_data
OSError: [Errno 30] Read-only file system: '/usr/local/opt/libreoffice4.0/program/../program/python-core-3.3.0/lib/encodings/__pycache__'

I symlinked /opt to /usr/local/opt, and for many reasons (including faster boot, storing /usr on an SSD) I mount /usr in read-only mode by default, and use the following snippet in /etc/apt/apt.conf.d/12remount to do the magic upon system upgrade and software installs.

DPkg
{
    Pre-Invoke {"mount -o remount,rw /usr && mount -o remount,exec /var && mount -o remount,exec /tmp";};
    Post-Invoke {"mount -o remount,ro /usr ; mount -o remount,noexec /var && mount -o remount,noexec /tmp";};
}

It seems that LibreOffice 4.0 tries to put compiled Python objects into a persistent cache, and since it resides on a read-only filesystem, it cannot even create the __pycache__ directories needed for that. My workaround is the following shell script that needs to be ran just once, and works quite well by letting LibreOffice put its cached pyc files into /tmp.

#!/bin/sh
mount /usr -o rw,remount
find /opt/libreoffice4.0/program/python-core-3.3.0/lib -type d \
    -exec ln -s /tmp {}/__pycache__ \;
mount /usr -o ro,remount

Four free software I started using in 2012

2013-02-02

At the end of 2012, I realized that two of the software I started using in that year started with the letter 'm', and later, I remembered two other as well, so here's this post to document what I used in 2013.

mcabber (console XMPP a.k.a. Jabber client with built-in OTR support)

In the last ten years, I always preferred IRC to XMPP/MSN Messenger/Skype since although all of them has both the option to one-to-one and many-to-many chat, latter is the common use-case for IRC while former is with all the others. That's when Stefan showed me OTR (Off-the-Record) messaging, which provided strong autentication and encryption along with deniability afterwards. We started experimenting with version 1 on IRC using irssi-otr, but found it to be quite unstable, and another big problem was that I prefer to run irssi on a remote server, which defies the whole purpose of the end-to-end security OTR aims to provide.

So I decided to give it a try with XMPP, especially since H.A.C.K. has its own server – with registration available to anyone – at xmpp.hsbp.org. Stefan recommended me mcabber as a client, and although it has its limitations (for example, it cannot connect to multiple servers and I had to use Pidgin for registration), I found it perfect for my use-cases, as it has built-in support for OTR up to version 2, and has a nice console UI.

mcabber in action

minidlna (lightweight DLNA/UPnP media server)

I didn't know what DLNA was before I got my hands on a device that actually supported it, then I started using Serviio, but it had its limitations. It required Java, updated the local repository really slow, had an awful and complicated GUI – and had I mentioned it ran on Java? After a week, I started looking for alternatives, I naïvely typed apt-cache search dlna and that's how I met found minidlna, which was quite the opposite of Serviio.

It consisted of a single native executable, a config file and some docs, and since it's targeted at embedded systems, it ran quite fast on my dual i3 notebook. The Debian version runs as an unprivileged user by default, and I added my user to the minidlna group, so I can just drop/link files into the /var/lib/minidlna directory, and they just become accessible for any DLNA consumer. In case of content from Bittorrent, I can even download it to a remote server, mount it with sshfs (also one of my favorite solutions), symlink it into the directory, and the TV magically plays the file from the remote server via my notebook over the home Wi-Fi, which works suprisingly well even in case of HD contents. Also, on Debian, the DLNA icon is a Debian swirl logo, so it even looks great in the TV menu. :)

minidlna in action

mosh (SSH replacement extension for roaming clients and laggy connections)

I think SSH is one of those software that demonstrate the power of “the Unix way” the best. I use it for lots of purposes, but at the same time, I've found it really hard to use in case of laggy connections. I cannot even decide, which one I hate better, both cellular data connections (GPRS, EDGE, 3G, etc.) and suboptimal Wi-Fi networks can make me want to smash the keyboard. After using mosh while uploading huge videos over a consumer-grade asymmetric uplink, I also found that networks without QoS can also make the interactive SSH experience turn into a text-based RPG.

I installed mosh on the two boxes I most regularly log into via SSH, and found it really useful, especially since Daniel Drown patched mosh support into ConnectBot, an Android terminal emulator and SSH client, which makes sense, since handheld devices have the most chance to be connected to networks matching the description above. Although some say it breaks interactive applications like VIM, I had no problems with version 1.2.3 I downloaded and compiled almost two months ago, so if you also find yourself connected to laggy networks, give it a try!

mosh in action on Android

mutt (the mail user agent that sucks less)

I've been a KMail user since around 2007 and although I saw many of my friends using mutt with server-side magic, I used it just like my window manager and my shell – a tool, which I used until it worked without a hassle. When it misbehaved or crashed (it did so quite a few times), I sent bugreports, partly to make myself feel better, partly to evade “and have you reported it” questions, but I also hoped that they'll fix these properly. Then one day, during an IMAP mass move operation, KMail crashed, and did so even after restart. I've had quite an experience in bruteforcing KMail into a working state from the past, but when I couldn't change the situation in half an hour, I decided that it's time to change.

I had three mailboxes on two IMAPS servers with two distinct SMTPSA MTAs to send mails through, and I also used client-side filtering extensively. I migrated latter functionality to procmail on one of the servers, and as of February 2013, I use a transitional setup with on-line IMAP mailboxes and a local header cache. In the near future, I plan to migrate online IMAP access to a solution based on offlineimap and run a local MTA that forwards mail to the appropriate SMTP server, preferably through a tunnel/VPN to avoid password authentication and my endpoint IP address appearing in the MIME envelope.

I only had one problem so far, it seems that the online IMAP functionality is not so well-tested in mutt, so even though I use Debian testing, it crashed in around 30% of the cases when changing IMAP directories, but I managed to solve it by compiling Mutt from source, including the folder sidebar patch. Here's how it looks with the current config, displaying the Python SOAP mailing list.

mosh in action on Android


FFmpeg recipes for workshop videos

2013-01-23

In November 2012, I started doing Arduino workshops in H.A.C.K. and after I announced it on some local channels, some people asked if it could be recorded and published. At first, it seemed that recording video would require the least effort to publish what we've done, and while I though otherwise after the first one, now we have a collection of simple and robust tools and snippets that glue them together that can be reused for all future workshops.

The recording part was simple, I won't write about it outside this paragraph, but although the following thoughts might seem trivial, important things cannot be repeated enough times. Although the built-in microphones are great for lots of purposes, unless you're sitting in a silent room (no noise from machines nor people) or you already use a microphone with an amplifier, a microphone closer to the speaker should be used. We already got a cheap lavalier microphone with a preamplifier and 5 meters of cable, so we used that. It also helps if the camera operator has a headphone, so the volume level can be checked, and you won't freak out after importing the video to the PC that either the level is so low that it has lots of noise or it's so high that it becomes distorted.

I used a DV camera, so running dvgrab resulted in dvgrab-*.dv files. Although the automatic splitting is sometimes desireable (not just because of crippled file systems, but it makes it possible to transfer each file after it's closed, lowering the amount of drive space needed), if not, it can be disabled by setting the split size to zero using -size 0. It's also handy to enable automatic splitting upon new recordings with -autosplit. Finally, -timestamp gives meaningful names to the files by using the metadata recorded on the tape, including the exact date and time.

The camera I used had a stereo microphone and a matching stereo connector, but the microphone was mono, with a connector that shorted the right channel and the ground of the input jack, the audio track had a left channel carrying the sound, and a right one with total silence. My problem was that most software handled channel reduction by calculating an average, so the amplitude of the resulting mono track was half of the original. Fortunately, I found that ffmpeg is capable of powerful audio panning, so the following parameter takes a stereo audio track, discards the right channel, and uses the left audio channel as a mono output.

-filter_complex "pan=1:c0=c0"

I also wanted to have a little watermark in the corner to inform viewers about the web page of our hackerspace, so I created an image with matching resolution in GIMP, wrote the domain name in the corner, and made it semi-transparent. I used this method with Mencoder too, but FFmpeg can handle PNGs with 8-bit alpha channels out-of-the-box. The following, combined command line adds the watermark, fixes the audio track, and encodes the output using H.264 into an MKV container.

$ ffmpeg -i input.dv -i watermark.png -filter_complex "pan=1:c0=c0" \
    -filter_complex 'overlay' -vcodec libx264 output.mkv

A cropped sample frame of the output can be seen below, with the zoomed watermark opened in GIMP in the corner.

hsbp.org watermark

I chose MKV (Matroska) because of the great tools provided by MKVToolNix (packaged under the same name in lowercase for Debian and Ubuntu) that make it possible to merge files later in a safe way. Merging was needed in my case for two reasons.

  • If I had to work with split .dv files, I converted them to .mkv files one by one, and merged them in the end.
  • I wanted to add a title to the beginning, which also required a merge with the recorded material.

I tried putting the title screen together from scratch, but I found it much easier to take the first 8 seconds of an already done MKV using mkvmerge, then placed a fully opaque title image of matching size using the overlay I wrote about above, and finally replace the sound with silence. In terms of shell commands, it's like the following.

ffmpeg -i input.mkv -i title.png -filter_complex 'overlay' -an \
    -vcodec libx264 title-img.mkv
mkvmerge -o title-img-8s.mkv --split timecodes:00:00:08 title-img.mkv
rm -f title-img-8s-002.mkv
ffmpeg -i title-img-8s-001.mkv -f lavfi -i "aevalsrc=0::s=48000" \
    -shortest -c:v copy title.mkv
rm -f title-img-8s-001.mkv

The first FFmpeg invocation disables audio using the -an switch, and produces title-img.mkv that contains our PNG image in the video track, and has no audio. Then mkvmerge splits it into two files, an 8 seconds long title-img-8s-001.mkv, and the rest as title-img-8s-002.mkv. Latter gets discarded right away, and a second FFmpeg invocation adds an audio track containing nothing but silence with a frequency (48 kHz) matching that of the recording. The -c:v copy parameter ensures that no video recompression is done, and -shortest discourages FFmpeg from trying to read as long as at least one input has data, since aevalsrc would generate silence forever.

Finally, the title(s) and recording(s) can be joined together by using mkvmerge for the purpose its name suggest at last. If you're lucky, the command line is as simple as the following:

$ mkvmerge -o workshop.mkv title.mkv + rec1.mkv + rec2.mkv

If you produced your input files using the methods described above, if it displays an error message, it's almost certainly the following (since all resolution/codec/etc. parameters should match, right?).

No append mapping was given for the file no. 1 ('rec1.mkv'). A default
mapping of 1:0:0:0,1:1:0:1 will be used instead. Please keep that in mind
if mkvmerge aborts with an error message regarding invalid '--append-to'
options.
Error: The track number 0 from the file 'dvgrab-001.mkv' cannot be
appended to the track number 0 from the file 'title.mkv'. The formats do
not match.

As the error message suggests, the order of the tracks can differ between MKV files, so an explicit mapping must be provided to mkvmerge for matching the tracks befor concatenation. The mapping for the most common case (a single audio and a single video track) is the following.

$ mkvmerge -o workshop.mkv t.mkv --append-to '1:0:0:1,1:1:0:0' + r1.mkv

I've had a pretty good experience with H.264-encoded MKV files, the size stayed reasonable, and most players had no problem with it. It also supports subtitles, and since YouTube and other video sharing sites accept it as well, with these tips, I hope it gets used more in recording and publishing workshops.


Complementing Python GPGME with M2Crypto

2012-12-31

While the GPGME Python bindings provide interface to most of the functionality provided by GnuPG, so I could generate keys and perform encryption and decryption using them, I found that it wasn't possible to list, which public keys can decrypt a PGP encrypted file. Of course, it's always a possibility to invoke the gpg binary, but I wanted to avoid spawning processes if possible.

As Heikki Toivonen mentioned in a Stack Overflow thread, the M2Crypto library had a PGP module, and based on a demo code, it seemed to be able to parse OpenPGP files into meaningful structures, including pke_packet that contains an attribute called keyid. I installed the module from the Debian package python-m2crypto, tried calling the PGP parser functionality, and found that

  • the keyid attribute is called _keyid now, and
  • after returning the pke_packet instances, it raises an XXXError in case of OpenPGP output generated by GnuPG 1.4.12.

It's also important to note that the M2Crypto keyid is an 8 bytes long raw byte string, while GPGME uses 16 characters long uppercase hex strings for the same purpose. I chose to convert the former to the latter format, resulting in a set of hexadecimal key IDs. Later, I could check, which keys available in the current keyring are able to decrypt the file. The get_acl function thus returns a dict mapping e-mail addresses to a boolean value that indicates the key's ability to decrypt the file specified in the filename parameter.

from M2Crypto import PGP
from contextlib import closing
from binascii import hexlify
import gpgme

def get_acl(filename):
    with file(filename, 'rb') as stream:
        with closing(PGP.packet_stream(stream)) as ps:
            own_pk = set(packet_stream2hexkeys(ps))
    return dict(
            (k.uids[0].email, any(s.keyid in own_pk for s in k.subkeys))
            for k in gpgme.Context().keylist())

def packet_stream2hexkeys(ps):
    try:
        while True:
            pkt = ps.read()
            if pkt is None:
                break
            elif pkt and isinstance(pkt, PGP.pke_packet):
                yield hexlify(pkt._keyid).upper()
    except:
        pass

Connecting Baofeng UV-5R to a Linux box

2012-12-23

Ever since I bought my Baofeng UV-5R handheld VHF/UHF FM transceiver, I wanted to hook it up to my notebook – partly to populate the channel list without fighting the crippled UI, partly out of curiosity. First, I had to build a cable, since I didn't receive one in the package, and it would've cost at least around 20 bucks to get my hands on one – plus the delay involved in postal delivery. In a Yahoo! group, jwheatleyus mentioned the following pinout:

  • 3.5mm Plug Programming Pins
    • Sleeve: Mic – (and PTT) Rx Data
    • Ring: Mic +
    • Tip: +V
  • 2.5mm Plug
    • Sleeve: Speaker – (and PTT) Data GND
    • Ring: Tx Data
    • Tip: Speaker +
  • Connect Sleeve to Sleeve for PTT

I took apart the headset bundled with the gear, and verified this pinout in case of the Mic/Speaker/PTT lines with a multimeter, so I only had to connect these pins to the notebook. Since I already had an FTDI TTL-232R-5V cable lying around for use with my Diavolino (actually, I won both of them on the LoL shield contest at 27C3), I created a breakout board that can be connected to the radio, and had pin headers just in the right order for the FTDI cable and two others for speaker and mic lines. The schematic and the resulting hardware can be seen below.

Baofeng UV-5R breakout board

With the physical layer ready, I only had to find some way to manipulate the radio using software running on the notebook. While many software available for this radio is either closed and/or available for Windows only, I found Chirp, a FLOSS solution written in Python (thus available for all sane platforms) which – as of this writing – could access Baofeng UV-5R in the experimental daily builds. Like most Python software, Chirp doesn't require any install procedures either, downloading and extracting the tarball led to a functional and minimalistic GUI. First, I set the second tuner to display the name of the channel, and uploaded a channel list with the Hármashatár-hegy SSTV relay (thus the name HHHSSTV) at position 2, with the following results.

HHHSSTV channel stored on Baofeng UV-5R

I could also access an interesting tab named other settings that made it possible to edit the message displayed upon startup and limit the frequency range in both bands.

Other settings and their effect on Baofeng UV-5R

Although Chirp states that the driver for UV-5R is still experimental, I didn't have any problems with it, and as it's written in Python, its code is readable and extensible, while avoiding cryptic dependencies. It's definitely worth a try, and if lack of PC connectivity without proprietary software was a reason for you to avoid this radio, then I have good news for you.


Restricting SSH access to rsync for Android

2012-11-30

I like to synchronize photos taken with my Android phone with my notebook, and since I dislike centralized solutions (mostly for reasons of privacy), I installed rsync for Android, which is easy to install from Play Store, and with SSH public key authentication, syncing the images is easy and secure at the same time.

My problem was that still hadn't collected enough information to trust my phone with powerful public keys (even though I use APG, I only added public keys so far), and having a key on my phone that could allow anyone to log into my notebook through SSH was unacceptable for me, even though I set up a separate user account, and SSH wasn't set up to start at boot.

To solve this problem, I logged what command the application started upon connecting via SSH, and added the following line to the authorized_keys file in the .ssh subdirectory of the home directory of the dedicated user (foo). The lines are split only for easier readability, there should be no line break or whitespace between no-port-forwarding, and no-agent-forwarding.

command="rsync --server -vlHDtre.i . /home/foo/images",no-port-forwarding,
    no-agent-forwarding,no-X11-forwarding,no-pty ssh-dss AAAA...

This way, the private key on the phone can only be used for rsyncing a specific directory, and cannot be used to

  • open a shell or start any other program, or
  • forward TCP ports, SSH agent or X11 connections from/to my notebook.

Thanks to rhapsodhy for the inspiration.


Seesmic Android information leak

2012-11-13

In the August 2012 hekkcamp I hunted for security vulnerabilities in several Android applications and Seesmic Android happened to be one of them. I originally heard about it from rhapsodhy, and it's one of those multi-platform social network clients, this one having the advantage of not requesting crazy privileges, unlike the official Twitter and Facebook apps. Zsombor told me about Mercury, a FLOSS Android vulnerability assessment tool, so I checked out the latest development version from their GitHub repo since 1.0.0, the only version available then happened to be incompatible with recent Android releases.

Using Mercury, I found that Seesmic offers several content providers that not only had interesting names and fields, but were available for reading to any other application running on the device. As Android separates applications pretty strictly, these providers are the favorable way of sharing structured information between apps, and although they can be protected with application-specific permissions, many developers tend to forget about such things. In case of Seesmic, I used the finduri command of Mercury in the provider module.

*mercury#provider> finduri com.seesmic

/data/app/com.seesmic-2.apk:
content://calendar/calendars
content://calendar/events
content://calendar/reminders
content://com.android.calendar/calendars
content://com.android.calendar/events
content://com.android.calendar/reminders
content://com.google.plus.platform/ads
content://com.google.plus.platform/token
content://com.seesmic.aggregate/aggregate_authors
content://com.seesmic.aggregate/aggregate_timelines
content://com.seesmic.facebook/facebook_authors
content://com.seesmic.facebook/facebook_feeds
content://com.seesmic.facebook/facebook_friendlists
content://com.seesmic.facebook/facebook_page_profiles
content://com.seesmic.facebook/facebook_people
content://com.seesmic.facebook/facebook_profiles
content://com.seesmic.facebook/facebook_updates
content://com.seesmic.twitter/accounts
content://com.seesmic.twitter/attachs
content://com.seesmic.twitter/authors
content://com.seesmic.twitter/dm
content://com.seesmic.twitter/list_info
content://com.seesmic.twitter/lists
content://com.seesmic.twitter/mute
content://com.seesmic.twitter/search_results
content://com.seesmic.twitter/searches
content://com.seesmic.twitter/timelines
content://com.seesmic.twitter/topics
content://com.seesmic.twitter/tweets
content://com.seesmic.twitter/userlists
content://com.seesmic.twitter/users

In order to inspect the extracted data and provide a nice and simple proof-of-concept, I developed a small application called CoProLeak (CoPro = Content Provider) that could show the two of the most problematic leaks in the Seesmic application. It's worth noting that the application doesn't require any permissions – as it can be seen on the left frame of the screenshot below – so it could lurk inside any kind of application or game.

  • The content://com.seesmic.facebook/facebook_people provider made all the Facebook friends of the user available with name, Facebook ID and full contact information. This can be seen in the middle frame of the screenshot below, clicking on a person's name displayed his/her photo using the Facebook graph API in a browser window.
  • The content://com.seesmic.twitter/accounts provider made all the accounts configured in the application available with username and password or OAuth token and secret. This can be seen in the right frame of the screenshot below, these credentials are enough for anyone to impersonate the user account.

Working proof-of-concept displaying sensitive information

For example, displaying the list of friends required the following snippet. (The relationship_type filter was necessary to exclude liked pages that were also available from the content provider.)

final Uri SEESMIC_FB_PEOPLE_URI = Uri.parse(
        "content://com.seesmic.facebook/facebook_people");
final String[] projection = { "_id", "full_name" };
final String selection = "relationship_type = ?";
final String[] selectionArgs = { "1" };
final String sortOrder = "full_name";

final Cursor cur = getContentResolver().query(SEESMIC_FB_PEOPLE_URI,
        projection, selection, selectionArgs, sortOrder);

final String[] from = { "full_name" };
final int[] to = { android.R.id.text1 };
setListAdapter(new SimpleCursorAdapter(this,
            android.R.layout.simple_list_item_1, cur, from, to));

As it turned out, contacting a social media related company with such delicate matter wasn't trivial. For purposes of feedback, they had a public forum, which was obviously not the place to describe vulnerabilities in detail. On their about site, I found the e-mail address ContactUs at Seesmic dot com, and sent them a mail right after the proof-of-concept worked. I waited for a month, then tried contacting them on their Facebook page, where they replied 5 days later, and said to open a ticket in their Zendesk system.

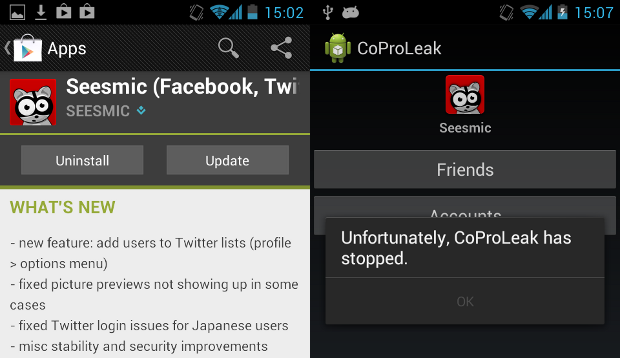
After I did so, they replied that they'll “let [their] Dev Team know about this as [they]'ll review the issue”. I waited for another two months, and then one day, I just opened the notification on my Android phone that a new version of Seesmic was available, that contains “security improvements”. Since they haven't released an update through the Play Store since summer, I immediately tried CoProLeak and I was pleased to found that both functions of the proof-of-concept application crashed with permission problems.

Updated version notification and crashing proof-of-concept

To be sure, I checked the logs with ADB, and it's pretty clear that the application gets terminated because of (unhandled) permission denial.

I/ActivityManager(  246): START {cmp=hu.silentsignal.android.coproleak/.SeesmicAccountsList u=0} from pid 8388
W/ActivityManager(  246): Permission denied: checkComponentPermission() owningUid=10073
W/ActivityManager(  246): Permission Denial: opening provider com.seesmic.data.DbProvider from ProcessRecord{422e6d78 8388:hu.silentsignal.android.coproleak/u0a46} (pid=8388, uid=10046) that is not exported from uid 10073
D/AndroidRuntime( 8388): Shutting down VM
W/dalvikvm( 8388): threadid=1: thread exiting with uncaught exception (group=0x414dc300)
E/AndroidRuntime( 8388): FATAL EXCEPTION: main
E/AndroidRuntime( 8388): java.lang.RuntimeException: Unable to start activity ComponentInfo{hu.silentsignal.android.coproleak/hu.silentsignal.android.coproleak.SeesmicAccountsList}: java.lang.SecurityException: Permission Denial: opening provider com.seesmic.data.DbProvider from ProcessRecord{422e6d78 8388:hu.silentsignal.android.coproleak/u0a46} (pid=8388, uid=10046) that is not exported from uid 10073
E/AndroidRuntime( 8388): Caused by: java.lang.SecurityException: Permission Denial: opening provider com.seesmic.data.DbProvider from ProcessRecord{422e6d78 8388:hu.silentsignal.android.coproleak/u0a46} (pid=8388, uid=10046) that is not exported from uid 10073
E/AndroidRuntime( 8388):        at android.os.Parcel.readException(Parcel.java:1425)
E/AndroidRuntime( 8388):        at android.os.Parcel.readException(Parcel.java:1379)
E/AndroidRuntime( 8388):        at android.app.ActivityManagerProxy.getContentProvider(ActivityManagerNative.java:2354)
E/AndroidRuntime( 8388):        at android.app.ActivityThread.acquireProvider(ActivityThread.java:4219)
E/AndroidRuntime( 8388):        at android.app.ContextImpl$ApplicationContentResolver.acquireUnstableProvider(ContextImpl.java:1703)
E/AndroidRuntime( 8388):        at android.content.ContentResolver.acquireUnstableProvider(ContentResolver.java:1099)
E/AndroidRuntime( 8388):        at android.content.ContentResolver.query(ContentResolver.java:354)
E/AndroidRuntime( 8388):        at android.content.ContentResolver.query(ContentResolver.java:313)
E/AndroidRuntime( 8388):        at hu.silentsignal.android.coproleak.SeesmicAccountsList.onCreate(SeesmicAccountsList.java:38)
E/AndroidRuntime( 8388):        at android.app.Activity.performCreate(Activity.java:5008)
E/AndroidRuntime( 8388):        at android.app.Instrumentation.callActivityOnCreate(Instrumentation.java:1079)
E/AndroidRuntime( 8388):        at android.app.ActivityThread.performLaunchActivity(ActivityThread.java:2023)
E/AndroidRuntime( 8388):        ... 11 more
W/ActivityManager(  246):   Force finishing activity hu.silentsignal.android.coproleak/.SeesmicAccountsList
W/ActivityManager(  246):   Force finishing activity hu.silentsignal.android.coproleak/.Main

Leaking data using DIY USB HID device

2012-10-29

Years ago, there was a competition, where contestants had to extract date out of a system that was protected by a state-of-the-art anti-leaking solution. Such challenges are based on the fact that private information should be available for use on a protected computer, but it must stay within the physical boundaries of the system. Obvious methods like networking and removable storage devices are usually covered by these mechanisms, but as with DRM, it's difficult – if not impossible – to think of every possibility. For example, in the aforementioned challenge, some guys used the audio output to get a file off the box – and when I heard about the Little Wire project, I started thinking about a new vector.

The requirements for my solution was to be able to extract data out of a

  • Windows 7 box
  • with no additional software installed
  • logged in as non-administrative account
  • that only allows a display, a keyboard and a mouse to be connected.

My idea was to use a USB HID device, since these can be connected to such system without additional drivers or special privileges. I've already built such a device for interfacing JTAG using an Arduino clone and V-USB, so I could reuse both hardware and experience, but avoid using an external programmer. The V-USB library made it possible for me to create an USB device without buying purpose-built hardware, by bit-banging the USB protocol with the general-purpose input and output pins of an AVR ATmega328 microcontroller. When used correctly, the AVR device shows up as a regular keyboard in the Windows 7 devices dialog.

USBpwn in the Windows 7 devices dialog

Keyboard was a logical choice for data extraction, since it was the only part of the HID specification that has a three bit wide output channel that's controllable without drivers and/or administrative privileges: the NUM, CAPS and SCROLL lock status LEDs. I've crafted a simple protocol that used NUM and CAPS as two data bits and SCROLL as a clock signal. When the SCROLL LED was on, the other two LEDs could be sampled for data. The newline (that could be achieved by “pressing” the Enter/Return key, since we're already “keyboards”) was the acknowledgement signal, making the protocol fully synchronous. For example, the bits 1101 could be sent in the following way:

            __________________________________
   NUM ____/
                               _______________
  CAPS _______________________/
                ______            ______
SCROLL ________/      \__________/      \_____

                  01                11

On the Windows host, an extractor agent was needed, that performed the transfer using the following code snippet:

set_lock(NUM,  (frame & 0x01) == 0x01);
set_lock(CAPS, (frame & 0x02) == 0x02);
set_lock(SCROLL, 1);
getchar();
toggle_key(SCROLL);

Bits were sent from LSB to MSB, n bytes were sent from 0 to n-1, stored at the nth position in the EEPROM. I tried using an SD card to store the data received, but it conflicted with the V-USB library, so I had to use the built-in EEPROM – the MCU I used was the ATmega328, which had 1 kbyte of it, which limited the size of the largest file that could be extracted.

Of course, the aforementoned agent had to be placed on the Windows box before transmitting file contents. The problem was similar to using dumb bindshell shellcodes to upload binary content, and most people solved it by using debug.com. Although it's there on most versions of Windows, it has its limitations: the output file can be 64 kilobytes at maximum, and it requires data to be typed using hexadecimal characters, which requires at least two characters per byte.

In contrast, base64 requires only 4 characters per 3 bytes (33% overhead instead of 100%), and there's a way to do it on recent Windows systems using a good old friend of ours: Visual Basic. I created a simple VBS skeleton that decodes base64 strings and saves the binary output to a file, and another simple Python script that fills the skeleton base64-encoded content, and also compresses it (like JS and CSS minifiers on the web). The output of the minified version is something like the one below.

Dim a,b
Set a=CreateObject("Msxml2.DOMDocument.3.0").CreateElement("base64")
a.dataType="bin.base64"
a.text="TVpQAAIAAAAEAA8A//8AALgAAAAAAAAAQAAaAAAAAAAAAAAAAAAAAA..."
Set b=CreateObject("ADODB.Stream")
b.Type=1
b.Open
b.Write a.nodeTypedValue
b.SaveToFile "foo.exe",2

The result is such a solution that makes it possible to carry a Windows agent (a simple exe program) that can be typed in from the Flash memory of the AVR, which, when executed, can leak any file using the LEDs. I successfully demonstrated these abilities at Hacktivity 2012, my slideshow is available for download on the Silent Signal homepage, videos should be posted soon. The hardware itself can be seen below, the self-made USB interface shield is the same as the one in the V-USB wiki hardware page.

USBpwn hardware

The hardware itself is bulky, and I won't try to make it smaller and faster any time soon, since I've already heard enough people considering it weaponized. Anyway, the proof-of-concept hardware and software solution

  • can type in 13 characters per seconds from the flash memory of the AVR,
  • which results in 10 bytes per seconds (considering base64 encoding),
  • and after deploying the agent, it can read LEDs with 1.24 effective bytes per second.

All the code is available in my GitHub repositories:


How I customized LaTeX beamer output

2012-10-23

Because of a response I got to my post about using MS Word templates with LaTeX, documenting the way I've been generating presentation material for my talks since 2010 got its priority raised. Like I said in the aforementioned post, I prefer using LaTeX for typesetting, and it's the same for creating those frames that appear behind my back during talks.

For the first few talks, I used the default template, then I switched to the Warsaw theme, which I frequently encounter in the beamer-using subset of IT security presenters. In 2011, Lasky – the graphics genius around Silent Signal – designed a presentation template that I actually liked, so I started fiddling with beamer to adapt the new theme.

First, I created a file called s2beamer.sty with the usual header, and two lines that set a sensible base. I had to disable shadow, since it couldn't handle setting background images, as it assumed that the background was a solid color.

\ProvidesPackage{s2beamer}

\useinnertheme[shadow=false]{rounded}
\usecolortheme{whale}

The theme I used included a separate background image for the title slide, and another for the rest (the ones with actual content), so I defined a command to create a title slide, which sets the background before and after the first frame. I added newlines only for readability, they must be removed or commented in the .sty file.

\newcommand{\titleframe}{
    \usebackgroundtemplate{
        \includegraphics[width=\paperwidth,height=\paperheight]
            {img/titlebg.jpg}
    }
    \frame{\titlepage}
    \usebackgroundtemplate{
        \includegraphics[width=\paperwidth,height=\paperheight]
            {img/slidebg.jpg}
    }
}

After setting the background, the colors needed to be changed too. First, I set the color of the body text and structural elements (such as list bullets). The color of the frame titles was set to the same orangeish one.

\setbeamercolor{normal text}{fg=white}
\usecolortheme[RGB={239,73,35}]{structure}
\setbeamercolor{frametitle}{fg=structure, bg=}

The default list bullets are actual bullets, which looked bad on the background image, so I changed them to little arrows. Also, I hid the navigation controls (placed in the lower-right corner) since they conflicted with the footer of the theme, and most people doesn't even know what they're for.

\setbeamertemplate{items}[default]
\setbeamertemplate{navigation symbols}{}

URLs and code snippets are written using fixed-size fonts (as they should be), but I prefer using Inconsolata for this purpose, instead of the default.

\RequirePackage{inconsolata}

In case of code snippets, I prefer using the listings package, and I configured it to use such colors for syntax highlighting that go well with the theme (newline added in case of the last line for readability only).

\RequirePackage{listings}
\definecolor{s2}{RGB}{240, 56, 31}
\definecolor{s2y}{RGB}{255, 200, 143}
\lstset{basicstyle=\footnotesize\ttfamily, breaklines=true,
    tabsize=2, keywordstyle=\color{s2}, stringstyle=\color{s2y}}

Since I give talks both in English and Hungarian, I added the following expression to set the order of first and last name according to babel language set by the document. (The \hunnexlabel command is defined when the babel language is set to magyar.) It also turns the e-mail address into a hyperlink that launches the default e-mail client when clicked on.

\ifdefined\hunnewlabel
    \renewcommand{\name}{\lastname\ \firstname}
\else
    \renewcommand{\name}{\firstname\ \lastname}
\fi

\author{\name\\\texttt{\href{mailto:\email}{\email}}}

The above lines require the following commands in the document:

\renewcommand{\email}{vsza@silentsignal.hu}
\renewcommand{\firstname}{András}
\renewcommand{\lastname}{Veres-Szentkirályi}

With these all set, I can create presentation material that look awesome but are still generated from plain text, thus compatible with all sensible editors and SCMs. You can see the snippets above in action by taking a look at my Hacktivity 2012 slides (four of them are below this paragraph), and some of them in the ones I made for Hacktivity 2011.

Four slides from my Hacktivity 2012 talk


Hackish shell 1-liner for SSL session analysis

2012-10-22

Last week, I tried to measure the entropy of the session ID of an SSL/TLS-wrapped web application. I prefer Burp Suite Pro for such tasks, but in this case, it could only gather 5 to 10 session IDs per second. I fired up Wireshark and found that it didn't reuse the SSL/TLS context, but opened a new TCP socket and performed handshake for every new session, even though the HTTP server set the Connection header to keep-alive.

Since collecting session IDs is not exactly rocket science, I decided that it's faster to roll my own solution instead of waiting for the dead slow Burp sequencer. First, I put a simple HTTP request into a text file, carefully ending the lines Windows-style (\r\n) and putting an empty line at the end.

HEAD / HTTP/1.1
Host: domain.tld
User-Agent: Silent Signal
Connection: keep-alive

I used HEAD so that I could minimize the latency and server load by keeping the server from sending me the actual contents (the session ID got sent in a Set-Cookie header anyways). First, I sent as many requests as I could, completely disregarding the answers.

$ while /bin/true; do cat req.txt; done | \
    openssl s_client -connect domain.tld:443 2>&1 | fgrep Set-Cookie

As it turned out, the server stopped responding after around 100 requests, so I simply reduced the number of requests per connection to 100, and put the whole thing into a while loop, so that it would keep opening new SSL/TLS connections after every 100 requests. I also added a simple sed invocation so that the result can be directly used by Burp for analysis.

$ while /bin/true; do (for i in $(seq 100); do cat req.txt; done | \
    openssl s_client -connect domain.tld:443 2>&1 | fgrep Set-Cookie | \
    sed 's/^[^=]*=\([A-Z]*\);.*$/\1/' >>cookies.txt); done

In another terminal, I started watch -n1 'wc -l cookies.txt', so I also had a sense of progress, as the above shell 1-liner produced the 20000 tokens required by FIPS in a matter of minutes.


ADSdroid 1.2 released due to API change

2012-10-18

On October 6, 2012, Matthias Müller sent me an e-mail, telling me that the download functionality of ADSdroid was broken. As it turned out, AllDataSheet changed their website a little bit, resulting in the following exception getting thrown during download.

java.lang.IllegalArgumentException: Malformed URL: javascript:mo_search('444344','ATMEL','ATATMEGA168P');
    at org.jsoup.helper.HttpConnection.url(HttpConnection.java:53)
    at org.jsoup.helper.HttpConnection.connect(HttpConnection.java:25)
    at org.jsoup.Jsoup.connect(Jsoup.java:73)
    at hu.vsza.adsapi.Part.getPdfConnection(Part.java:32)
    at hu.vsza.adsdroid.PartList$DownloadDatasheet.doInBackground(PartList.java:56)
    at hu.vsza.adsdroid.PartList$DownloadDatasheet.doInBackground(PartList.java:48)
    at android.os.AsyncTask$2.call(AsyncTask.java:264)
    at java.util.concurrent.FutureTask$Sync.innerRun(FutureTask.java:305)
    at java.util.concurrent.FutureTask.run(FutureTask.java:137)
    at android.os.AsyncTask$SerialExecutor.run(AsyncTask.java:208)
    at java.util.concurrent.ThreadPoolExecutor.runWorker(ThreadPoolExecutor.java:1076)
    at java.util.concurrent.ThreadPoolExecutor$Worker.run(ThreadPoolExecutor.java:569)
    at java.lang.Thread.run(Thread.java:856)
 Caused by: java.net.MalformedURLException: Unknown protocol: javascript
    at java.net.URL.<init>(URL.java:184)
    at java.net.URL.<init>(URL.java:127)
    at org.jsoup.helper.HttpConnection.url(HttpConnection.java:51)
    ... 12 more

The address (href) of the link (<a>) used for PDF download has changed from a simple HTTP one to a JavaScript call that JSoup, the library I used for HTML parsing and doing HTTP requests couldn't possibly handle. The source of the mo_search function can be found in js/datasheet_view.js. The relevant part can be seen below, I just inserted some whitespace for easier readability.

function mo_search(m1, m2, m3) {
    frmSearch2.ss_chk.value = m1;
    frmSearch2.sub_chk.value = m2;
    frmSearch2.pname_chk.value = m3;
    frmSearch2.action = 'http://www.alldatasheet.com/datasheet-pdf/pdf/'
        + frmSearch2.ss_chk.value + '/' + frmSearch2.sub_chk.value
        + '/' + frmSearch2.pname_chk.value + '.html';
    frmSearch2.submit();
}

That didn't seem that bad, so I wrote a simple regular expression to handle the issue.

import java.util.regex.*;

Pattern jsPattern = Pattern.compile(
    "'([^']+)'[^']*'([^']+)'[^']*'([^']+)'");

final Matcher m = jsPattern.matcher(foundPartHref);
if (m.find()) {
    foundPartHref = new StringBuilder(
        "http://www.alldatasheet.com/datasheet-pdf/pdf/")
        .append(m.group(1)).append('/')
        .append(m.group(2)).append('/')
        .append(m.group(3)).append(".html").toString();
}

The regular expression is overly liberal on purpose, in the hope that it can handle small changes in the AllDataSheet website in the future without upgrading the application. I pushed version 1.2 to GitHub, and it contains many other optimizations, too, including enabling ProGuard. The resulting APK is 30% smaller than previous versions, and it can be downloaded by using the link in the beginning of this sentence, or using the QR code below. It's also available from the F-Droid Android FOSS repository, which also ensures automatic upgrades.

ADSdroid QR code


Shift vs. division in managed languages

2012-09-27

From time to time, I hear it from low-level coder monkeys posing as either tech gurus or teachers that using the shift operators (<< and >> in C syntax) instead of multiplication and division in cases when the factor/divisor is an integer power of 2 results in faster code. While I've always been skeptical about such speculations – and I've been reassured several times by many sources, including MSDN forums and Stack Overflow – I haven't tried it for myself, especially in managed languages such as C# that are compiled to a byte code first.

Although Mono is not the reference implementation of C# and the .Net virtual machine, it's the one that runs on my notebook and allows for easy static compilation which makes it possible for me to inspect the machine code generated from the .Net executable file. First, I wrote a simple program that reads a byte from the standard input, divides it by 2, and writes the result to the standard output (mainly to avoid optimization that would replace division with compile-time evaluation).

using System;

class Program
{
    static void Main()
    {
        int a = Console.Read();
        int b = a / 2;
        Console.WriteLine(b);
    }
}

I compiled it with the Mono C# compiler and verified that it works (T = 84 in ASCII).

$ mcs monodiv.cs
$ file monodiv.exe
monodiv.exe: PE32 executable (console) Intel 80386 Mono/.Net assembly, for MS Windows
$ echo T | ./monodiv.exe
42

Dumping the .Net bytecode reveals that the first pass of compilation uses division.

$ monodis monodiv.exe
...
.method private static hidebysig 
       default void Main ()  cil managed 
{
    // Method begins at RVA 0x2058
    .entrypoint
    // Code size 17 (0x11)
    .maxstack 2
    .locals init (
            int32   V_0,
            int32   V_1)
    IL_0000:  call int32 class [mscorlib]System.Console::Read()
    IL_0005:  stloc.0 
    IL_0006:  ldloc.0 
    IL_0007:  ldc.i4.2 
    IL_0008:  div 
    IL_0009:  stloc.1 
    IL_000a:  ldloc.1 
    IL_000b:  call void class [mscorlib]System.Console::WriteLine(int32)
    IL_0010:  ret 
} // end of method Program::Main

Finally, transforming the bytecode into machine code assures us again that premature optimization is the root of all evil, as the code executed by the CPU at runtime contains the good old shift right (shr) opcode.

$ mono --aot=full monodiv.exe 
Mono Ahead of Time compiler - compiling assembly /home/dnet/_projekt/monodiv/monodiv.exe
Code: 38 Info: 4 Ex Info: 6 Unwind Info: 9 Class Info: 30 PLT: 3 GOT Info: 14 GOT: 48 Offsets: 47
Compiled 2 out of 2 methods (100%)
Methods without GOT slots: 2 (100%)
Direct calls: 0 (100%)
JIT time: 0 ms, Generation time: 0 ms, Assembly+Link time: 0 ms.
$ file monodiv.exe.so
monodiv.exe.so: ELF 64-bit LSB shared object, x86-64, version 1 (SYSV), dynamically linked, not stripped
$ objdump -d monodiv.exe.so

monodiv.exe.so:     file format elf64-x86-64


Disassembly of section .text:

...

0000000000001020 <Program_Main>:
1020:       48 83 ec 08             sub    $0x8,%rsp
1024:       e8 17 00 00 00          callq  1040 <plt_System_Console_Read>
1029:       48 8b f8                mov    %rax,%rdi
102c:       c1 ef 1f                shr    $0x1f,%edi
102f:       03 f8                   add    %eax,%edi
1031:       d1 ff                   sar    %edi
1033:       e8 12 00 00 00          callq  104a <plt_System_Console_WriteLine_int>
1038:       48 83 c4 08             add    $0x8,%rsp
103c:       c3                      retq   
103d:       00 00                   add    %al,(%rax)
    ...


next posts >
< prev posts

CC BY-SA RSS Export
Proudly powered by Utterson