The members of H.A.C.K. – one of the less wealthy hackerspaces – felt happy at first, when the place could afford to buy a slightly used UNI-T UT2025B digital storage oscilloscope. Besides being useful as a part of the infrastructure, having a USB and an RS-232 port seized our imagination – one of the interesting use-cases is the ability to capture screenshots from the device to illustrate documentation. As I tried interfacing the device, I found that supporting multiple platforms meant Windows XP and 2000 for the developers, which are not very common in the place.
I installed the original software in a virtual machine, and tried the serial
port first, but found out, that although most of the functionality worked,
taking screenshots is one available only using USB. I connected the scope
using USB next, and although the vendor-product tuple was present in the
list of USB IDs, so lsusb could identify it, no drivers in the kernel tried
to take control of the device. So I started looking for USB sniffing software
and found that on Linux, Wireshark is capable of doing just that.
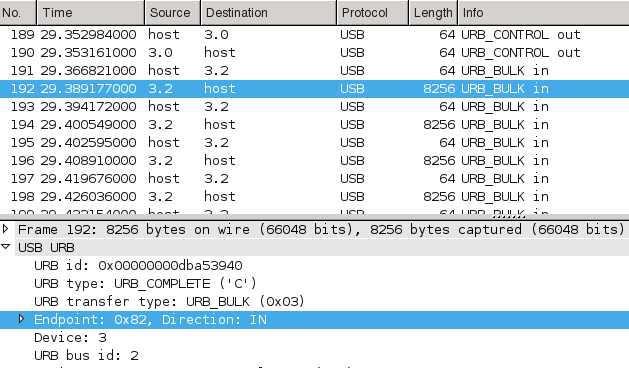
I forwarded the USB device into the VM and captured a screenshot transmission
for analysis. Wireshark was very handy during analysis as well – just like in
case of TCP/IP – so it was easy to spot the multi-kilobyte bulk transfer among
tiny 64 byte long control packets.
I started looking for simple ways to reproduce the exact same conversation using free software – I've used libusb before while experimenting with V-USB on the Free USB JTAG interface project, but C requires compilation, and adding things like image processing makes the final product harder to use on other computers. For these purposes, I usually choose Python, and as it turned out, the PyUSB library makes it possible to access libusb 0.1, libusb 1.0 and OpenUSB through a single pythonic layer. Using this knowledge, it was pretty straightforward to modify their getting started example and replicate the “PC end” of the conversation. The core of the resulting code is the following.
dev = usb.core.find(idVendor=0x5656, idProduct=0x0832)
if dev is None:
    print >>sys.stderr, 'USB device cannot be found, check connection'
    sys.exit(1)

dev.set_configuration()
dev.ctrl_transfer(ReqType.CTRL_OUT, 177, 0x2C, 0)
dev.ctrl_transfer(ReqType.CTRL_IN, 178, 0, 0, 8)
for i in [0xF0] + [0x2C] * 10 + [0xCC] * 10 + [0xE2]:
    dev.ctrl_transfer(ReqType.CTRL_OUT, 177, i, 0)

try:
    dev.ctrl_transfer(ReqType.CTRL_OUT, 176, 0, 38)
    for bufsize in [8192] * 4 + [6144]:
        buf = dev.read(Endpoint.BULK_IN, bufsize, 0)
        buf.tofile(sys.stdout)
    dev.ctrl_transfer(ReqType.CTRL_OUT, 177, 0xF1, 0)
except usb.core.USBError:
    print >>sys.stderr, 'Image transfer error, try again'
    sys.exit(1)
Using this, I managed to get a binary dump of 38912 bytes, which contained the precious screenshot. From my experience with the original software, I already knew that the resolution is 320 by 240 pixels – which meant that 4 bits made up each pixel. Using this information, I started generating bitmaps from the binary dump in the hope of identifying some patterns visually as I already knew what was on the screen. The first results were the result of converting each 4-bit value to a pixel coloured on a linear scale from 0 = black to 15 = white, and looked like the following.
Most of the elements looked like they're in the right spot, and both horizontal and vertical lines seemed intact, apart from the corners. Also, the linear mapping resulted in an overly bright image, and as it seemed, the firmware was transmitting 4-bit (16 color) images, even though the device only had a monochrome LCD – and the Windows software downgraded the quality before displaying it on the PC on purpose. After some fiddling, I figured out that the pixels were transmitted in 16-bit words, and the order of the pixels inside these were 3, 4, 1, 2 (“mixed endian”). After I added code to compensate for this and created a more readable color mapping I finally had a script that could produce colorful PNGs out of the BLOBs, see below for an example.
In the end, my solution is not only free as in both senses and runs on more platforms, but can capture 8 times more colors than the original one. All code is published under MIT license, and further contributions are welcome both on the GitHub repository and the H.A.C.K. wiki page. I also gave a talk about the project in Hungarian, the video recording and the slides can be found on the bottom of the wiki page.