As soon as Let's Encrypt became popular, people started demanding wildcard certificates, and as it turned out, this marked the next milestone in my ACME client stack. On March 13, 2018, wildcard support went live, and I started doing my research again to find the perfect stack.
Although ACME (and thus Let's Encrypt) support many different methods of
validation, wildcard certificates could only be validated using dns-02
.
This involves the ACME API giving the user a challenge, which must be
later returned in the TXT record of _acme-challenge.domain.tld
thus
requires frequent access to DNS records. Most solutions solve the problem
by invoking APIs to the biggest DNS provider, however, I don't use any of
those and have no plan on doing so.
Fortunately, one day I bumped into acme-dns, which had an elegant
solution to this problem. Just like http-01
and http-02
validators follow
HTTP redirects, dns-01
and dns-02
behave in a similar way regarding CNAME
records. By running a tiny specialized DNS server with a simple API, and
pointing a CNAME record to a name that belongs to it, I could have my cake and
eat it too. I only had to create the CNAME record once per domain and that's it.
The next step was finding a suitable ACME client with support for dns-02
and
wildcard certificates. While there are lots of ACMEv1 clients, adoption of
ACMEv2 is a bit slow, which limited my options. Also, since a whole new DNS API
had to be supported, I preferred to find a project in a programming language I
was comfortable contributing in.
This led me to sewer, written in Python, with full support for
dns-02
and wildcard certificates, and infrastructure for DNS providers
plugins. Thus writing the code was pretty painless, and I submitted
a pull request on March 20, 2018. Since requests was already
a dependency of the project, invoking the acme-dns HTTP API was painless, and
implementing the interface was pretty straightforward. The main problem was
finding the acme-dns subdomain since that's required by the HTTP API, while
there's no functionality in the Python standard library to query a TXT record.
I solved that using dnspython, however, that involved adding a new
dependency to the project just for this small task.
I tested the result in the staging environment, which is something I'd recommend for anyone playing with Let's Encrypt to avoid running into request quotas. Interestingly, both the staging and production Let's Encrypt endpoints failed for the first attempt but worked for subsequent requests (even lots of them), so I haven't debugged this part so far. I got my first certificate issued on April 28, 2018 using this new stack, and used the following script:
from sys import argv
import sewer
dns_class = sewer.AcmeDnsDns(
ACME_DNS_API_USER='xxxxxxxx-xxxx-xxxx-xxxx-xxxxxxxxxxxx',
ACME_DNS_API_KEY='yyyyyyyyyyyyyyyyyyyyyyyyyyyyyyyyyyyyyyyy',
ACME_DNS_API_BASE_URL='http://127.0.0.1:zzzz',
)
with open('/path/to/account.key', 'r') as f:
account_key = f.read()
with open('/path/to/certificate.key', 'r') as f:
certificate_key = f.read()
client = sewer.Client(domain_name='*.'+argv[1],
domain_alt_names=[argv[1]],
dns_class=dns_class,
account_key=account_key,
certificate_key=certificate_key,
# ACME_DIRECTORY_URL='https://acme-staging-v02...',
LOG_LEVEL='DEBUG',
)
certificate = client.cert()
with open(argv[1] + '.crt', 'w') as certificate_file:
certificate_file.write(certificate)
By pointing all the CNAME records to the same acme-dns subdomain, I could
hardcode that, and even though there's an API key, I also set acme-dns to
listen on localhost only to limit exposure. By specifying the ACME_DIRECTORY_URL
optional argument in the sewer.Client
constructor, the script can easily be
used on the staging Let's Encrypt infrastructure instead of the production one.
Also, at the time of this writing, certificate_key
is not yet in mainline sewer,
so if you'd like to try it before it's merged, take a look at my pull request
regarding this.
First of all, setting an emulator-wide proxy is really easy, as Fas wrote,
all I needed was the -http-proxy
command line argument. Because of this, I
had to start the emulator from command line – I've only used the GUI provided
by android
before. I looked at the output of ps w
for hints, and at first,
I used a command line like the following.
$ tools/emulator64-arm -avd Android17 -http-proxy http://127.0.0.1:8081
emulator: ERROR: Could not load OpenGLES emulation library: lib64OpenglRender.so: cannot open shared object file: No such file or directory
emulator: WARNING: Could not initialize OpenglES emulation, using software renderer.
Since using the Android emulator without hardware rendering would've been like
using Subversion after Git, I looked into the matter and found that I just had
to set the LD_LIBRARY_PATH
path to the tools/lib
subdirectory of the SDK.
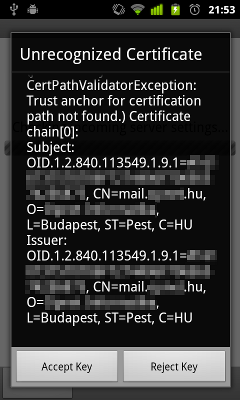
Now I could intercept various TCP connections using Burp, but in case of SSL
connections, certificate mismatch caused the usual problem.
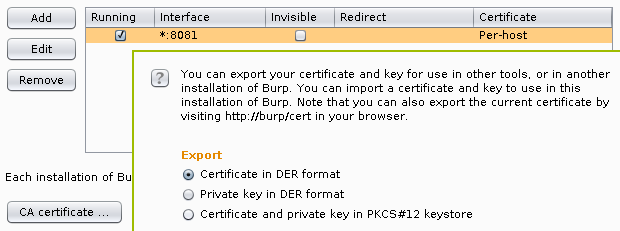
Luckily, Burp provides really easy ways of exporting the its root CA
certificate in the last few releases, I chose to export it into a DER file by
clicking on the Certificate
button on the Options
subtab of the Proxy
tab, and selecting the appropriate radio button as seen below.
Android 4.x stores root CA certificates in system/etc/security/cacerts/
in
PEM format, so running the following command gives a chance to review the
certificate before adding and the output can be used directly by Android.
$ openssl x509 -in burp.cer -inform DER -text
Certificate:
Data:
Version: 3 (0x2)
Serial Number: 1296145266 (0x4d419b72)
Signature Algorithm: sha1WithRSAEncryption
Issuer: C=PortSwigger, ST=PortSwigger, L=PortSwigger, O=PortSwigger, OU=PortSwigger CA, CN=PortSwigger CA
Validity
Not Before: Jan 27 16:21:06 2011 GMT
Not After : Jan 22 16:21:06 2031 GMT
Subject: C=PortSwigger, ST=PortSwigger, L=PortSwigger, O=PortSwigger, OU=PortSwigger CA, CN=PortSwigger CA
Subject Public Key Info:
Public Key Algorithm: rsaEncryption
Public-Key: (1024 bit)
Modulus:
00:a0:c2:98:2b:18:cf:06:42:4a:7b:a8:c9:ce:ab:
1d:ec:af:95:14:2a:dd:58:53:35:9d:68:18:86:a5:
3a:84:6e:6c:32:58:11:f3:d7:bf:b4:9e:29:d2:dc:
22:d2:7f:23:36:16:9d:10:c4:e5:4c:69:55:4d:95:
05:9f:9b:f8:33:37:8d:9f:d0:23:0f:61:d4:53:d7:
40:fd:da:6d:f0:04:75:2c:ef:75:77:0a:4a:8c:34:
f7:06:6b:4e:ea:58:af:a7:89:51:6b:33:a2:89:5c:
6b:64:cb:e6:31:a7:7f:cf:0a:04:59:5b:a4:9e:e3:
96:53:6a:01:83:81:2b:0b:11
Exponent: 65537 (0x10001)
X509v3 extensions:
X509v3 Subject Key Identifier:
FE:2F:6C:CD:EB:72:53:1E:24:33:48:35:A9:1C:DC:C7:D6:42:6F:35
X509v3 Basic Constraints: critical
CA:TRUE, pathlen:0
Signature Algorithm: sha1WithRSAEncryption
1e:f0:92:13:bd:05:e8:03:33:27:72:3d:03:93:1e:d9:d6:cc:
f0:bd:ae:e2:a3:8f:83:e0:65:5e:c7:03:9d:25:d4:d2:8f:6e:
bc:3e:7d:5c:28:2d:b3:dd:c0:8b:8e:60:c5:a8:8c:26:dc:19:
50:db:da:03:fb:39:e0:72:01:26:47:a7:ea:c4:58:f5:c9:71:
bf:03:cd:af:16:07:6d:a5:36:72:4c:b5:8d:4f:86:4a:bc:60:
1c:01:62:eb:e5:48:a0:83:c6:1c:ea:b9:36:d6:b1:f1:de:e6:
19:4a:2a:76:7e:d3:d2:39:70:64:a3:63:ce:89:da:2e:7d:17:
ff:52
-----BEGIN CERTIFICATE-----
MIICxDCCAi2gAwIBAgIETUGbcjANBgkqhkiG9w0BAQUFADCBijEUMBIGA1UEBhML
UG9ydFN3aWdnZXIxFDASBgNVBAgTC1BvcnRTd2lnZ2VyMRQwEgYDVQQHEwtQb3J0
U3dpZ2dlcjEUMBIGA1UEChMLUG9ydFN3aWdnZXIxFzAVBgNVBAsTDlBvcnRTd2ln
Z2VyIENBMRcwFQYDVQQDEw5Qb3J0U3dpZ2dlciBDQTAeFw0xMTAxMjcxNjIxMDZa
Fw0zMTAxMjIxNjIxMDZaMIGKMRQwEgYDVQQGEwtQb3J0U3dpZ2dlcjEUMBIGA1UE
CBMLUG9ydFN3aWdnZXIxFDASBgNVBAcTC1BvcnRTd2lnZ2VyMRQwEgYDVQQKEwtQ
b3J0U3dpZ2dlcjEXMBUGA1UECxMOUG9ydFN3aWdnZXIgQ0ExFzAVBgNVBAMTDlBv
cnRTd2lnZ2VyIENBMIGfMA0GCSqGSIb3DQEBAQUAA4GNADCBiQKBgQCgwpgrGM8G
Qkp7qMnOqx3sr5UUKt1YUzWdaBiGpTqEbmwyWBHz17+0ninS3CLSfyM2Fp0QxOVM
aVVNlQWfm/gzN42f0CMPYdRT10D92m3wBHUs73V3CkqMNPcGa07qWK+niVFrM6KJ
XGtky+Yxp3/PCgRZW6Se45ZTagGDgSsLEQIDAQABozUwMzAdBgNVHQ4EFgQU/i9s
zetyUx4kM0g1qRzcx9ZCbzUwEgYDVR0TAQH/BAgwBgEB/wIBADANBgkqhkiG9w0B
AQUFAAOBgQAe8JITvQXoAzMncj0Dkx7Z1szwva7io4+D4GVexwOdJdTSj268Pn1c
KC2z3cCLjmDFqIwm3BlQ29oD+zngcgEmR6fqxFj1yXG/A82vFgdtpTZyTLWNT4ZK
vGAcAWLr5Uigg8Yc6rk21rHx3uYZSip2ftPSOXBko2POidoufRf/Ug==
-----END CERTIFICATE-----
As rustix wrote, the file name needs to be the the hash of the subject of the certificate, in case of the above certificate, it can be calculated as the following.
$ openssl x509 -noout -subject_hash_old -inform DER -in burp.cer
9a5ba575
Now all we need is to upload the file using adb.
$ adb push burp.cer /system/etc/security/cacerts/9a5ba575.0
failed to copy 'burp.cer' to '/system/etc/security/cacerts/9a5ba575.0':
Read-only file system
The error message was fairly straightforward, /system
is mounted read-only,
all we need to do is remounting it in read-write (rw) mode.
$ adb shell
root@android:/ # mount -o rw,remount /system
root@android:/ # ^D
$ adb push burp.cer /system/etc/security/cacerts/9a5ba575.0
failed to copy 'burp.cer' to '/system/etc/security/cacerts/9a5ba575.0':
Out of memory
That's a tougher one, but easily solveable by resizing the system partition
using the emulator command line argument -partition-size
. With this change as
well as the library path for OpenGL, the full command line looks like the
following (of course, 64
should be removed if you're using a 32-bit OS).
$ LD_LIBRARY_PATH=tools/lib/ tools/emulator64-arm -avd Android17 \
-http-proxy http://127.0.0.1:8081 -partition-size 512
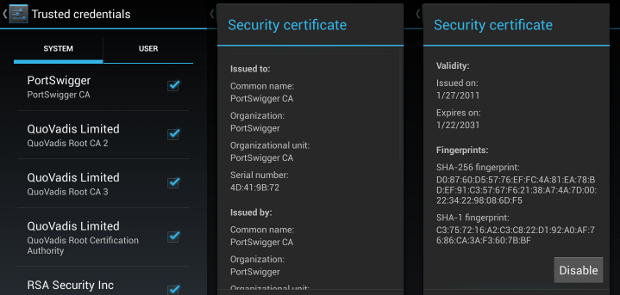
Since restarting the emulator wiped my changes from /system
, I had to upload
the certificate again, and finally, it appeared in the list of system
certificates.
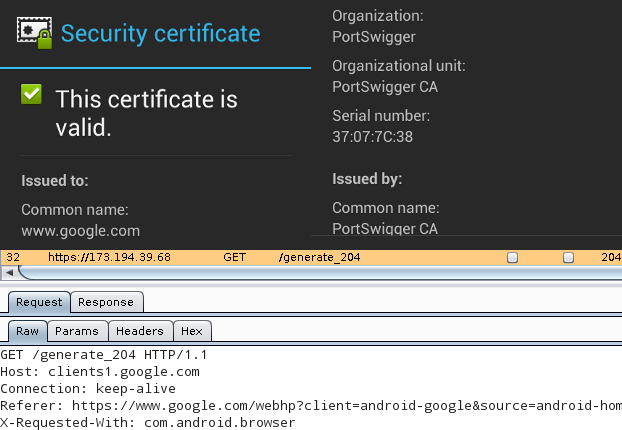
This being done, all applications using SSL/TLS connections (except for those
that do certificate pinning) will accept the MITM of Burp, as it can
be seen below with Google as an example. The top half is the certificate
viewer of the Android web browser, stating that Portswigger issuing a
certificate for www.google.com
is perfectly valid, while the bottom half
is the Burp Proxy window, showing the contents of the HTTPS request.
As of this writing, the CAcert site contains another method that also requires
root access, but as Jethro Carr wrote in his blog, since at least ICS,
it's possible to install certificates without any witchcraft, using not only
PKCS12 but also PEM files. Since Debian ships the CAcert bundle, I used
that file, but it's also possible to download the files from
the official CAcert root certificate download page. Since I have Android
SDK installed, I used adb
(Android Debug Bridge) to copy the certificate to
the SD card, but any other method (browser, FTP, e-mail, etc.) works too.
$ adb push /usr/share/ca-certificates/cacert.org/cacert.org.crt /sdcard/
2 KB/s (5179 bytes in 1.748s)
On the phone, I opened Settings > Security, scrolled to the bottom, and selected Install from storage. It prompted for a name of the certificate, and installed the certificate in a second without any further questions asked.
After this, the certificate can be viewed and by opening Trusted credentials and selecting the User tab, and browsing an HTTPS site with a CAcert-signed certificate becomes just as painless and secure as with any other built-in CA.
]]>I tried an alternative mail client called K-9 mail, which had more options available, as it allowed the user to examine the certificate, and accept it to be used in future communications. I configured the mailbox, and got a nice dialog box asking me to confirm the details of the certificate.
Unfortunately, the only problem with this dialog box was making the whole feature useless: it didn't contain the checksum (also known as fingerprint) of the certificate, which is the only value not spoofable by a man in the middle (MITM) attacker. There are point-and-click tools available on the web that can create a rogue certificate matching the original one in every detail, and the only difference is the public key, which affects the checksum. I developed a patch to fix this problem, which was accepted after a short discussion, and later made its way into the Android Market.
First, I found, that the checksum algorithm is SHA-1 most of the time, since MD5 is considered broken for this purpose. To calculate the SHA-1 hashes of the certificates in the chain, I imported the necessary classes and instantiated the SHA-1 MessageDigest class.
import java.security.NoSuchAlgorithmException;
import java.security.MessageDigest;
...
MessageDigest sha1 = null;
try {
sha1 = MessageDigest.getInstance("SHA-1");
} catch (NoSuchAlgorithmException e) {
Log.e(K9.LOG_TAG, "Error while initializing MessageDigest", e);
}
I spent most of the time figuring out how to extract the content of the
certificate that needs to be hashed. As Roman D figured out in a
post on Stack Overflow, “the hash is calculated over the DER-encoded
(again, not the PEM string) TBS part only, including its ASN.1 header
(the ID 0x30 == ASN1_SEQUENCE | ASN1_CONSTRUCTED
and the length field)”.
Knowing this, I just needed to extract this information form the instances of the X509Certificate interface. I tried the getTBSCertificate method with no luck, but later found that there's a method inherited from Certificate called getEncoded, which does just what I needed. There was only one task to do: since the MessageDigest object returns the digest in raw bytes, I needed to convert them to hex digits in order to display it in the dialog box. It turned out, that the project already had a class for that, so I could avoid reinventing the wheel.
import com.fsck.k9.mail.filter.Hex;
import java.security.cert.CertificateEncodingException;
...
if (sha1 != null) {
sha1.reset();
try {
char[] sha1sum = Hex.encodeHex(sha1.digest(chain[i].getEncoded()));
chainInfo.append("Fingerprint (SHA-1): " + new String(sha1sum) + "\n");
} catch (CertificateEncodingException e) {
Log.e(K9.LOG_TAG, "Error while encoding certificate", e);
}
}
After development and building, there was only one task: testing. I installed the modified version into an emulator and tried to configure an account on my mail server. It worked, and as you can see on the screenshot below, the checksum matches the one you can CAcert fingerprint page.
]]>